How To - Survox LIST Utility
Overview
LIST is a built-in Survox utility used to view and extract data directly from the command line via PuTTY. It allows staff to inspect data files, fone files, subset files, and coded files at any point during a project -- without needing to generate a formal report or run a full data dump.
LIST can be run from any directory that contains data in a record-based format -- meaning CaseIDs in a data file, or sample records in a fone file. While LIST can technically be run against other file types, common practice limits its use to data files (.tr) and fone files (.fon).
LIST produces output in one of two formats:
- By Variable -- Groups all records together and displays them one variable at a time. Think of it like a normal column in a spreadsheet -- all respondents' answers to Q1 together, then all answers to Q2, etc.
- By Record -- Displays one record at a time, showing all selected variables for that case before moving to the next. This is the most common format. Think of it like transposing a spreadsheet so each case is its own column. Useful for drilling into a single respondent's full record.
To launch LIST, open a PuTTY session, navigate to the appropriate directory, and type:
list <enter>The utility will walk you through a series of screens to configure your output. It works like a survey, so how you answer each screen, dictates what screen shows up next.
Step-by-Step Process
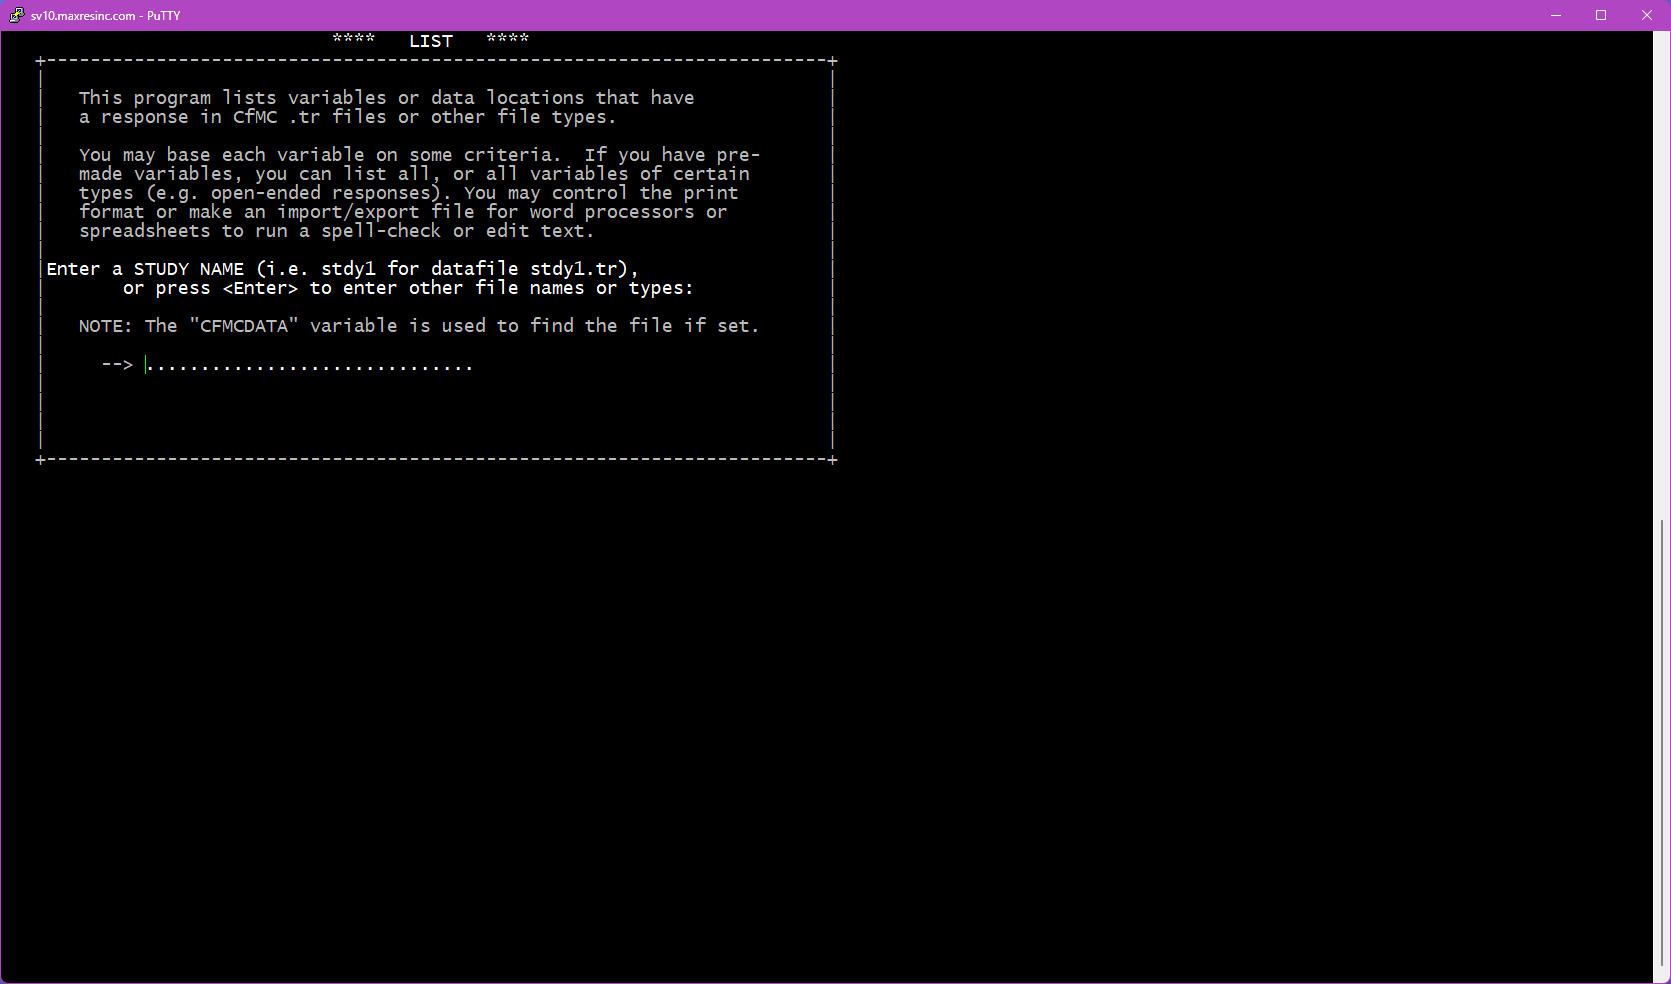
Step 1 -- Specify the Data File
The first screen asks for a datafile name. By default, LIST looks in the $CFMC/data folder for whatever filename you enter here.
- If you want the main data file for the project (located in
$CFMC/data), type the jobname/datafile name and press <Enter>. - If you want any other file (a subset file, coded file, fone file, etc.) -- or if you are already in a different directory -- leave this screen blank and press <Enter>. This will take you to Steps 1B and 1C.
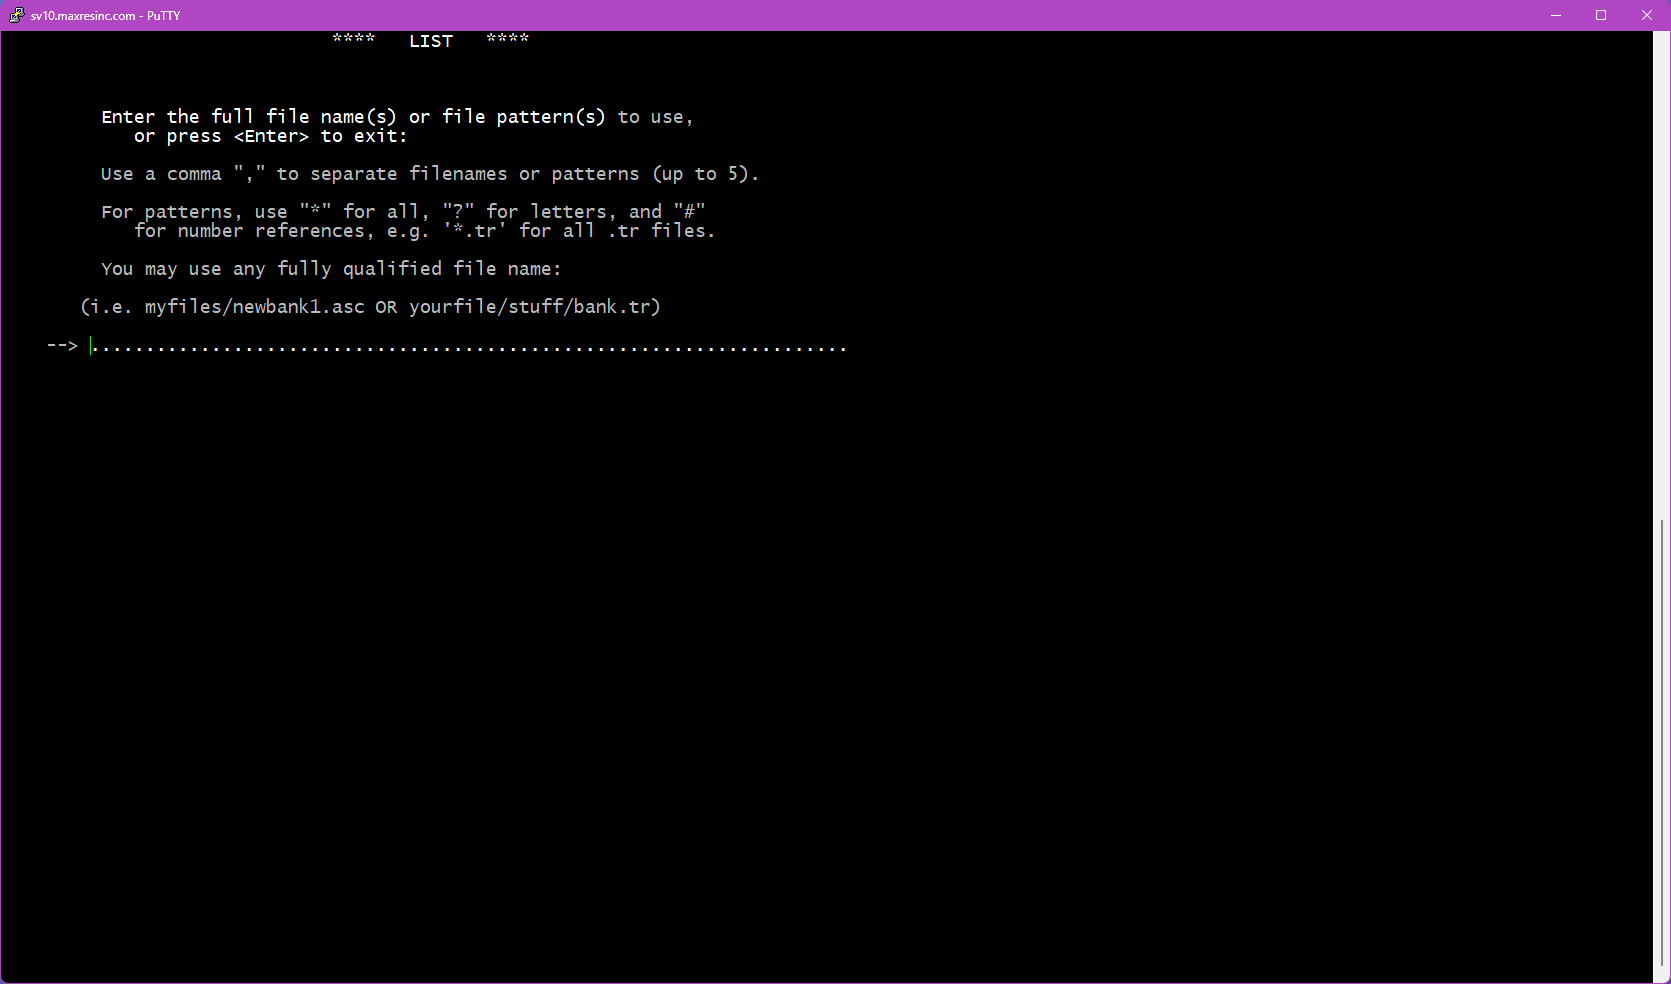
Step 1B -- Specify an Alternate File (if Step 1 was left blank)
If you left Step 1 blank, this screen asks you to provide the full filename of the file you want to list. Unlike Step 1, you must include the file extension here.
Examples:
jobname1.tr
jobname1.fon
jobname1_subset.tr
Important: If the file is not located in the directory you are currently in, you must either provide the full path to the file, or abort (Ctrl+C), navigate to the correct directory, and relaunch LIST.
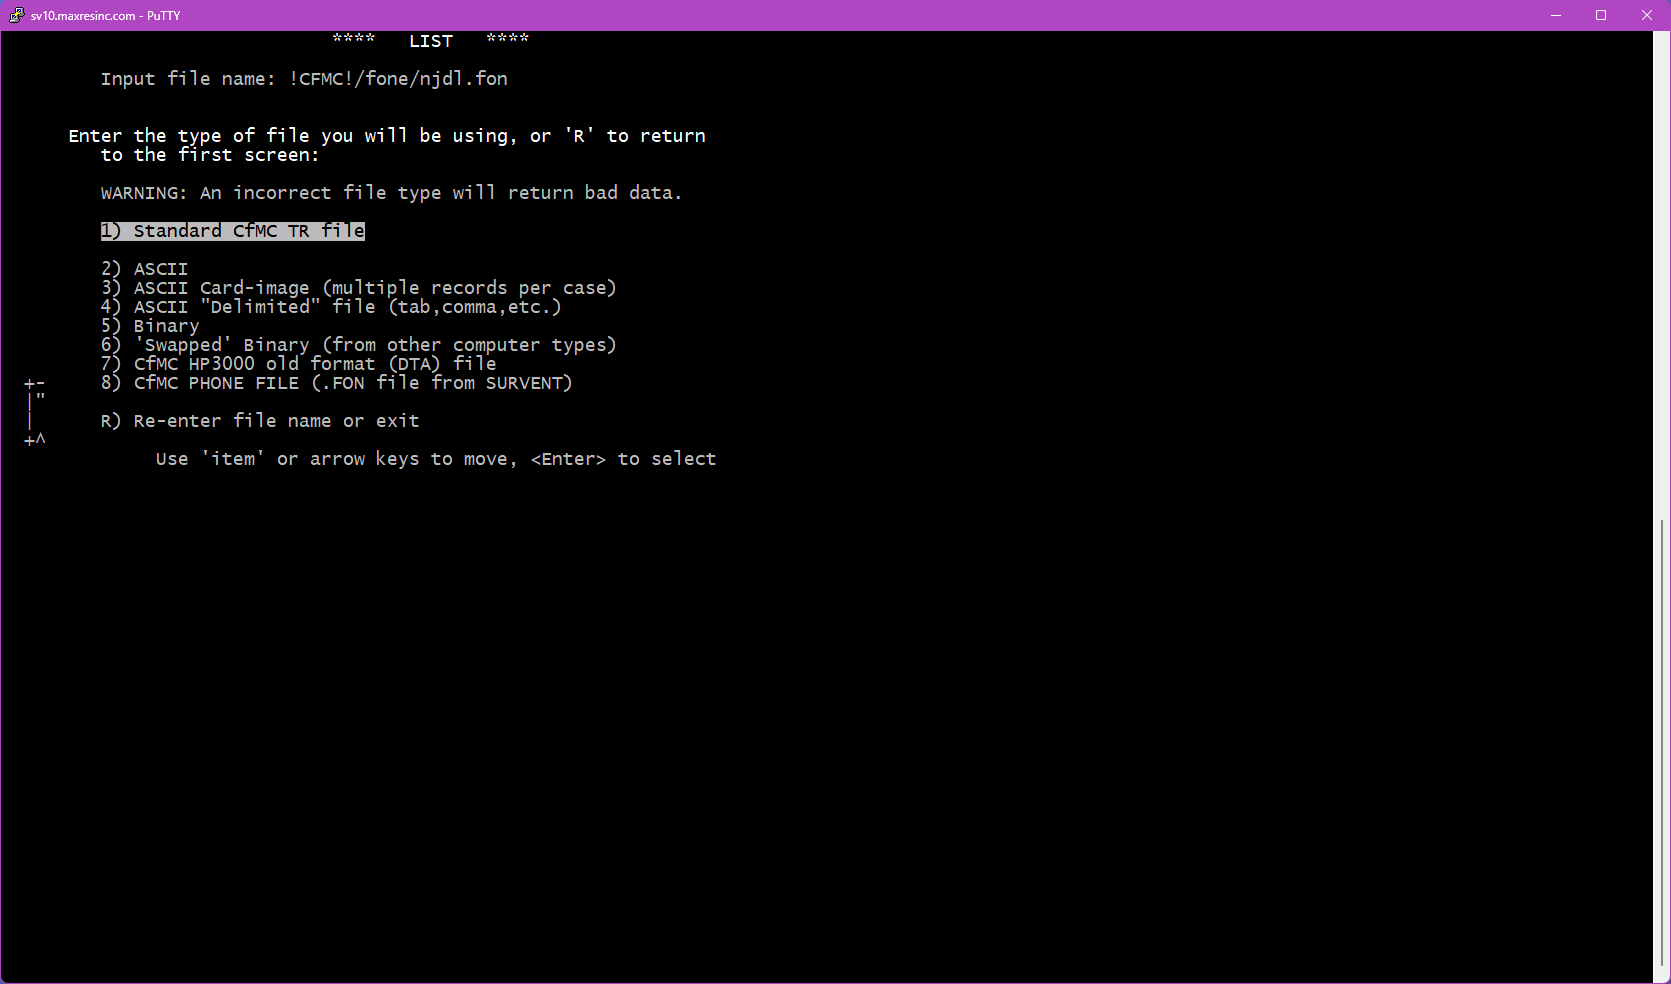
Step 1C -- Specify the File Type (if Step 1 was left blank)
If the file you specified in Step 1B is not a .tr datafile, this screen will appear and ask you to identify the file type so the software knows how to load it.
The two most commonly used options are:
- Option 2 -- ASCII file (use for subset files, coded files, etc.)
- Option 8 -- Fone file (use for
.fonsample files)
Note: This screen does not appear if the file you entered in Step 1B is a .tr file.
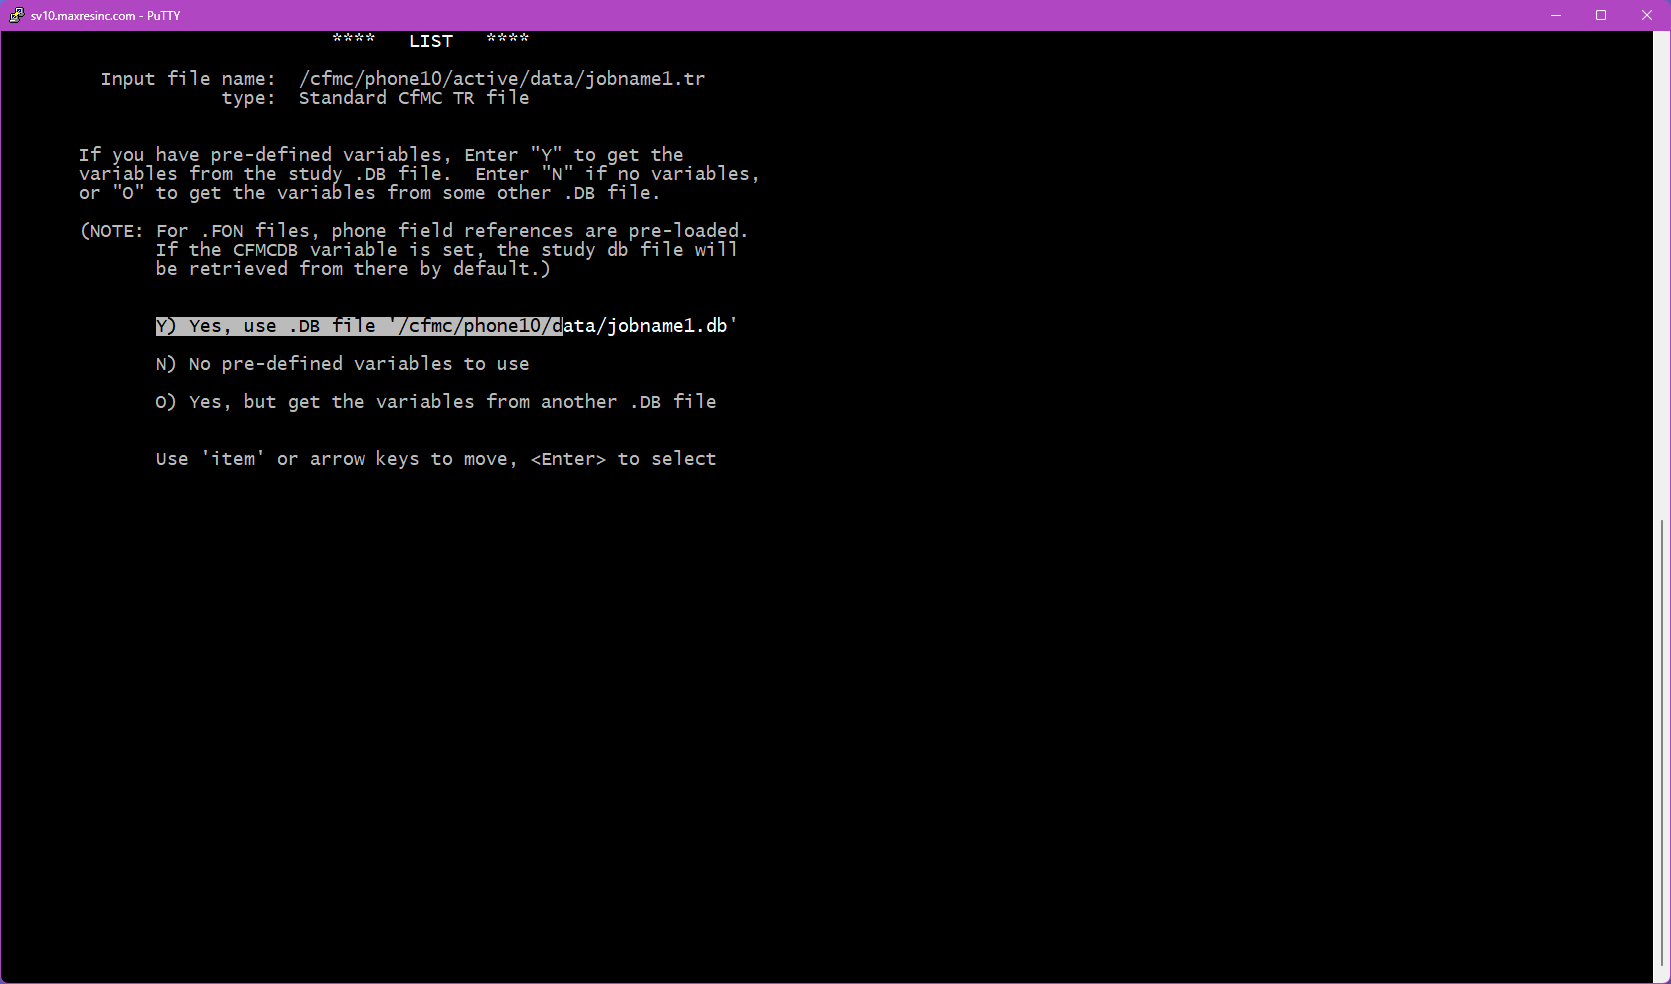
Step 2 -- Use a DB File?
This screen asks whether you want to use a .db file. A .db file contains the variable definitions for the study -- without it, you cannot reference variables by name (like statcode, date, intv, q1, etc.) and would need to know the exact data locations instead.
Important: If you are listing an ASCII or fone file, answer N and press <Enter>. These file types cannot easily use a .db file.
If you specified a study name at Step 1, you will see three options:
- Y) Yes, use the .db file found at the default location for this study
- N) No -- do not use a .db file (variable names will not be available)
- O) Yes, but load the .db file from a different location
If you loaded a file from Step 1B instead, the Y) option will not appear -- only N) and O) will be shown.
To use a .db file from a non-default location, select O and press <Enter>. This will take you to Step 2B.
Step 2B -- Specify the DB File Location (if O was selected)
Enter the full path to the .db file you want to use. Do not include the .db extension -- the utility appends it automatically.
Example:
/cfmc/studies/phone/jobname1/jobname1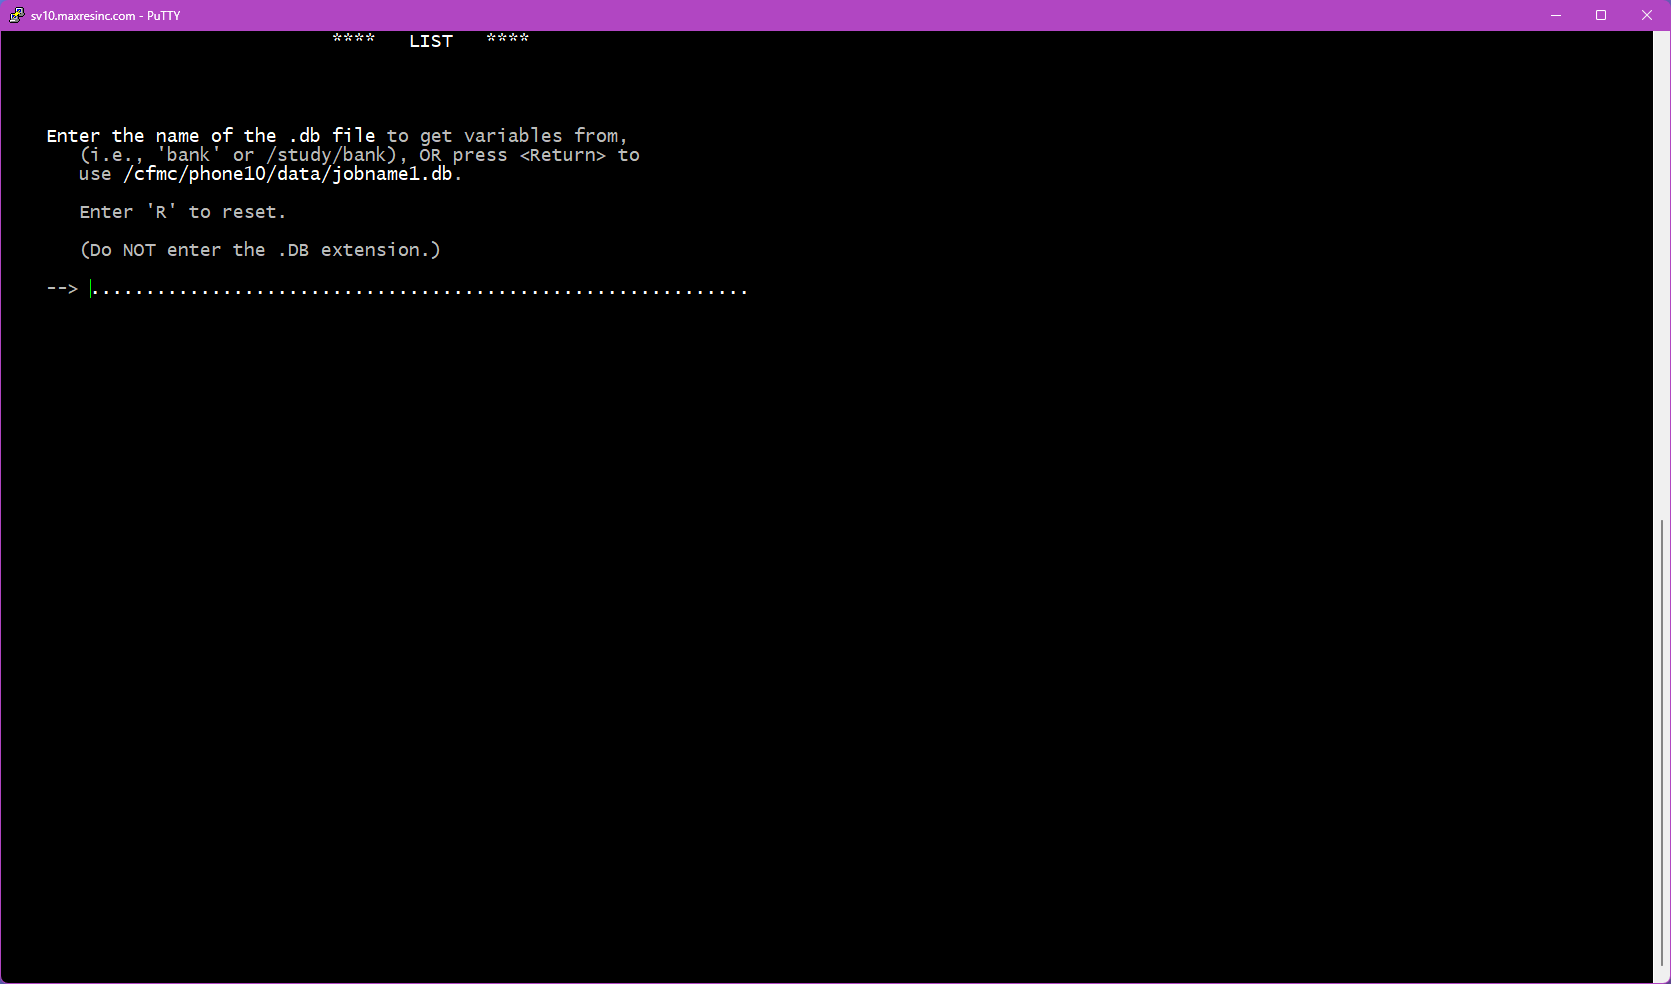
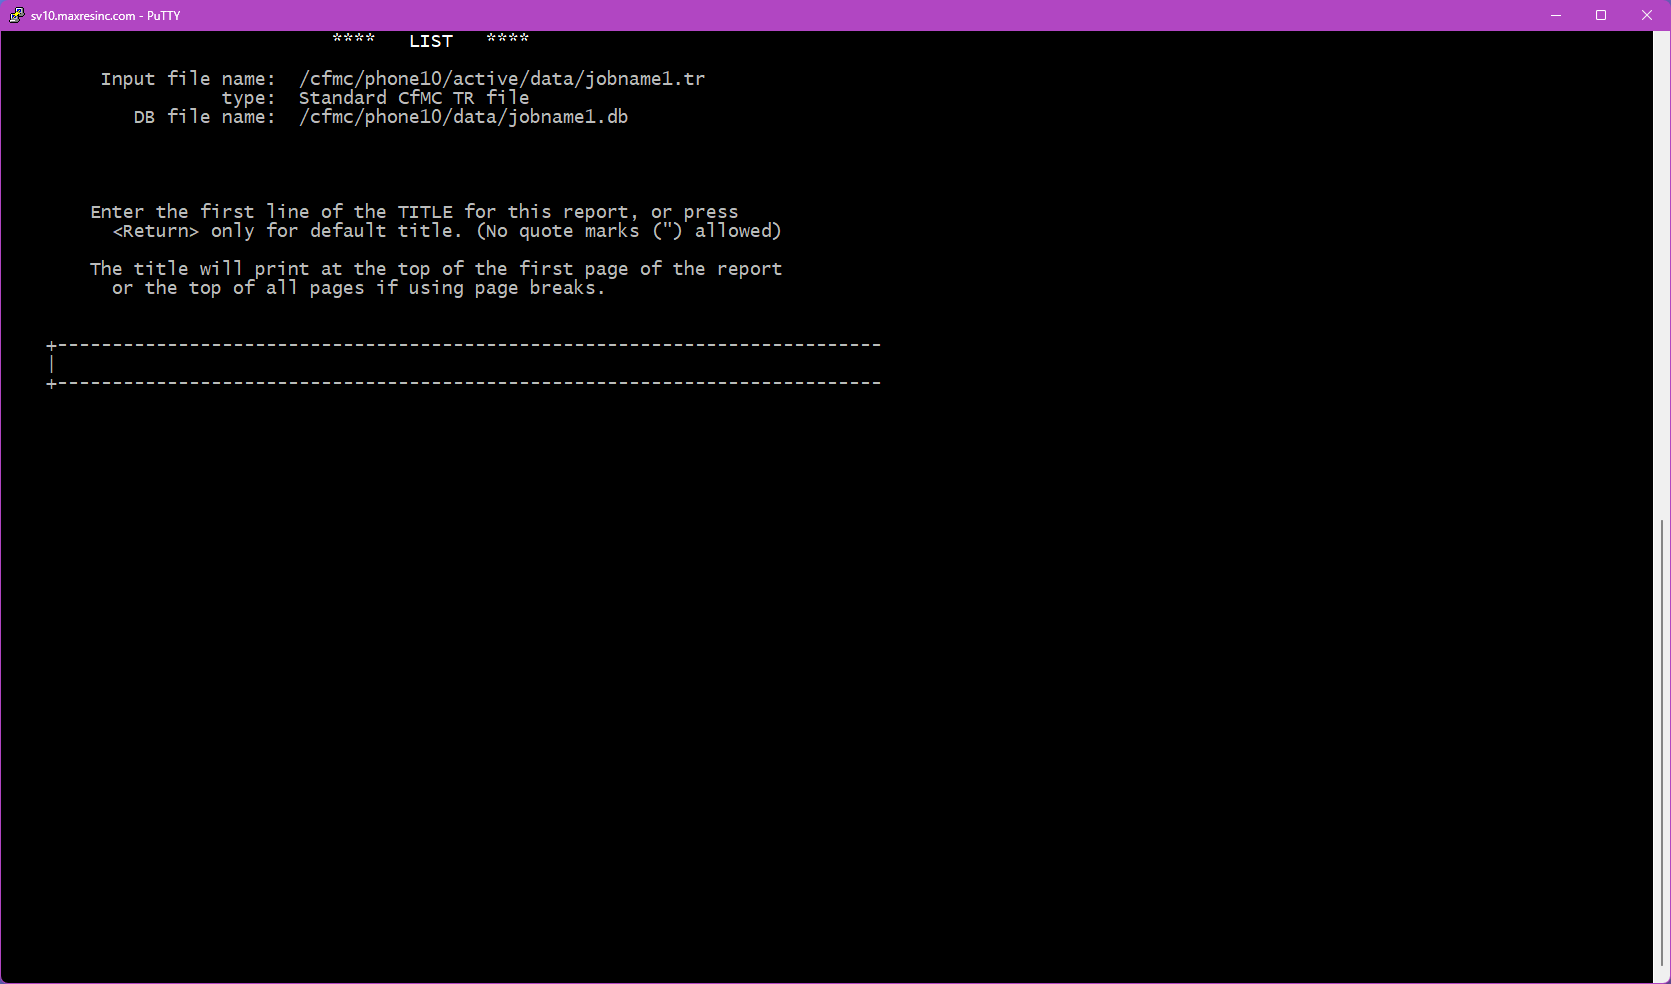
Step 3 -- Title
This screen allows you to enter a title that will appear at the top of each page of output. In most cases, leave this blank and press <Enter>.
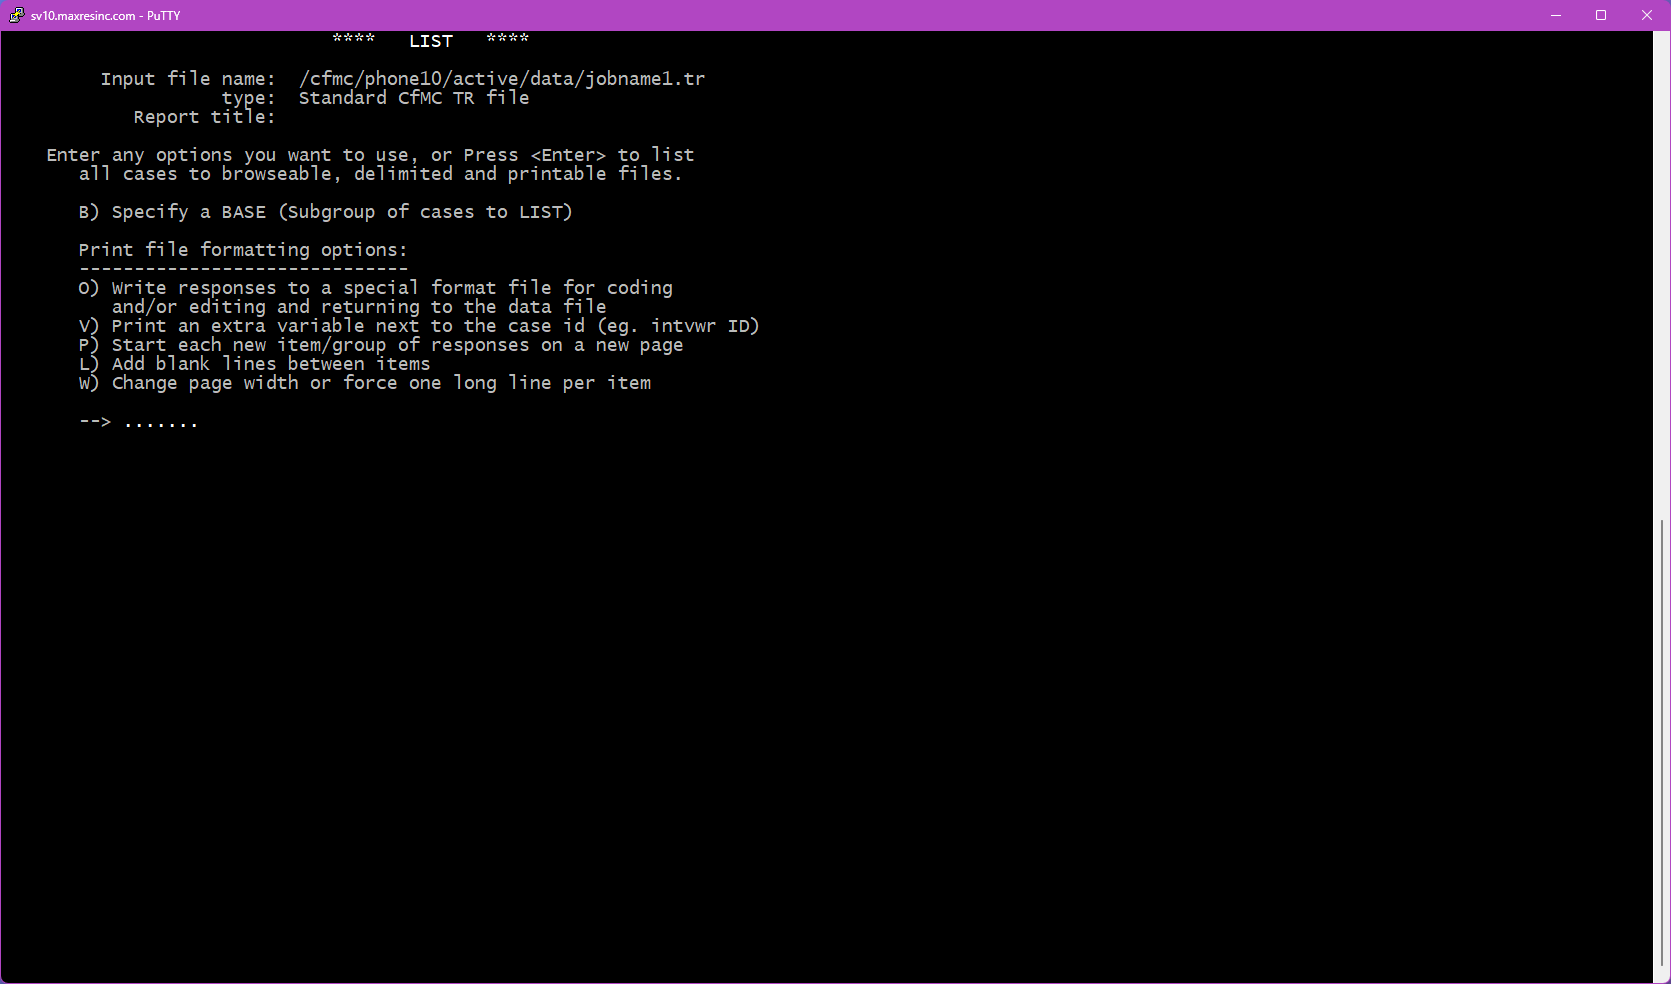
Step 4 -- List Options
This screen presents up to 6 optional settings you can apply to your list. You can select none, one, or several. The four most commonly used are:
- B -- Base: Subsets the list to only include records matching a condition you specify. For example, only completed interviews, or only records from a specific region.
- V -- Extra Variable: Adds a single additional data label to every record in the output. Useful when listing open ends and you also want to see the interviewer ID or phone number alongside each response.
- P -- New Page: Starts a new page for each variable in the output. No additional screens are required for this option. This is a useful option if the lists will be printed, as it creates a natural page break after either each case/record or variable listed.
- L -- Blank Lines: This will prompt you near the end of the run for how many blank lines to add between variables, 0, 1 or 2.
Step 4B -- Base Entry (if B was selected)
Enter the base (select condition) you want to apply. Only records matching this condition will appear in your list output. For guidance on building base conditions, refer to:
- LINK: Data Variable Bases article (coming soon)
- LINK: Sample Variable Bases / Select Statements article (coming soon)

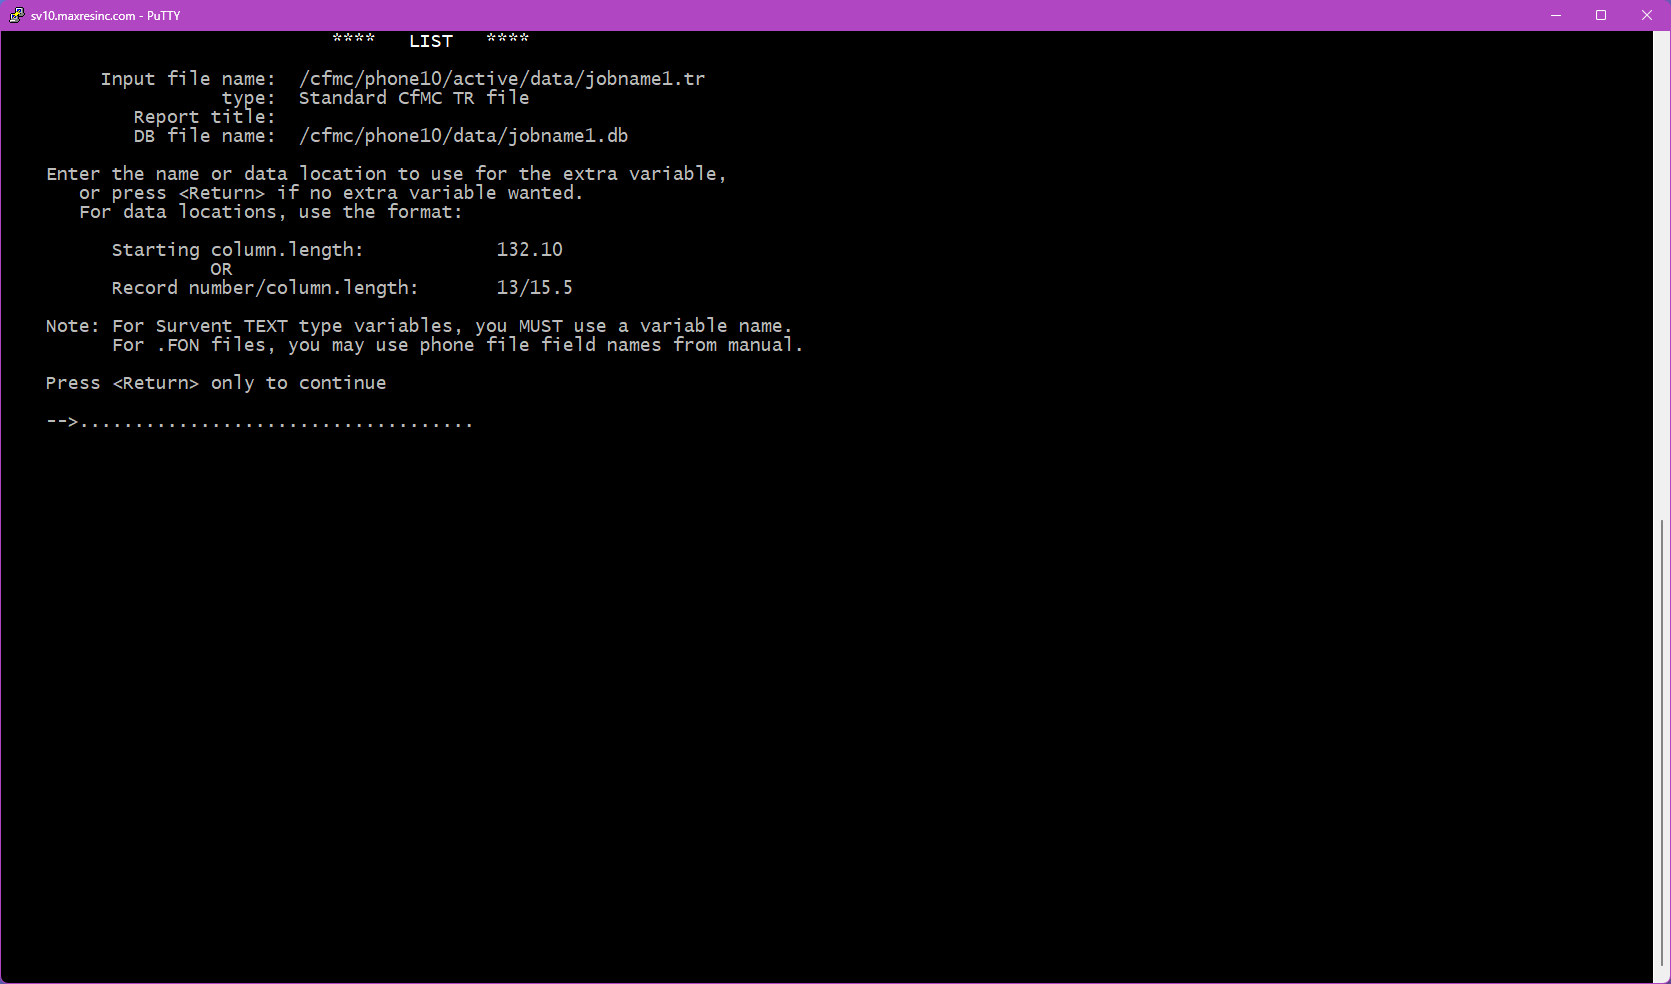
Step 4C -- Extra Variable Entry (if V was selected)
Enter a single variable label or data location to include as an extra column alongside your list output. Only one extra variable can be specified.
Example use case: You are listing all open end responses, but you also want to see the interviewer ID (intv) attached to each response for QC purposes.
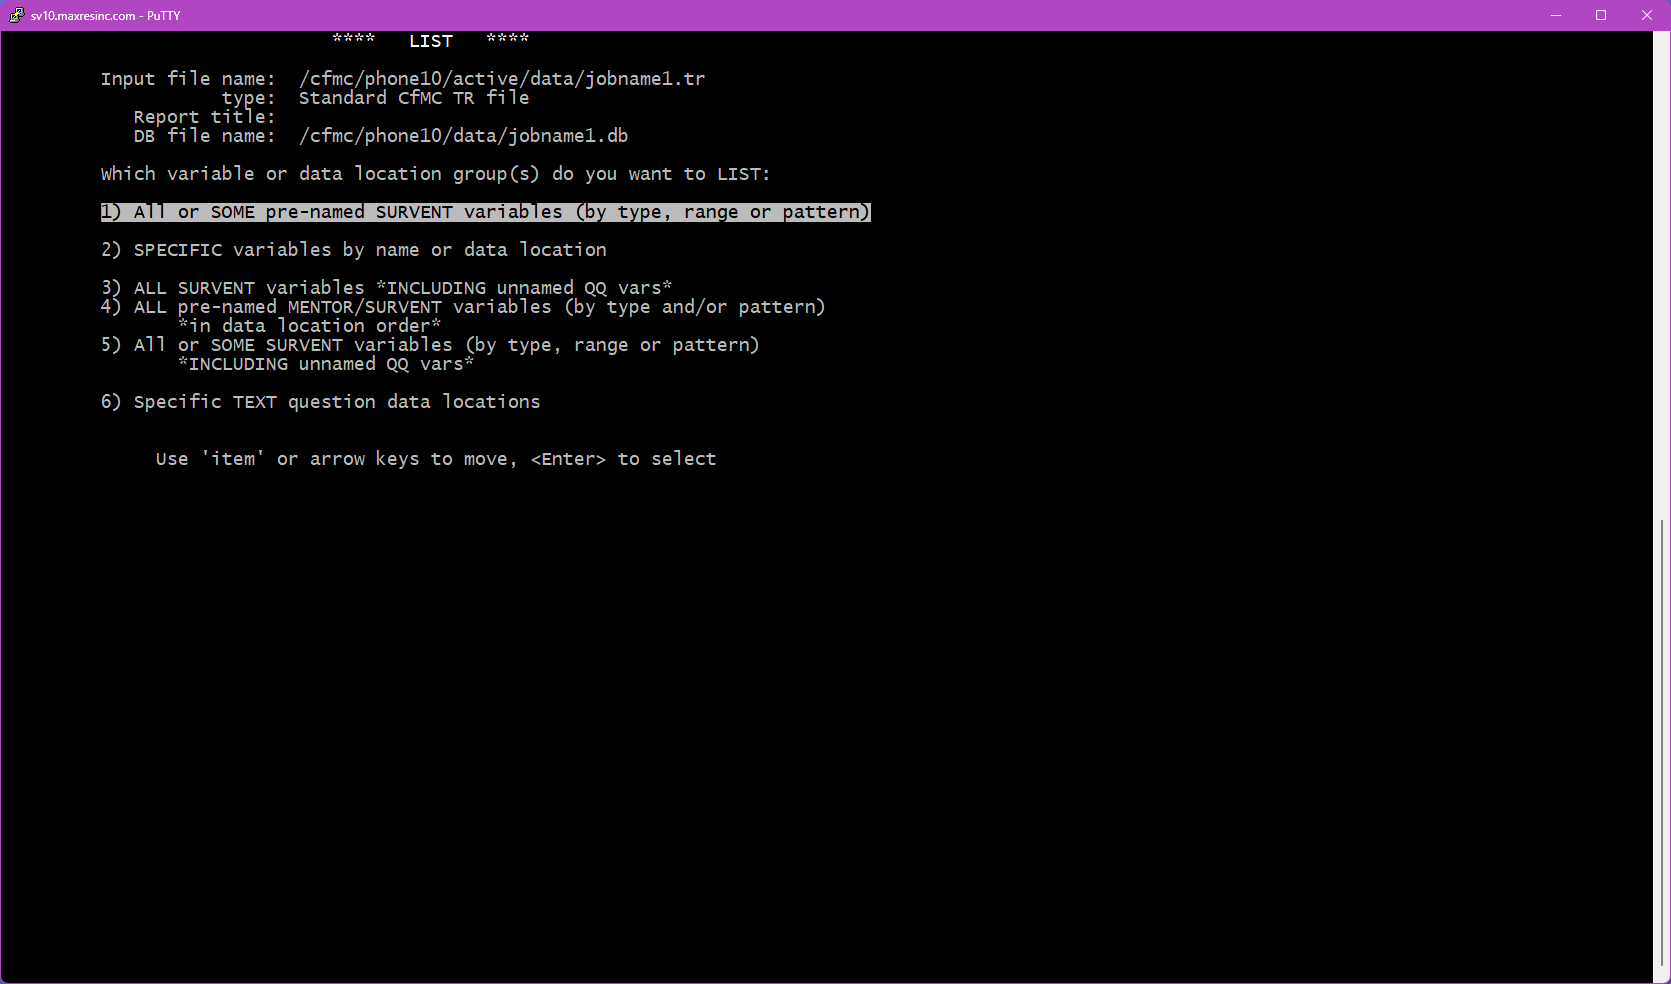
Step 5 -- What to List
This screen asks what variables you want included in your list. This screen only appears if you are using a .db file. If no .db file is in use, you will only be able to specify raw data locations.
The two options used in practice are:
- Option 1 -- All or Some Pre-Named Variables: Lists all variables, or a filtered subset by type (open ends only, closed ends only, etc.). Takes you to Steps 5B and 5D.
- Option 2 -- Specific Variables: Allows you to manually specify up to 10 individual variable labels or data locations. Takes you to Step 5C.
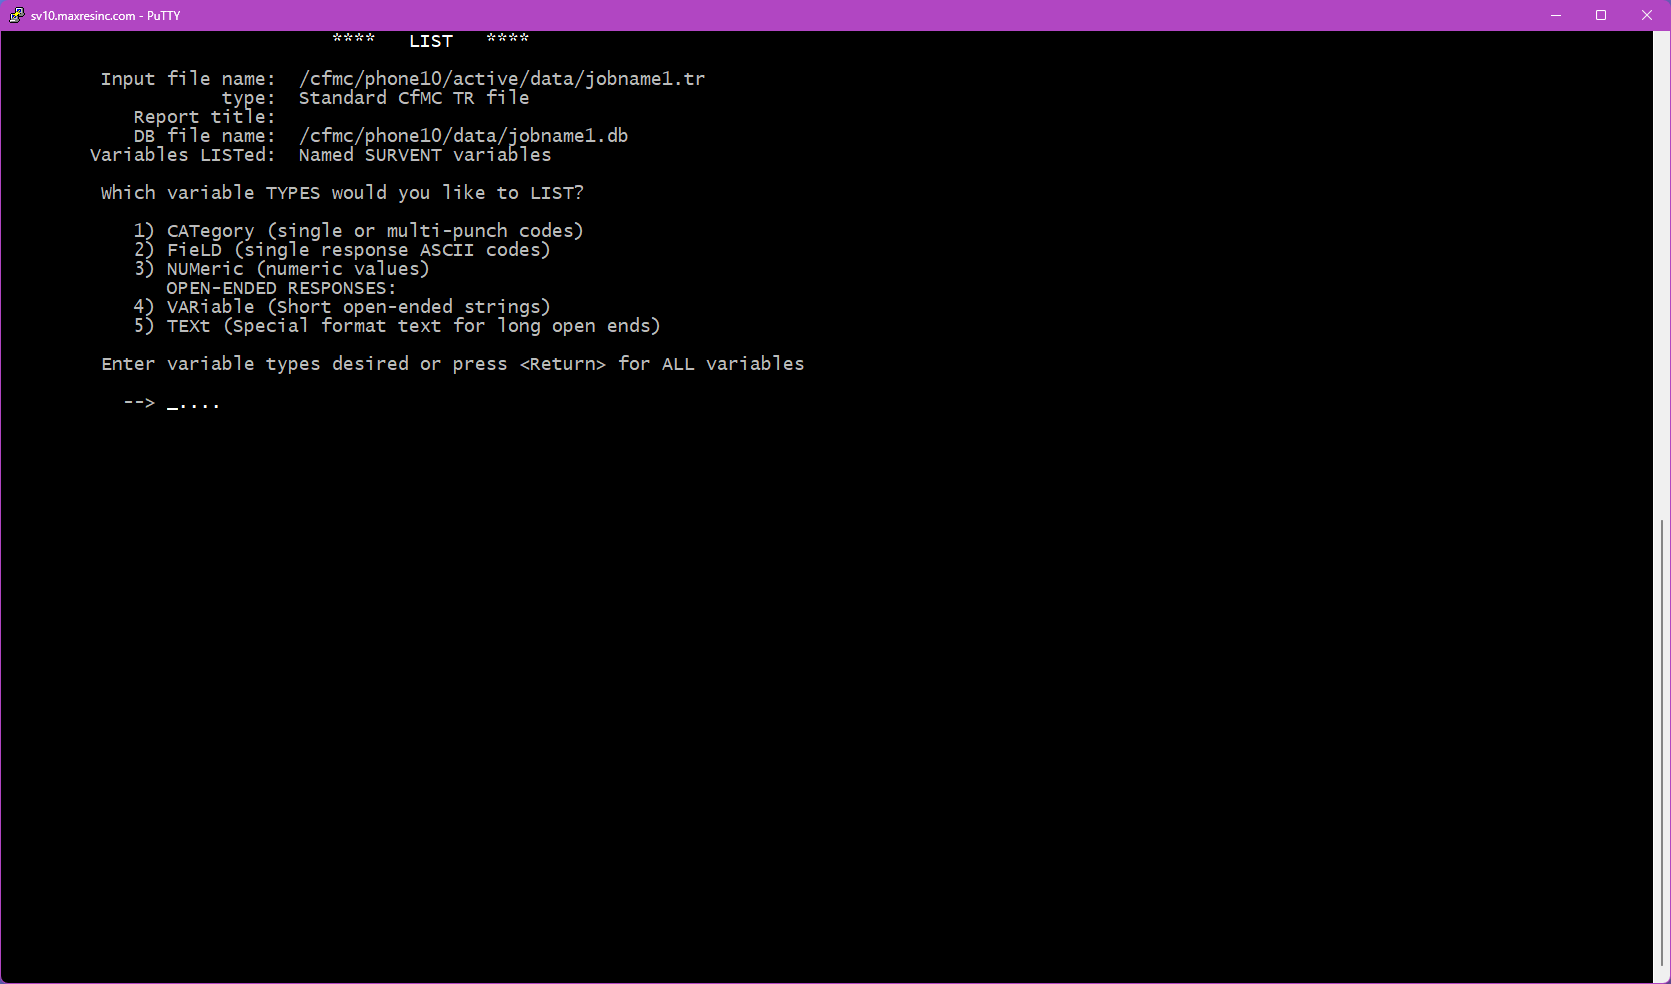
Step 5B -- Select Variable Types (if Option 1 was selected)
Press <Enter> without entering a code to return all available variables. Or enter one or more codes to filter by type:
- 1 -- CAT: No longer used in Survox 10. Selecting this will return no data.
- 2 -- List/Closed End: Single-response questions -- gender, yes/no, rating scales, hospital lists, etc.
- 3 -- Numeric: Numeric answer fields -- age, date of birth, percentage scales, etc.
- 4 -- Short Text / Variables: Short text fields -- name, address, sample data, and system variables like
date,intv,ipaddress. - 5 -- Open End: Long-form verbatim responses.
Step 5C -- Specific Variable Entry (if Option 2 was selected)
You will be prompted to enter variables one at a time, up to 10. After entering the second variable, an additional prompt will appear asking if you want to apply a secondary base specifically for that variable. Press <Enter> to skip and use the main base from Step 4. Each variable can have its own independent base, though this is rarely needed for list output.

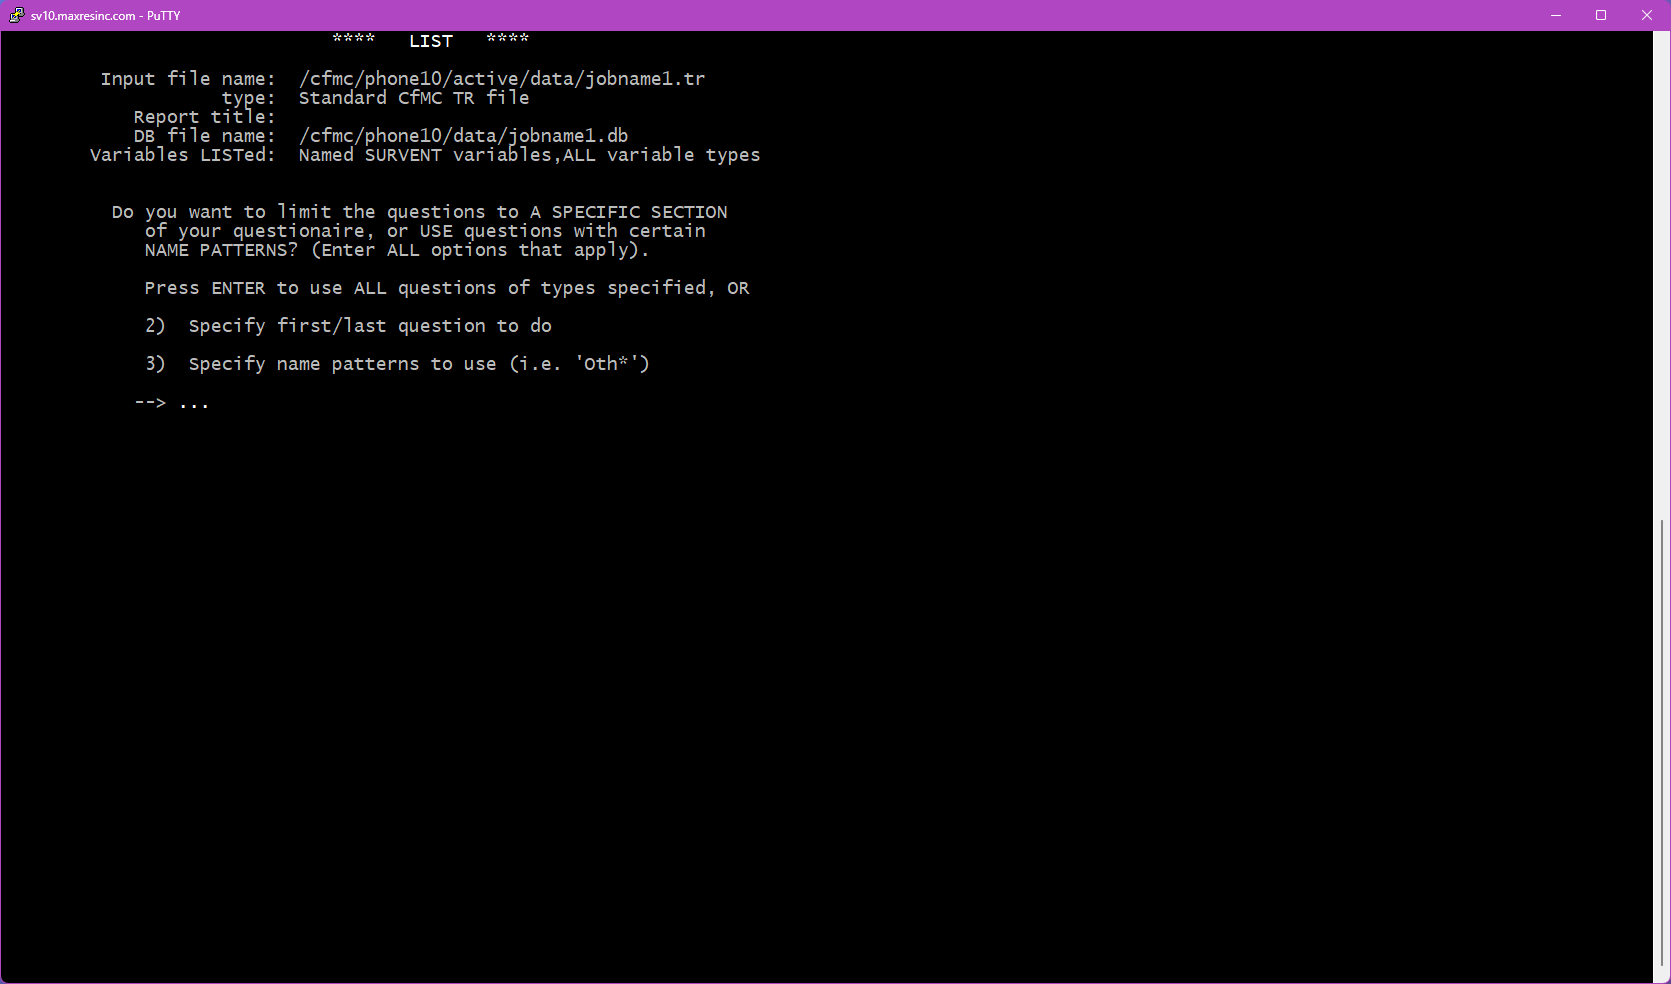
Step 5D -- Subset the Variable List (if Option 1 was selected)
This screen asks if you want to narrow down which variables are included in the output. Three options are available:
- <Enter> -- All: Returns all variables of the selected type(s). No further filtering.
- Option 2 -- Range: Specify a starting and stopping variable. You can use the built-in markers
FirstQandLastQto limit output to actual survey questions only, omitting sample and system variables. - Option 3 -- Pattern Match: Filter by a naming pattern using the
*wildcard. Examples:*_os-- returns only Other Specify fieldss_*-- returns only sample variables
*wildcard is required when using this option.
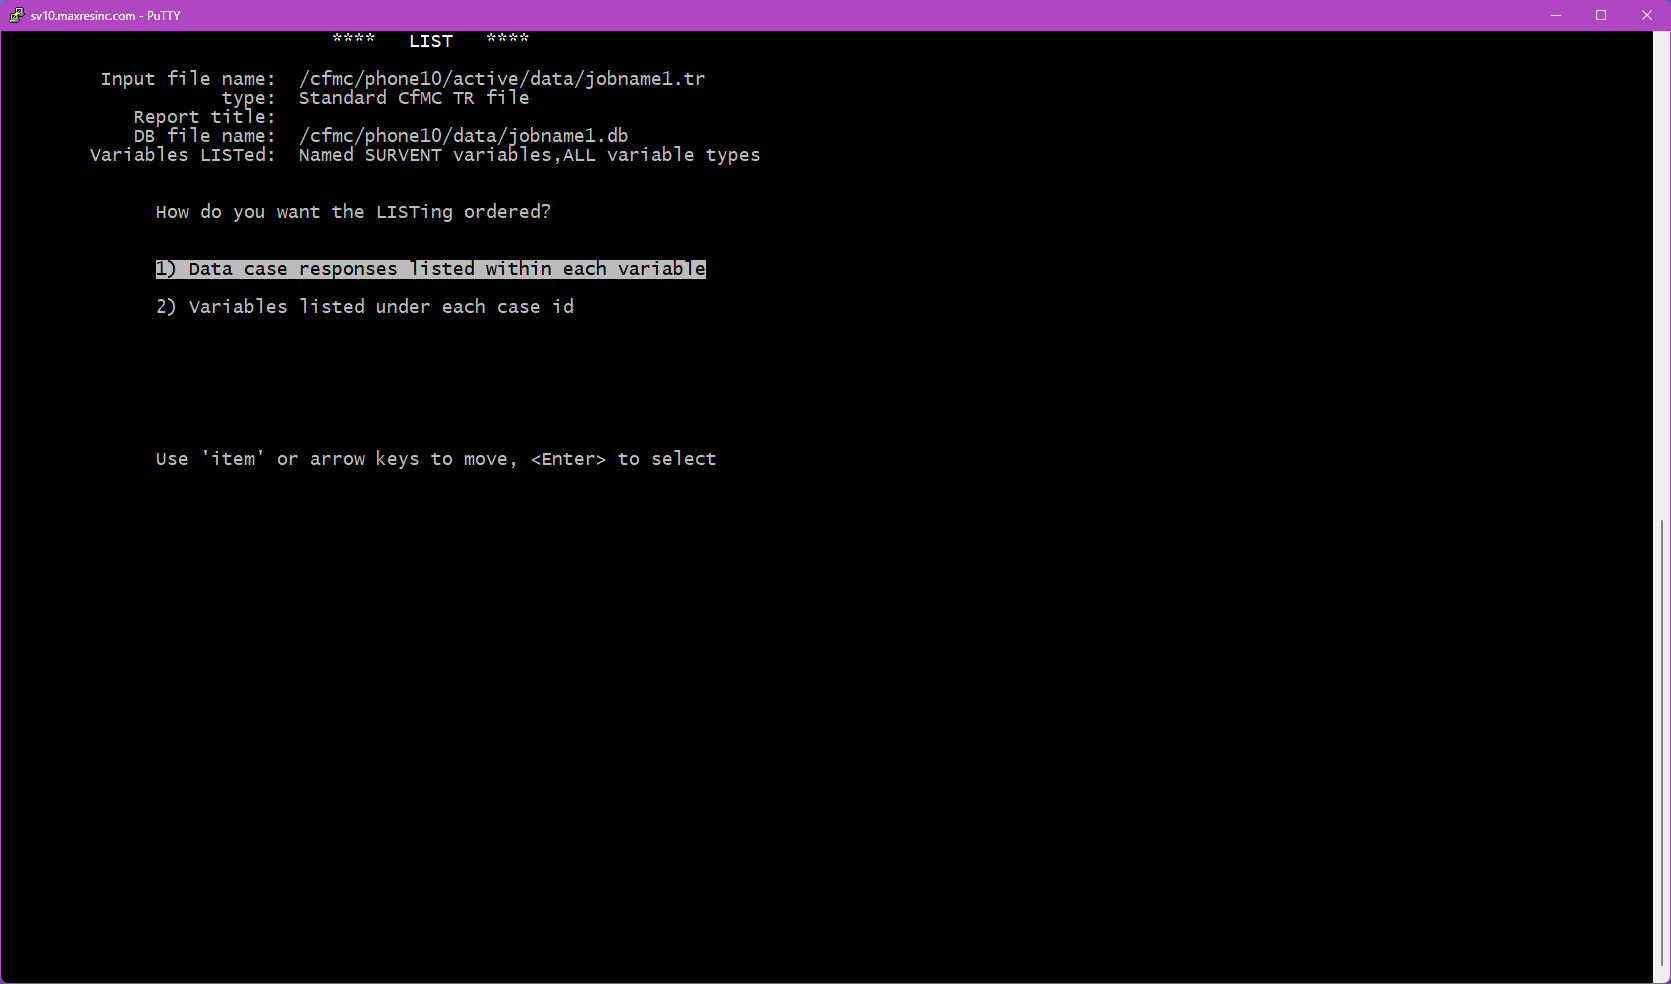
Step 6 -- By Variable or By Record?
This screen asks how you want the output organized:
- Option 1 -- By Variable: All records grouped together under each variable, one variable at a time. Best used when reviewing open end responses, or stepping through a set of questions one at a time for QC or coding work.
- Option 2 -- By Record: All selected variables shown for one case at a time before moving to the next. Best used when you need to view a full survey record question by question -- for example, reviewing a specific respondent's complete interview. Note that if you need this data in spreadsheet form, pulling it from rundata or a reformatting tool is generally more efficient.
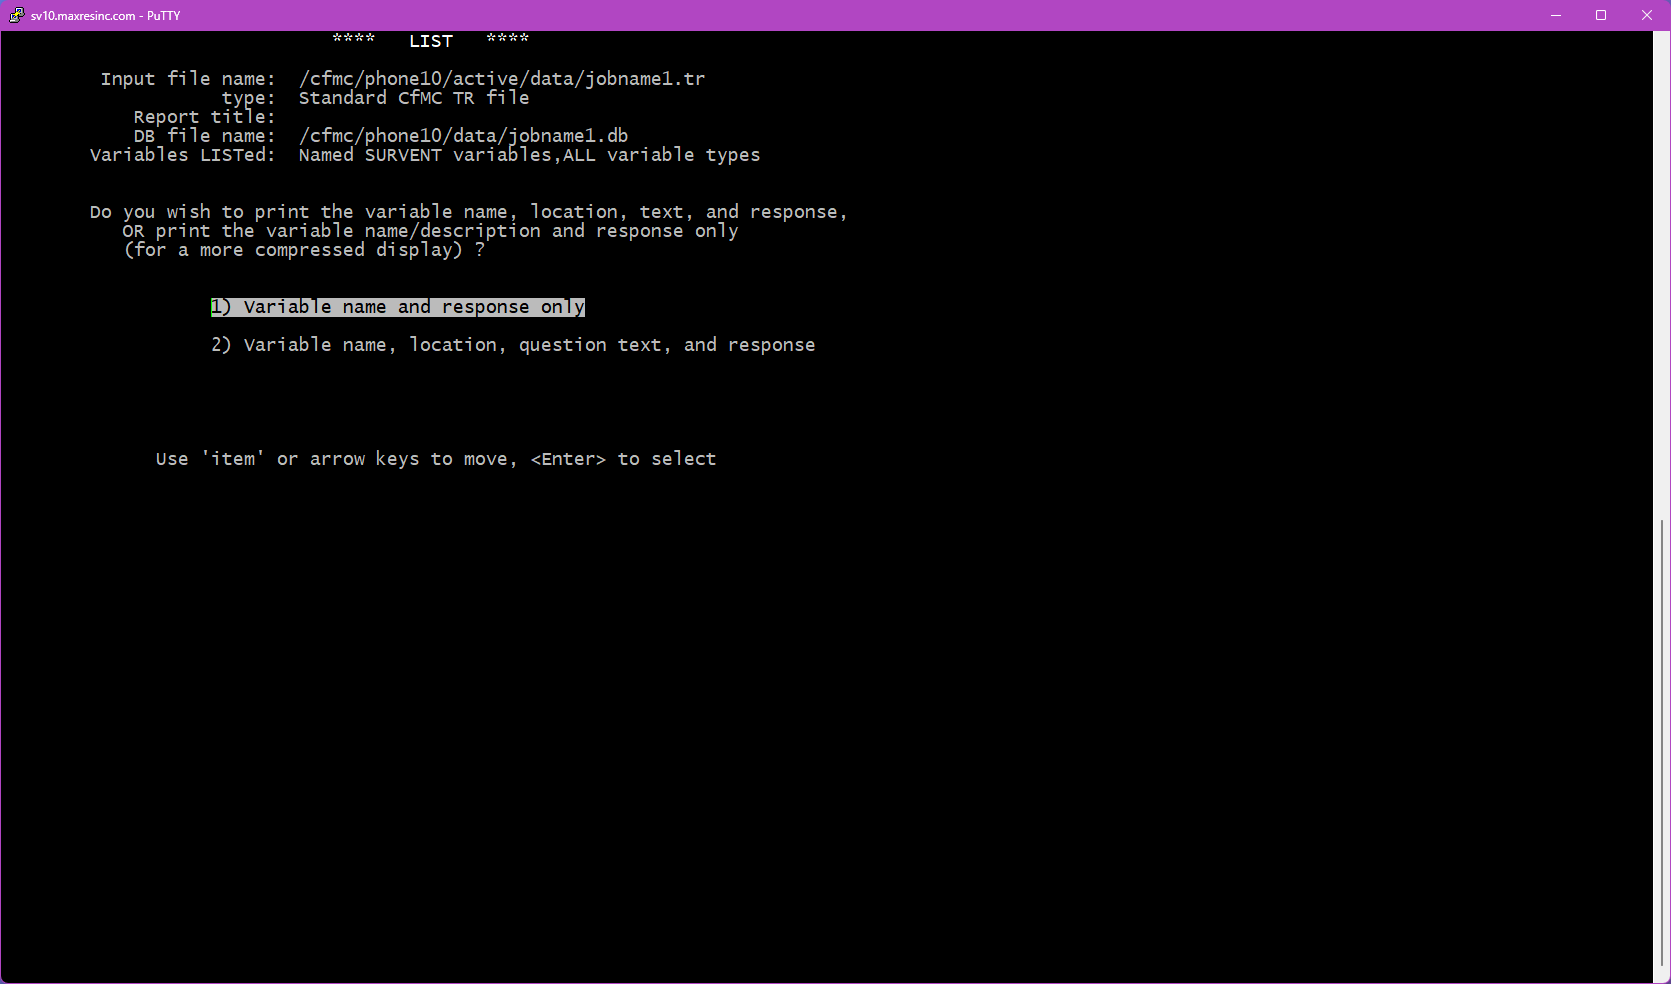
Step 7 -- Output Format
This screen controls how much detail is shown for each item in the output:
- Option 1 -- Label and Response Only: The standard format. Shows the variable name and the recorded response. Use this in most situations.
- Option 2 -- Question Text, Label, and Response: Also includes the full question text above each variable. Most useful when listing open ends by variable (Option 1 from Step 6), as it provides visual context for QC and coding review.
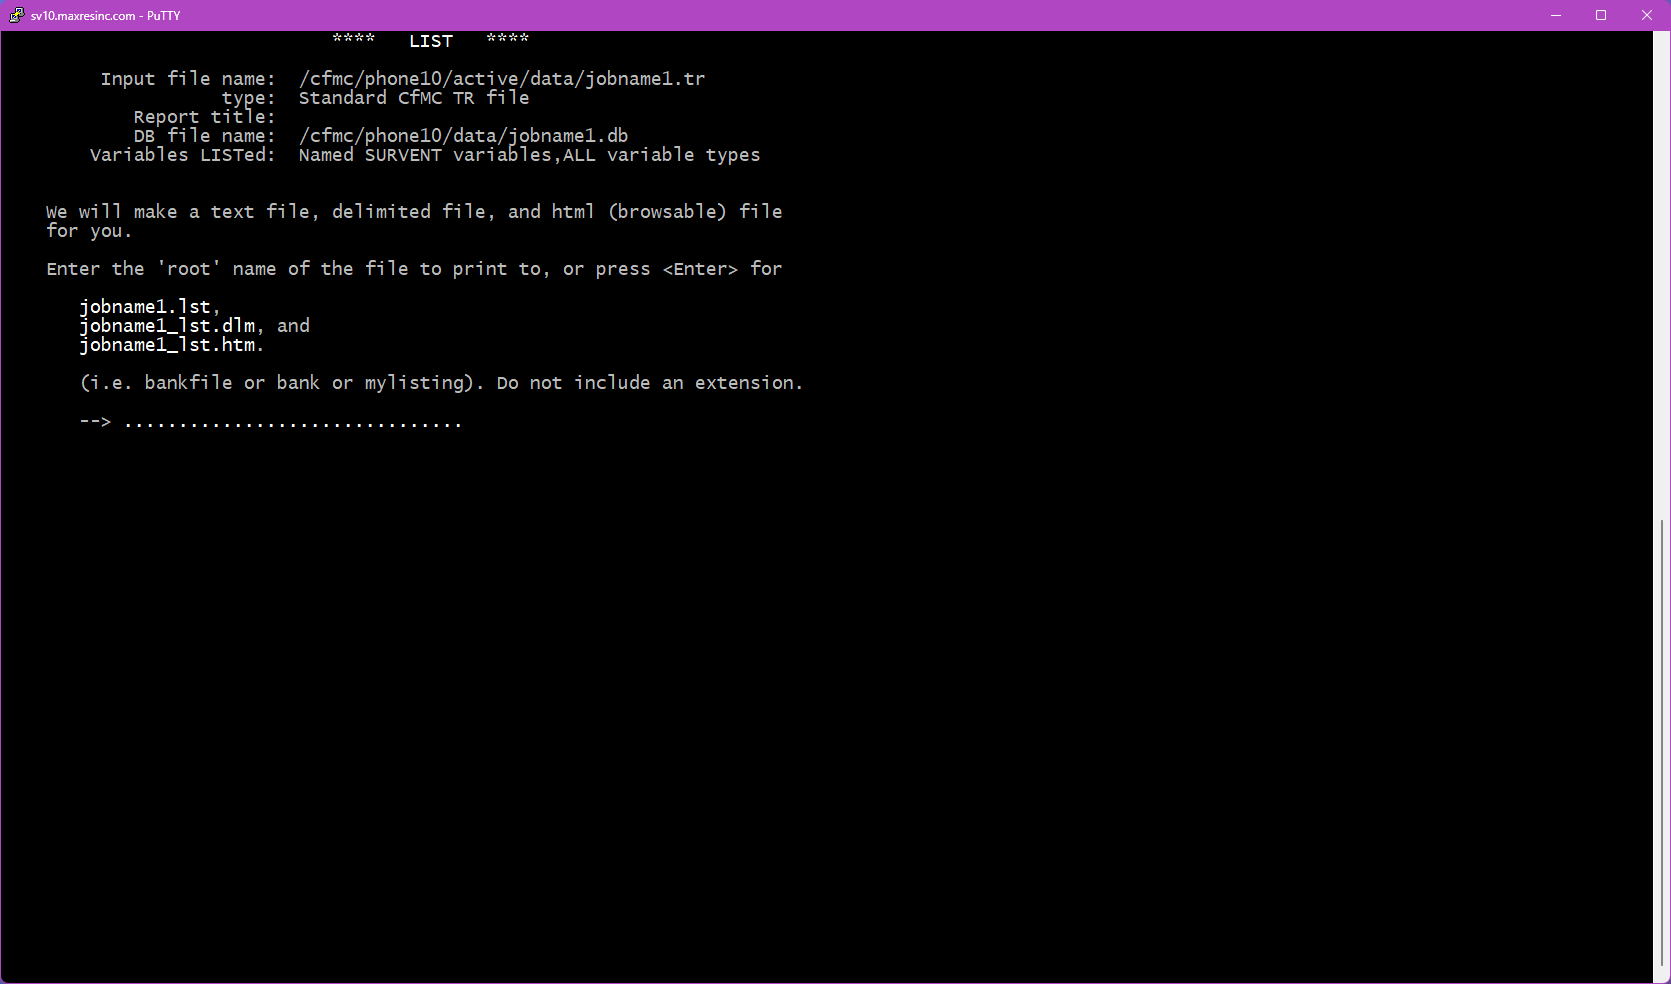
Step 8 -- Output File Name
Enter a name for the output file, or press <Enter> to accept the default (jobname1.lst). The output file will be saved in the directory you are currently in.
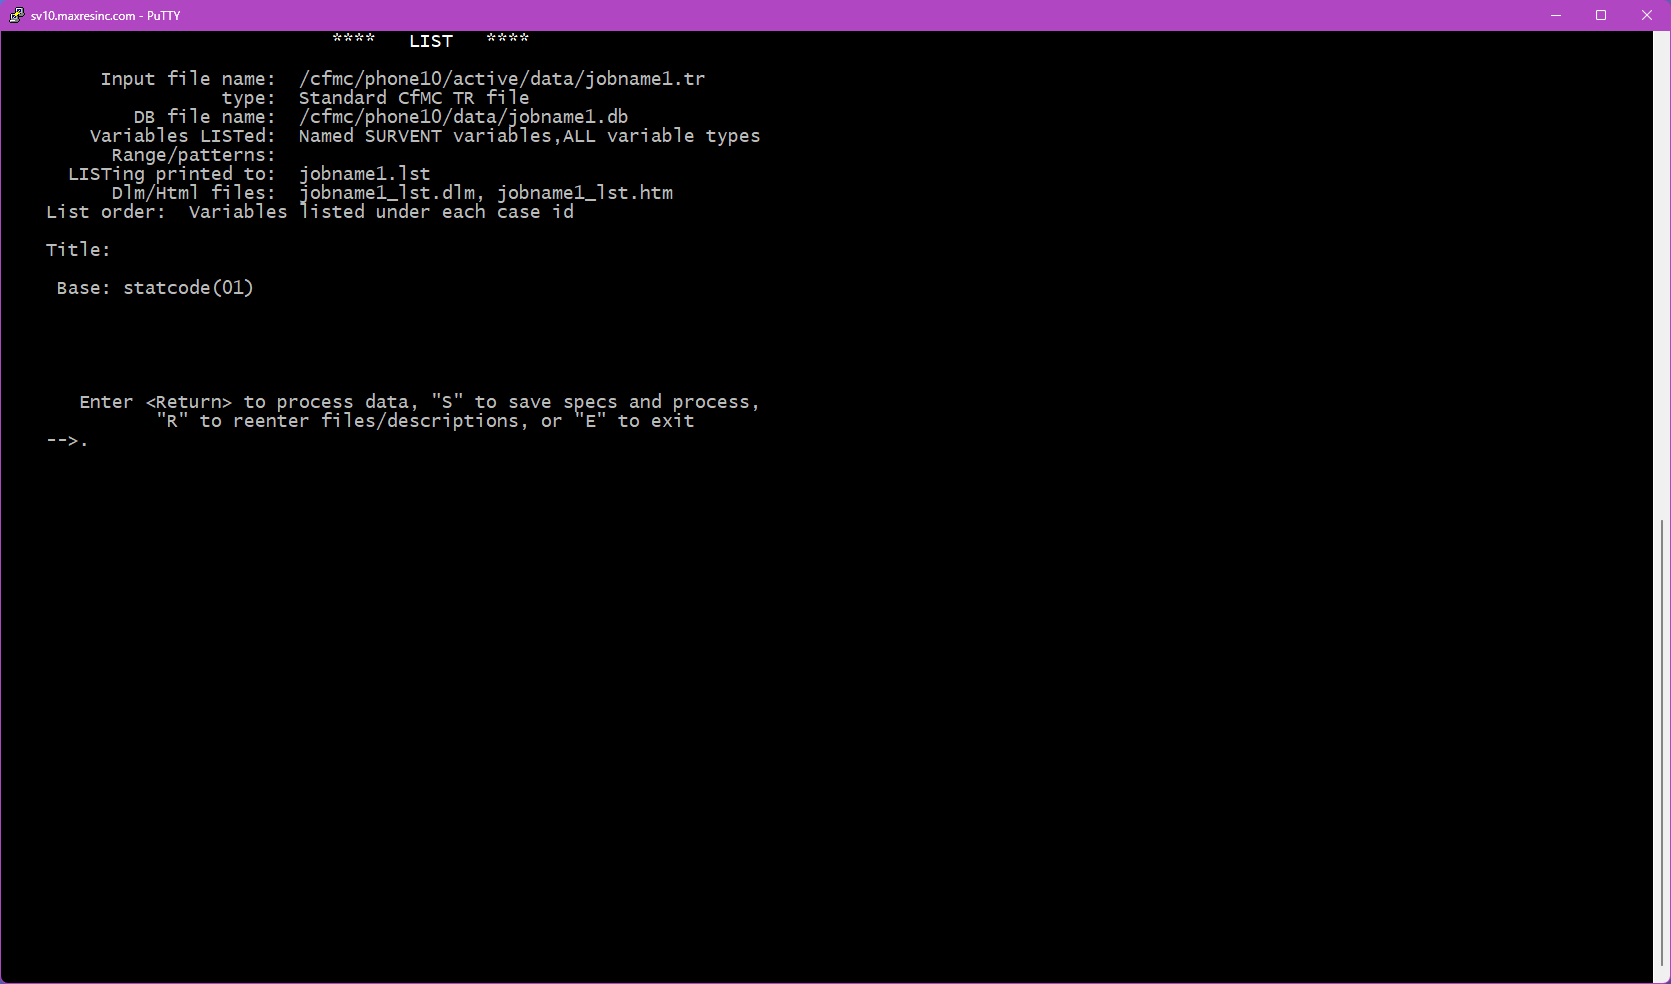
Step 9 -- Final Confirmation and Run
This screen displays a summary of everything you have configured -- the file being read, whether a .db file is in use, the base (if any), the variables or types selected, and the output format. Review the summary, then press <Enter> to run the list.
Saving Your Settings for Later (SPX File)
Before pressing <Enter> to run, you have the option to save all of your current settings as a reusable file. Instead of just pressing Enter, type a filename with an .spx extension -- for example:
jobname1_openends.spxThis saves all your LIST configuration options to that file. To rerun the exact same list in the future, navigate to the same directory and run:
m2 jobname1_openends.spxThis is especially useful for lists that are complex to configure, or that will be run repeatedly throughout the life of a project.
Video Demonstrations
The following short demos walk through two common LIST use cases from start to finish.
Demo 1 -- All Completes, By Case ID, Survey Data Only
This demo shows how to run a list of all completed interviews, outputting only the actual survey questions (using FirstQ / LastQ to exclude sample and system variables), organized by record (By Case ID).
Demo 2 -- All Sample Variables, By Variable, No Base
This demo shows how to run a list of all sample variables across all records, with no base applied, organized by variable.
Demo 3 -- Open Ends Grouped by Question, with INTV shown
This demo shows how to run a list of all open ends, by caseID, with an Extra Variable of the INTV. It will show two methods, one is raw and the other is a cleaned up version.
Troubleshooting / Common Issues
Output file is empty or contains no records
The most common cause is a base (Step 4B) that returned zero matching records. Double-check your select condition for typos or logic errors. Also verify that the data file you specified actually contains records -- running LIST against an empty or partially built file will produce no output.
Confirm that you are using the * wildcard in your pattern. Without it, the system looks for an exact match rather than a pattern. For example, use *_os not _os.
Variable names are not recognized
This means LIST is running without a .db file, or the wrong .db file was specified. Return to Step 2 and confirm the correct .db file path. Remember -- do not include the .db extension when entering the path in Step 2B.
File not found error at Step 1B
The file path or filename entered is incorrect, or the file does not exist in the current directory. Verify the exact filename and extension, and confirm your current working directory with pwd. If the file is in a different location, provide the full path or navigate there first.
No data returned when selecting CAT (Option 1) in Step 5B
CAT-type questions no longer exist in Survox 10. Selecting this option will always return no data. Use the appropriate question type instead (closed end, open end, etc.).
Data values look incorrect or misaligned
If the data in your list output does not appear to match what you expect -- wrong values, shifted responses, or variables that don't line up -- the most likely cause is an outdated .db file. If the study's questionnaire has been modified since the .db file was last generated, the variable definitions will be out of sync with the actual data. Regenerate the .db file for the study and rerun the list.