
How To: Caller ID/LCP Settings & Call Interceptor Program
CallerIDs/LCP & Call Interceptor System:
A How To Guide for PDs
The Realtime CallerID Management Portal is a self-service tool for managing the outbound CallerID numbers used on your studies -- no more dropping or relaunching a job just to update the number list.
When active on a study, this system intercepts the dialer's standard CallerID and replaces it with one pulled from a real-time, PD-adjustable source. Changes made here take effect on the very next call -- instantly, with no reload required.
Three modes are available per study, switchable any time:
- Use List -- Enter your own list of numbers; the system rotates through them evenly, call after call.
- Use LCP (Local Calling Presence) -- Automatically match the CallerID to the area code of the number being dialed, so respondents see a more local-looking number, with no list to maintain.
- Use Survox (Disabled) -- Turn rotation off for a study; the dialer's normal CallerID behavior takes over, exactly as it always has.
Switching between modes preserves your existing list in the background, so you can flip back and forth without losing your work.
There are 3 steps to follow, for ALL projects, to make sure the systems all communicate properly with one another. These steps include, in order:
- Making a Survox list
- Making the MAXWell Reporting List
- Making the Realtime list, which is the authority on how a project behaves when dialing is active
Step 1: Making the Survox List
This process has not changed from before, overall. The only difference is that the Survox file you create should include ALL numbers you plan to use for the project, even if you are not going to actively use them at first.
By adding all numbers at once, you prevent having to go back and add numbers if you do not complete all the steps before dialing begins. Meaning, if you haven't made your Interceptor lists yet, Survox will use whatever is in here until you do -- or if you toggle the Interceptor back to "Disabled," you know you still have a full list of numbers for the project to use.
Create the File
Open the file:
t:\phone10\control\dialer\callerids\newjob_cid.txtPaste in your numbers, removing the example numbers already in the file.
Important: Make sure there are NO blank lines at the bottom after you paste in your numbers. Blank lines at the bottom can cause the job to not load properly.
Once your numbers are in the file, use Save As to save it as projectname_cid.txt in that same t:\phone10\control\dialer\callerids\ folder -- just in case Windows tries to redirect the save to Documents, Desktop, or somewhere else.
Note: If your project is using LCP Mode, you do not need to make a specific list file for the project. However, you still must follow the rest of these instructions.
Set the File in Survox
After the file is created and saved, navigate to the Survox console:
Manage > Study Control > Dialer Config
Select your project. Several fields will appear on this screen -- for these instructions, you only need to focus on the dropdown showing lcp_list.txt. Change that dropdown to your file name.
Note: If using LCP Mode, leave this setting as is.
Click Save Changes. This completes the Survox step.
[PLACEHOLDER: Screenshot of Survox Dialer Config screen]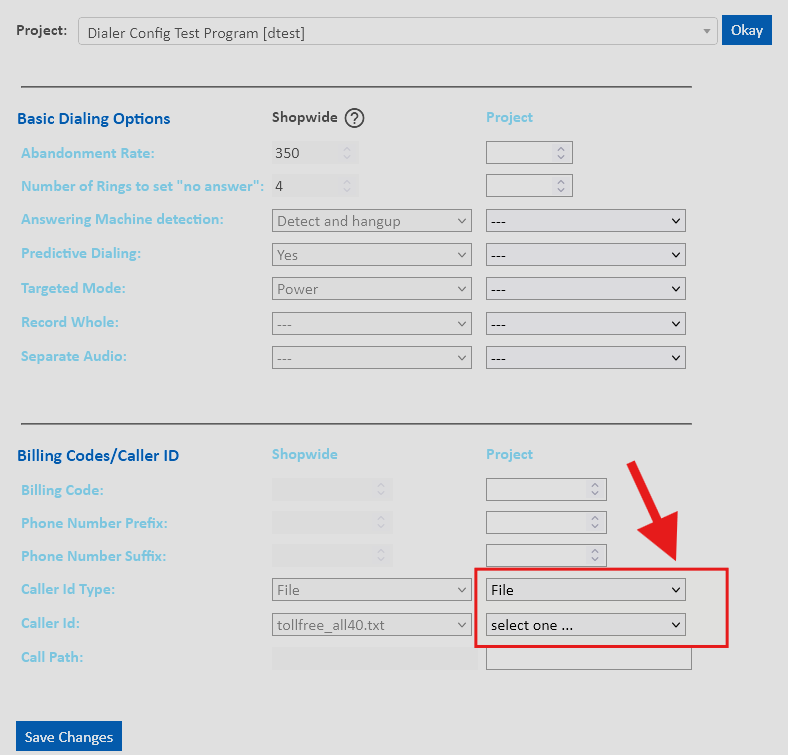
Step 2: MAXWell Setup
This process is nearly identical to the Survox step. You are taking the same all-inclusive list and adding it into MAXWell as well, for report tracking.
Accessing the Tool
Access the MAXWell site and click on the "Number Management Portal" link. Scroll down to the bottom and click the blue "Manage Lists" button.
[PLACEHOLDER: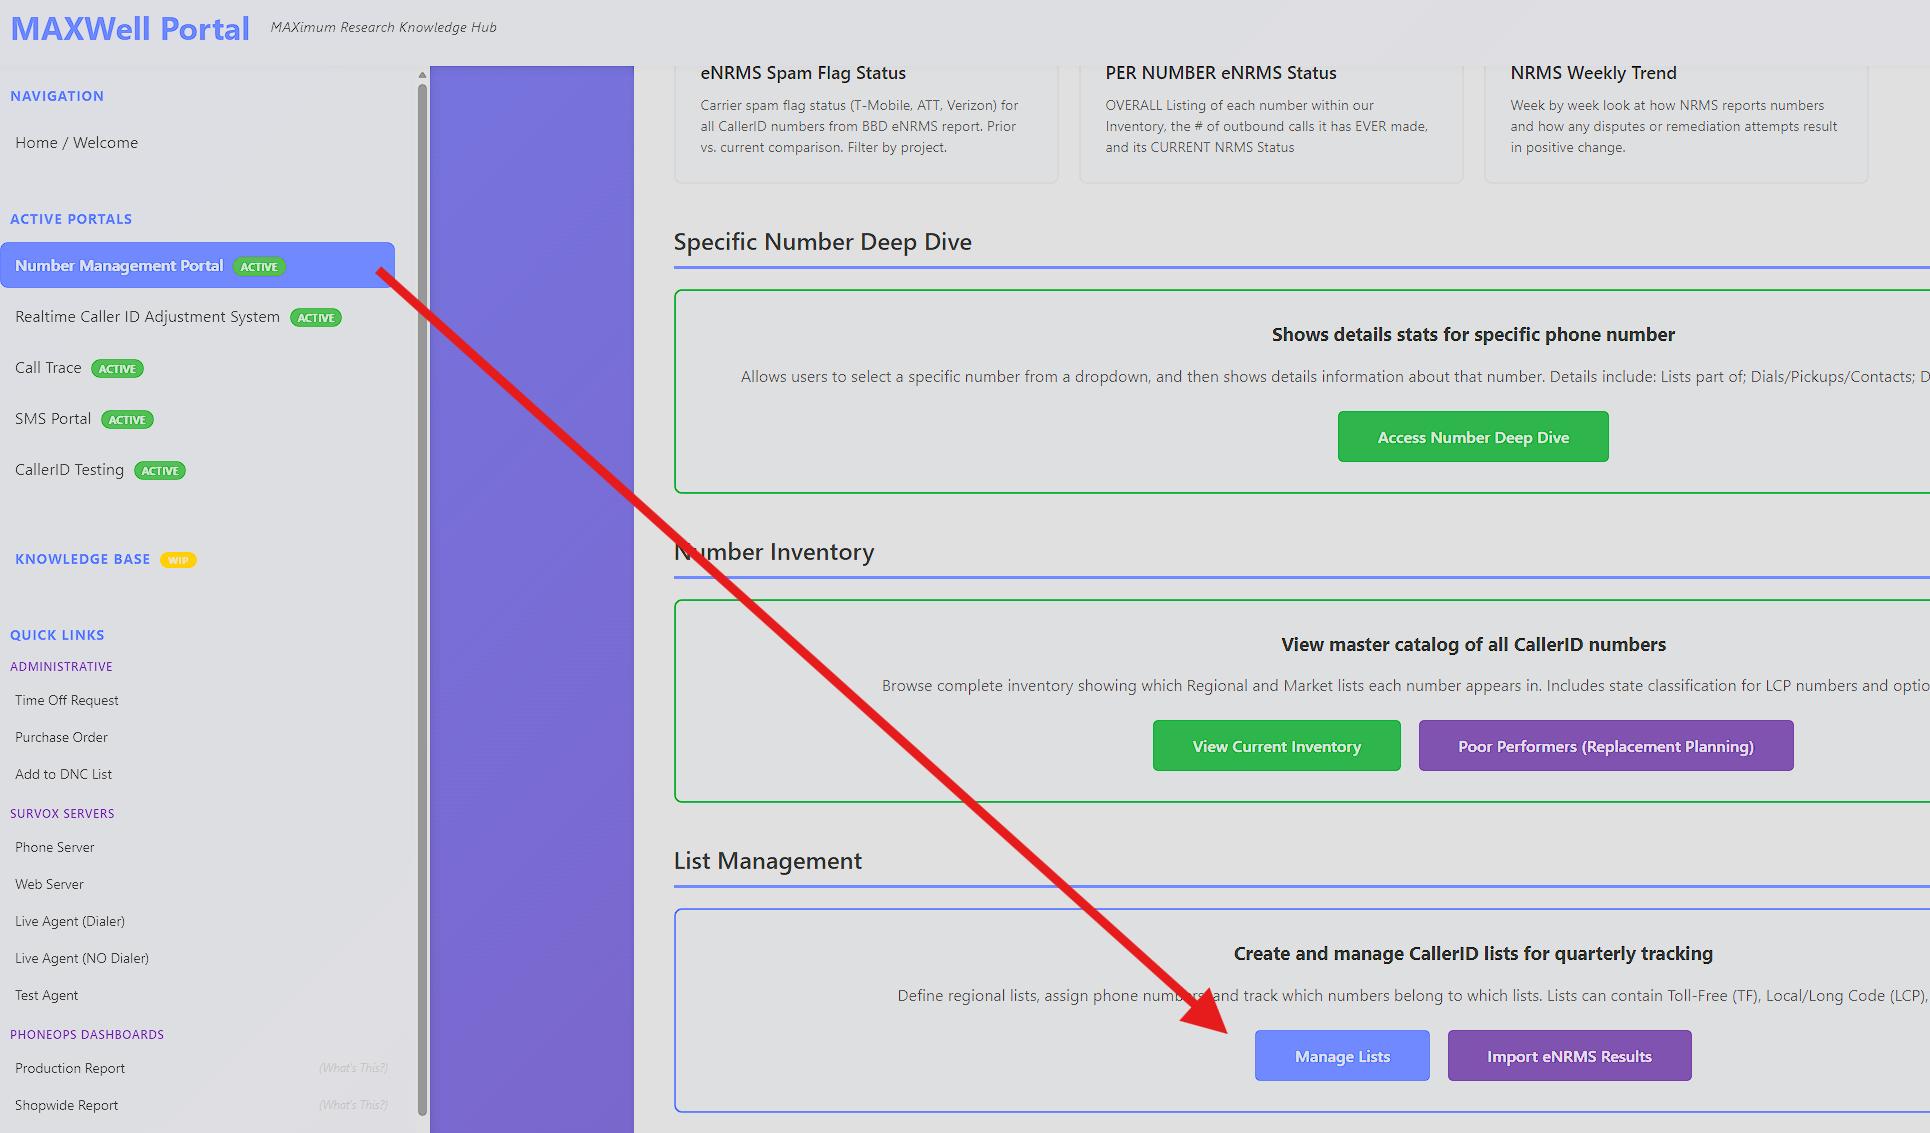

Filling in Box A
- List Name -- This is MAXWell's internal list name. It should be clearly identified to match the project name.
- Survox Name -- This is the name of the file you created in Step 1 (
jobname_cid.txt). - You can leave the Quarter and Active To/From fields alone.
- Add any notes you want in the Notes field. These are just for reference.
Filling in Box B
Paste the EXACT SAME list of numbers in here as you pasted into the Survox file.
Finally, click the blue Create List button.
Editing an Existing List
Scroll down past the Box A/B area and you will see a list of already created CID lists. Find your project and click the Edit button to the right. This will load all the stored information into the Box A/B fields so you can adjust the numbers and the Survox filename being used. Then just click the Save button to apply the update.
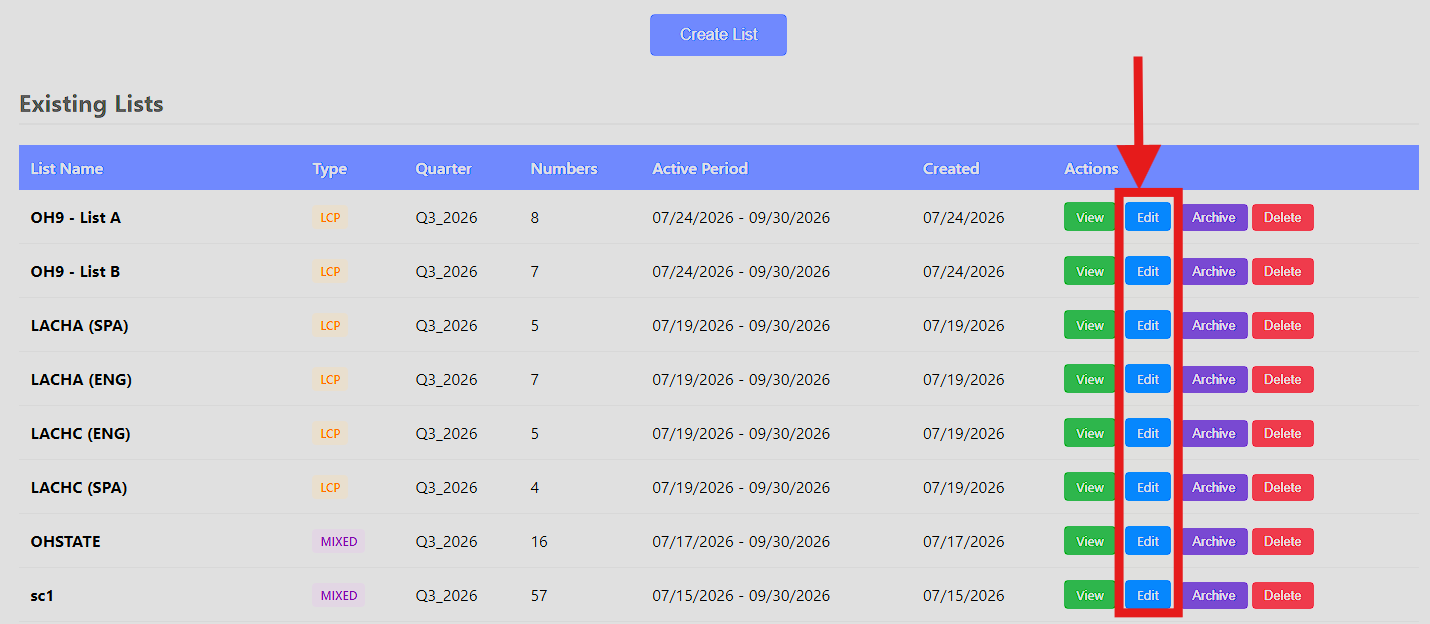
If you do update a list, it is wise to scroll down to the bottom and click the orange Run Attribution Refresh button. This will rerun the current data/calls against the changed list, so the reports are corrected. Use this if you left out a number in here that you were actually using in Survox or the Interceptor lists.
Notes
- Even if using LCP at first, still create a list for the job in MAXWell and put in potential numbers you may use later -- even if you plan to just stay in LCP. You can edit the numbers later if you decide to switch to a list.
- If you ever ADD numbers you plan to use, you have to come back in and Edit the list to add them.
- Never REMOVE numbers from the lists in here, or you risk having them not count in the reporting, resulting in incorrect stats.
Step 3: The Realtime CallerID Management Portal
This is the entirely new step. It is also the MOST important step, as this is where you can actually control the realtime swapping of Caller IDs. However, this step is optional on a per-project basis. If a job is not set up in this portal, it will simply use whatever Survox is set to (the Survox defaults).
In MAXWell, click on the "Realtime CallerID Adjustment System" menu/box.
[PLACEHOLDER:
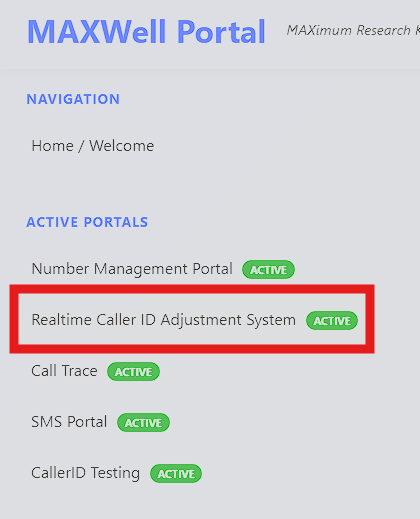
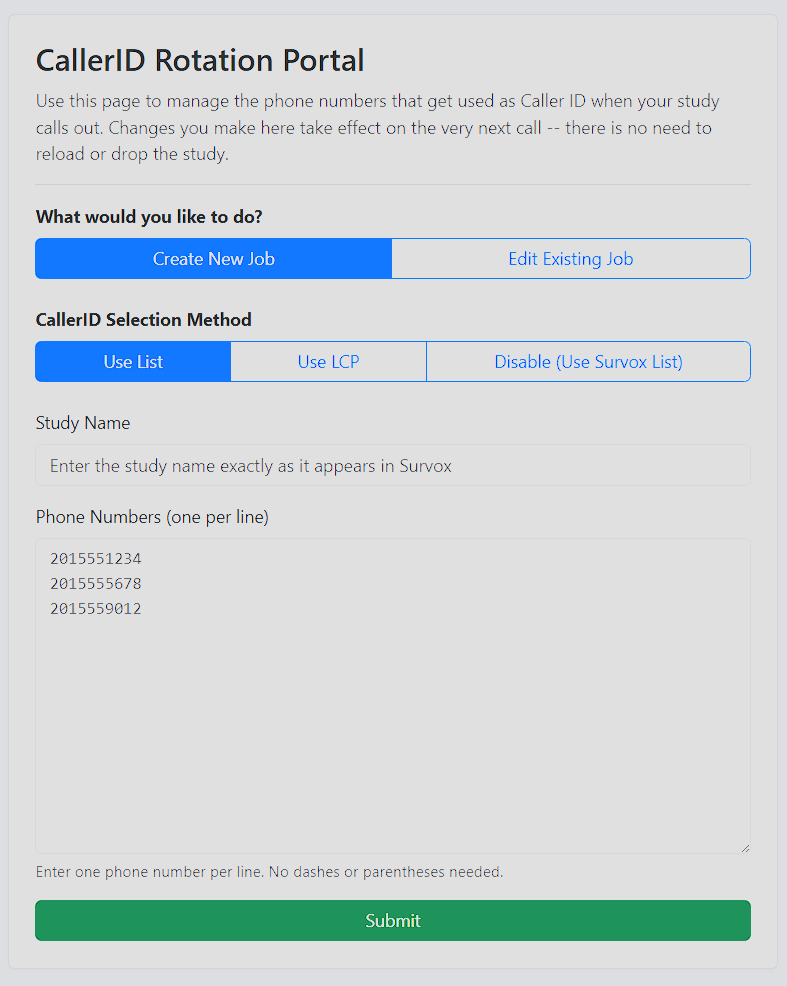
Create New Job / Edit Existing Job
Self-explanatory -- choose whichever applies to your situation.
Use List / Use LCP / Disable (Use Survox List)
This is where the actual behavior of the system is controlled.
- Use List -- Lets you create a realtime list of numbers to use, active immediately after you save the list. If you are setting a job up for the first time, this is where you want to put the numbers you plan to ACTUALLY USE for dialing.
- Use LCP -- Overrides the Survox settings and uses our normal LCP process. Note: if your Survox job is already set to use LCP, you would get the same numbers here -- so to keep server load down, use the Disabled option instead in that case.
- Disable (Use Survox List) -- Defaults back to using whatever Survox is set to. If Survox is using a list, calls will use those numbers. If Survox is using LCP, calls will use LCP. This is basically a toggle to either intercept and change the number, or just let Survox handle it as normal.
Study Name
This field MUST match the Survox study name letter for letter. Case does not matter.
If the Study Name does not match exactly, nothing will happen -- the Interceptor script is looking for that exact name in the "dial" commands the dialer sends. A mismatch simply means the system won't find a match, and the call will fall back to the Survox Default behavior.
Phone Numbers
Paste in the actual numbers you want to use (if using a List), one per row.
When you are happy with your selections, click the green "Submit" button at the bottom. Your new Interceptor task will be created and active immediately.
Notes
- If a job is running and there isn't a job created in here, it will just use whatever Survox says.
- Numbers and Mode changes are INSTANT, starting with the very next call.
- All changes are logged and stored for historic reference (Brian access needed to view logs).
- Adding a number into a list multiple times "weights" it, so it gets used more frequently.
Edit Existing Job
The only real difference here is that the Study Name type-in box becomes a dropdown, letting you select an existing project. All other steps and notes covered above are the same.
There are 2 additional options available when editing an existing job:
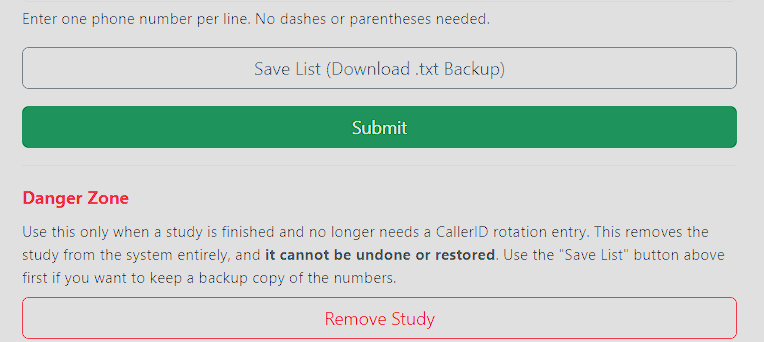
If you plan to remove a study, it's recommended to use Download List right beforehand to save a record of the settings -- though this is completely optional.
- Download List -- Creates a txt file for you to save when a project is done, so you can store the settings for later reference, should the job come back, or if someone asks how it was set up.
- Remove Study -- Completely DELETES the project from the Interceptor program, and reverts the job back to whatever Survox has it set to. This should ONLY be done after a project has concluded fielding and is billed. Doing so helps keep the database at a minimum and running smoothly.
Verifying Your Changes
To check your changes are working, you can view the Realtime Dashboard from MAXWell's Number Management Portal. You should see the changes reflected within a few minutes.
- If you switched to LCP or added new numbers to a list, you should start seeing new numbers appear with calls from them in the table for the study.
- If you removed a number, or turned off LCP, the numbers NOT in the list should stop incrementing shortly (calls still live from before the change can still cause minor increases).
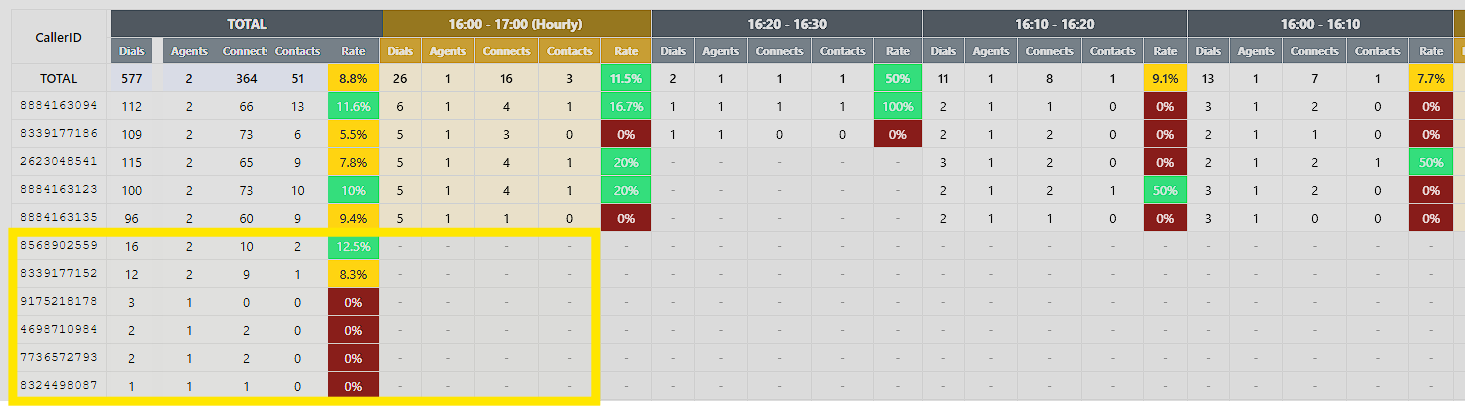
*Numbers in the yellow box were removed after dialing started. Notice they have far less calls than the others, and none in the recent 10-minute windows.
Common Problems Q&A
Q: I set everything up in the Realtime Portal, but the calls are still using the wrong CallerIDs. What happened?
A: This is almost always a Study Name mismatch. The name entered in the Realtime Portal must match the Survox study name exactly. If it doesn't match, the system won't find your job at all, and calls will silently fall back to the Survox Default behavior.
Q: My Survox job won't load, or throws an error on launch. Could this be CallerID related?
A: Check your Survox CID file for a blank line at the bottom. A trailing blank line after your last number can prevent the job from loading properly.
Q: My reports are showing incorrect or missing CallerID stats. Why?
A: This usually means a number is being used in Survox or the Realtime Portal that was never added to the MAXWell list, or a number was removed from the MAXWell list after the fact. Never remove numbers from a MAXWell list once created -- only add to it. If you've made changes to a MAXWell list, run the Attribution Refresh button at the bottom of the Manage Lists page to recalculate stats against the update.
Q: My project is using LCP in Survox. Do I need to set LCP again in the Realtime Portal?
A: No. If Survox is already set to LCP, setting the Realtime Portal to LCP as well just duplicates the same result and adds unnecessary load to the server. Use the Disabled option in the Realtime Portal instead -- it will let Survox's LCP behavior pass through normally.
Q: Can I skip the Realtime Portal step entirely?
A: Yes. It's optional per project. If you don't set a job up in the Realtime Portal, the system simply uses whatever Survox is already set to. You can also add it at any time after a job starts, without having to change anything in Survox or MAXWell.
Q: When should I use Remove Study in the Realtime Portal?
A: Only after a project has finished fielding and has been billed. Removing a study too early will cause the Interceptor to stop controlling CallerIDs for that project while it's still active. It's a good idea to use Download List first to save a copy of the settings before removing.
Q: I don't see my job/list in MAXWell at all?
A: Most likely the Survox list name was entered incorrectly. MAXWell relies on comparing the Survox list name and study name -- if either of these do not match exactly between MAXWell and Survox, it will not generate any reports.