IV. Help/Support/Troubleshooting
Something broken, not loading, or not working as expected? The answer is probably in here.
- Troubleshooting - Locked QSS
- Troubleshooting - Out of Sample
- Troubleshooting - INTV Login Issues
- Troubleshooting - Server/Dialer Crash
- TroubleShooting - Fixing (Rebuilding) Active Project Fone Files
Troubleshooting - Locked QSS
Problem: When you need to modify quotas but the quota screen (QSS) is locked or inaccessible, this guide will help you diagnose the problem and resolve it.
Accessing the QSS
There are three ways to access the QSS, if one specific method doesn't work, try the others first before attempting to "correct" the issue:
- Survox Console - Web interface under Manage > Manage Quotas > Named
- Super/Boss Command Line - Type
qss <jobname>from a super or boss session - QuotaMod - Direct access via the QuotaMod application in putty, by typing
quotamod <enter> and providing the jobname
Why the QSS Gets Locked
The QSS becomes locked or inaccessible for three main reasons:
- Another user has it open - Someone is viewing/editing the quota file in QuotaMod in Read/Write mode
- Server load failure - Programming changes affecting quotas prevented the study server from loading the file properly (super/boss only)
- Active or hung surveys - Interviewer sessions or stuck processes are keeping the quota file open on the study server
Diagnosing the Lock
Follow these steps to determine what's causing the lock:
Step 1: Check QuotaMod Access
Try opening the job in QuotaMod. Check if it opens in:
- Read/Write mode (rw) - You can edit (no lock)
- Read-Only mode (ro) - File is locked by another process
If the file shows a Read Only, someone else has it open, so skip to step 3 below, otherwise continue to step 2.
Step 2: Test Loading from Super/Boss
Open a super or boss session and try:
qss <jobname>Look for specific error messages that indicate programming issues or file conflicts. You will typically see 2 different errors... "crc qff <-> quo mismatch" or "can't open quota file, failed to load jobname". If you get crc mismatch errors, this will require IT/DP to fix so contact them and await further instructions. if you get "Can't Open" messages then continue to step 3.
Step 3: Check File Ownership
From Survox CLI (PuTTY), run the following:
whylock jobname <enter>It should return something similar to below:
Here are the files listed as open for Jobname
Anything besides STDYSRVR can be cleared without
risking crashing the server.

If NO programs are listed, you need to check with a
programmer to investigate the issue further

COMMAND  PID    USER FILENAME
======== ====== ==== ============================================
stdysrvr 4087502 cfmc /cfmc/phone10/active/data/jobname.tr
stdysrvr 4087502 cfmc /cfmc/phone10/active/fone/jobname.fon
survent 345139 cfmc /cfmc/phone10/active/quota/jobname.quo
survent 369242 cfmc /cfmc/phone10/active/quota/jobname.quo
stdysrvr 4087502 cfmc /cfmc/phone10/active/quota/jobname.quo
survent 345139 cfmc /cfmc/phone10/active/qff/jobname.qff
survent 369242 cfmc /cfmc/phone10/active/qff/jobname.qff

Those are all the files we found open...
This shows which processes or users have all study files open. "survent" are interviewer sessions and "stdysrvr" is the actual study server. if someone has the file open in quotamod, it will be shown there too... If nothing is shown, then the problem requires deeper investigation, and should be handled by IT/DP.
Fixing the Lock
Based on your diagnosis, use the appropriate fix:
If QuotaMod Has the File Open
- Email the team to ask if anyone is actively using QuotaMod for this job
- If no one is using it, the process is likely hung
- Contact IT to issue a
killcommand to terminate the stuck QuotaMod process
If Study Server (stdysrvr) Owns the Lock
- Confirm no active interviewing is happening on the study
- From super/boss, run:
server:clearstudy (@sc for short) <jobname>- This releases the server's hold on the study and all of the associated files, including the quota file.
- It is possible that hung survent processes do not release the files, even when the study clears them. If you issue a server:clear and the problem persists, you will need IT/DP to issue a kill command on them.
Retesting After Fix
After attempting a fix, verify the QSS is now accessible:
- From super/boss, activate the job:
   activate <jobname>
qss <jobname>- If the QSS loads successfully, the problem is resolved
- If it still fails to load, repeat the diagnosis and fix steps
Alternative: Modify Quotas While Locked
If the QSS is locked by the study server but the job must remain active (interviewing cannot stop), you can modify quotas directly from the command line:
- From super/boss, type:
mq <jobname>- When prompted, enter the quota you want to change (example:
completes.t) - Enter the adjustment using
+or-followed by the amount:+5adds 5 to the current value-10subtracts 10 from the current value
- The server will confirm the change was applied
Note: This method only works for adjusting existing quotas. You cannot add new quota cells or make structural changes using mq.
Troubleshooting - Out of Sample
Is your project out of sample…?
So, you think you are out of sample, because interviewers are getting “Out Of Numbers” screens. Well, you may be, however if the SPI screen shows numbers available in the various buckets, the following steps can be used to see what is really going on. The key is, there is no magic “I am out of sample, give me more.” button. You have to understand the information presented on the SPI screens, what they REALLY mean, and how to work with them in your favor.
Prerequisite Information - There are few key bits of information that are important to understand, before figure out why you do not have numbers...
First, it is important to know that the first SPI screen is just a total of all numbers not dead/hidden. It doesn’t account for zeroed out time zones, markets, etc. To truly see where your AVAILABLE numbers are, you need to look at the SPI G screen (from a boss/super, type “spi g <jobname>” to go right to it). This screen will tell you where you have numbers, if any, and why you don’t have numbers in some of the spots. Most commonly, the market is zero, the time zone is zero, it isn’t the right time of day, the reps are high enough, or the minimum system time hasn’t been reached yet.
Regarding dayparts, typically, MAXimum Research only uses DP Time 1, and it is set to 9am/5pm-10pm, allowing us to call respondents anytime, between 9am/5pm and 10pm THEIR TIME. Occasionally a job may have more than 1 time set, something like 5pm-6:30pm/6:30pm-8pm/8pm-10pm. Day jobs may also use Dayparts, so that B2B respondents get attempts at different times of day, for example 9am-12pm, 12pm-2pm, 2pm-5pm. When jobs are set like this, the system will move numbers between these 3 DP times, to allow numbers to be called at different times during the shift. Each one of these DP Times will have their own # of attempts. When numbers have been dialed the maximum number of attempts per daypart, they move into the “All Targeted” bucket, and are held there until released.
You also need to understand what the “Minimum System Time” setting means. All live numbers, besides a busy and a specified callback will come back up AFTER the minimum system time has elapsed, ASSUMING the number hasn’t been called the maximum # times for all applicable dayparts. When we have more than 1 daypart, numbers will move between them as calls are made. This is so we don’t call the same number during the same time of day for every call. Our default MINSYSTIME is 360 minutes (6 hours), meaning numbers will be redialed 6 hours after their last call. Since most shifts do not run for 6 hours, except maybe the weekends, numbers very rarely get called more than 1 time per shift. When using more than 1 daypart, that MINSYSTIME will decide which DP time the number will move to next.
So, here is what to do to get sample, IN ORDER, all of which is accomplished from the MPF Screen in a Super/Boss or under Modify Sample Parameters in the Console:
- First and foremost, make sure the current BUILDING TIME is INSIDE the current daypart time. If it is 10am here, but DP Time 1 starts at 5pm, you will not get any numbers. Adjust the DP Time 1 so it is BEFORE the building time. But remember, this DP time is RESPONDENT TIME. If the job is west coast for example, the DP TIME 1 needs to be 3 hours EARLIER than our building time (if it is 5pm here, DP Time 1 needs to be 2pm)
- If you have 2 or more dayparts:
- You can set “Release System” to yes. This only works if you have more than 1 daypart though. What this will do is allow numbers in other dayparts, that are old enough, to still be dialed, even though we are not currently in their assigned daypart window.
- Increase the # of attempts per Daypart by 1 each and Release System Numbers. What this does is dump all numbers, greater than the minimum system time setting, from all dayparts. This should let you dial EVERYTHING, that wasn’t already dialed today. Numbers younger than the minimum system time will not come out until that # of minutes has passed.
- If you still need sample, lower the “minimum system callback time” by 15 minutes. Check the SPI G again to see if you have numbers, and how many. If you need more, then repeat the process, 15 minutes at a time.
- Release Timed Numbers. (Scheduled Callbacks)
- Release HoldArea (Soft Refusals/Resp. Hung Up in Intro) Numbers
- Release All Targeted Numbers (though they would have been called 3+ times already) This will allow numbers to be continuously dialed until they reach the MAX_ATTEMPTS value (12 by default). Numbers are still bound to the minimum system time though, even when this setting is turned on.
If after following all these steps, you still do not have sample, there are either closed markets, hidden sample, or errors preventing the sample from coming out. In any of these situations, it is best to ask a PD/Programmer/PhoneOps Manager what to do.
Troubleshooting - INTV Login Issues
INTVS Cannot Login...? Here is what to check:
At times, interviewers may experience various issues when logging in, that prevents the process from completing. The below list covers the "most common" causes but doesn't include everything. If nothing below seems to fix the issue, DP/IT should be involved to further diagnose the problem... The documentation below covers: "White Screens", "Cannot Initialize Dialer", & "Booth Not Authorized" issues.
I. Interviewers See "Booth Not Authorized" Message:
When this "booth not authorized" message appears, it simply means that the booth/ID they are using has not been granted access to the project they are trying to access. This is a simple fix, accomplished via the Survox Console located under Manage -> Monitoring & Stations -> Authorize Station. To fill out the form, first confirm if the booth(s) in question have already been authorized for the study in a different mode "Practice" vs "Live" & "Dialer" vs "No Dialer". If the booth(s) are not shown in the list, the steps to authorize them are straight forward, using the prompts at the top of the Console screen:
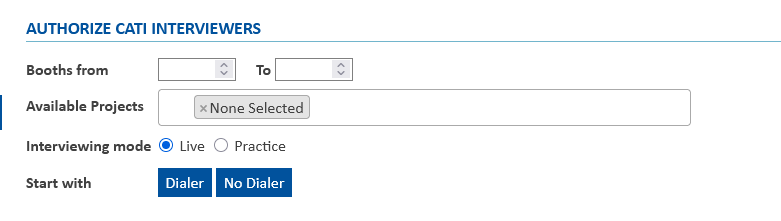
- In the "Booths from" section, add the starting and stopping range of booths/IDs. For ALL BOOTHS, use 1001 - 1650. For a specific booth, put that same number in both boxes. Note: booth 1001-1650 are INTV IDs, 1700-1750 are for clients and/or non-dialer access/testing.
- Under "Available Projects" box, click in the white area to see a list of know projects. Either scroll down to the project or start typing the study code and it will appear. Be sure to actually "click" the study you want, so it shows up in the "Available Projects" box.
- Select Live for "Interviewer Mode"
- 9 times out of 10 the "Start With" will be dialer. As soon as you click Dialer/No Dialer, the booth(s) will be added to the list below of Authorized Studies.
- The Agent(s)/Booth(s) should now be able to login
NOTE: For Client Testing/Data Entry/Suspend Entering, use booths "1701-1750", "Live" and "No Dialer" options. Because of our "wctran" way of testing, booths do NOT need to be authorized for testing mode.
II. Interviewers receive "Dialer Can't Initialize Study XYZ" Message:
If interviewers login and receive this message, it typically means there is something wrong with the study's "Dialer Configuration" page, most commonly something wrong in the callerID File (extra blank lines, non-phone number text, changing CID from list to specific numbers, or "DOS" formatted files.) Most times, this requires DP/IT to resolve, however there a few things that can be checked before engaging them...
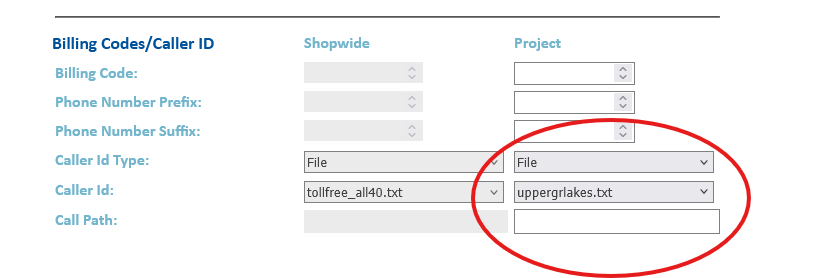
- The first step in diagnosing the issue is to isolate what mode the dialer is using, by checking the Study's Dialer Config Page.
- Navigate to the dialer config page in the console, Manage -> Study Control -> Dialer Configuration and then selecting the study from the dropdown
- Take note of the CallerID information at the bottom of the screen

- It should be shown as either:
- File & a specific filename
- --- and a specific number in the "CallerID" Box
- Blank (meaning it uses the "Shopwide" column
- If the study is using a file, we need to check that it is properly formatted. To do this, in putty navigate to the CID File folder, which is located in
/cfmc/phone10/control/dialer/callerids/here is where all the callerID lists that show up in the file dropdown are read. once you are in the folder, there are 2 things to check with the file:- Make sure the file is named with all lowercase letters. Survox has strange behavior when dealing with files that are a mix of UPPERCASE and lowercase letters. Linux allows for mixed case file, but survox always "looks" for all lowercase names, which causes confusion. If the file is all lowercase, proceed to the next step. If the filename is mixed case, have the PD/DP/IT change it to be all lowercase, and correct the filename in the dialer config before testing access again.
- If you confirmed the filename is labeled correctly, the next step is to ensure it is properly readable by linux. Files created in textpad/notpad/excel and saved to the survox drive typically get saved as DOS format, and do not read properly. To fix the formatting of the file, simply open putty, go into the callerID folder and type the following command.
dos2unix filename <enter>This will convert the file to unix/linux format, so the dialer can read it properly. The whole process should look like below:CfMC-phone10 /cfmc>cd /cfmc/phone10/control/dialer/callerids/ CfMC-phone10 /cfmc/phone10/control/dialer/callerids>dos2unix missdelta.txt dos2unix: converting file missdelta.txt to Unix format... CfMC-phone10 /cfmc/phone10/control/dialer/callerids> - Once you confirm the file formatted in UNIX format, by no errors showing up on-screen, retest dialer access. If intvs still cannot login and get "Can't Initialize..." error, proceed to the next step.
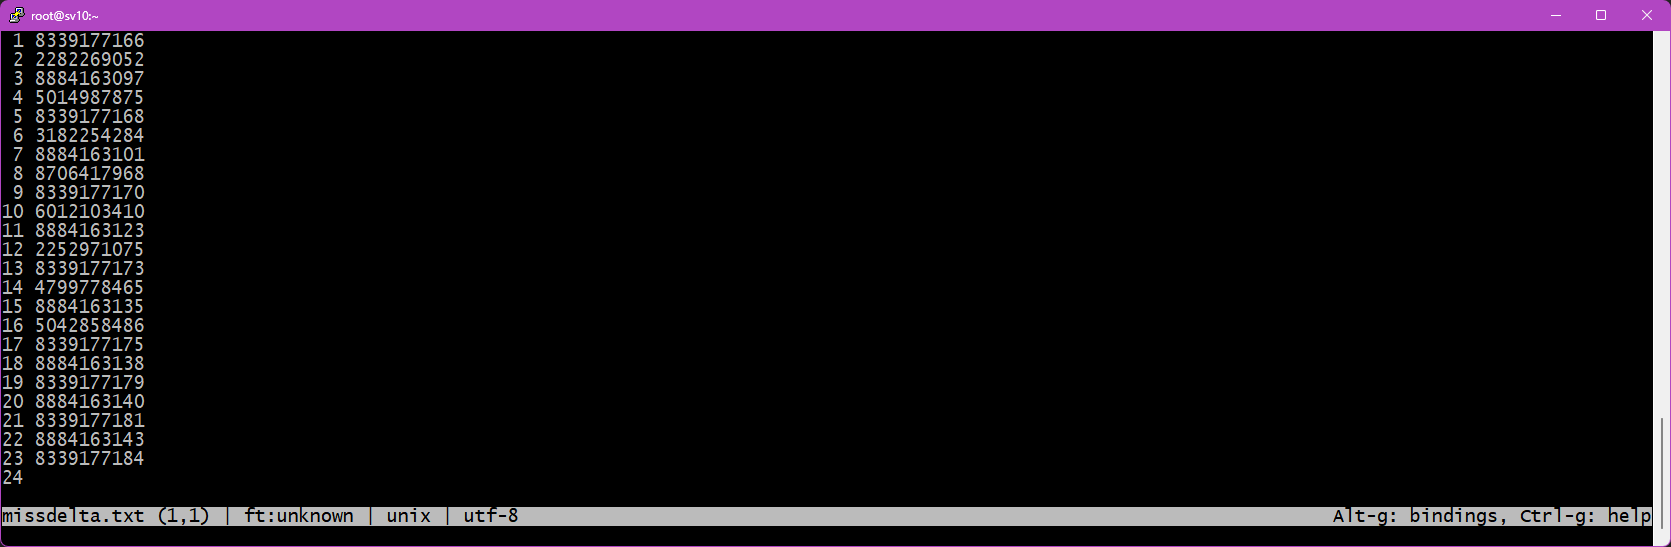
- Lastly, sometimes an extra line or text can creep into the callerid files. You can check this by opening the file in textpad, and ensure it is nothing but 10-digit phone numbers, and there are no blank rows at the bottom. The file should look similar to this:

- If you notice more than one blank line below the last phone number, delete them, so there is just a single blank line under the last file. Save and attempt accessing the dialer with the study again. Sometimes a
server:clearstudycommand is needed from a boss/super to ensure the updated file gets read. If intvs still cannot login and get "Can't Initialize..." error, proceed to the next step.
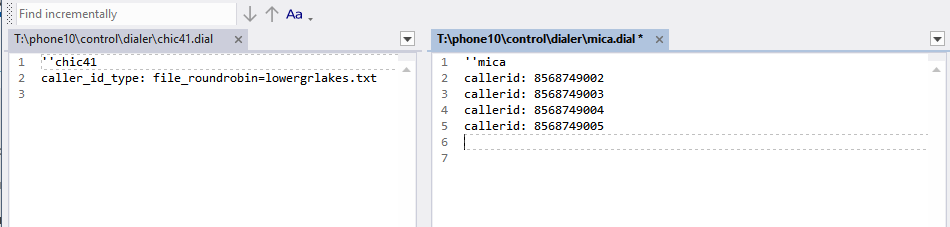
- The next step to check the dialer settings is to look directly at the study's ".dial" file, which is the text version of the console window. While they should be a match, sometimes the .dial can get corrupted, especially if a PD switches a job from list to specific number, or vice versa.
- To check the .dial settings, browse to the
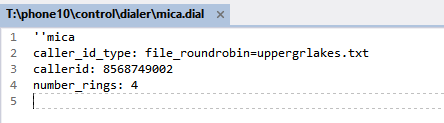
/cfmc/phone10/control/dialerfolder and look for the .dial for your study. Viewing it in textpad/notepad is acceptable for this check. The file should resemble one of the two shown below. The image on the left is a study using a list, and the one on the right is using specific numbers:
- However, if a PD changes a project's settings, the file can sometime be corrupted, and have both settings, as shown below:

- If the file looks like above, confirm with the PD which setting is correct, and REMOVE the line that should not be there, either the caller_id_type: or callerid: line, and remove the one that shouldn't be there. Reset dialer access after saving the file. Sometimes a
server:clearstudycommand is needed from a boss/super to ensure the updated file gets read.
- To check the .dial settings, browse to the
- If all above checks have been completed, and everything is correct, but the study still will not, the only other basic test would be to clear the study from the server completely and reload it. By executing a
server:clearstudycommand from a boss/super, and then doing a qss/spi immediately after, ensures the updated file gets read by the server. - Last option... Contact DP/IT for help.
III. Interviewers Report "White Screens" when logging in:
An interviewer "White Screen" is typically reported as they try to login, and the study simply cannot load. If there was a file mismatch error, or read/write access error, they would make it through login process, and then immediately logout, while white screens don't even make it that far. The 2 most common cause of white screens are:
- Something being set wrong in the study's .wc file.
- The server's access to files changed after loading.
Each of the 2 issues above are relatively simple to check/fix.
- Errors in study.wc File - whenever a study is created, there is a .wc file created, located in
/cfmc/phone10/wc_files/called jobname_mode.wc where mode is either ws (websurvent - ONLINE mode) or wc (webcati - INTERVIEWER mode). We create a linked version simply called jobname.wc that links to the _wc version. This is done so when logging into the training/practice/testing mode, we do not have to specify the _wc on the studycode name. To diagnose an issue with the .wc file, the following steps should be followed:- You can view the file via puTTY or Windows Explorer. Simply browse to
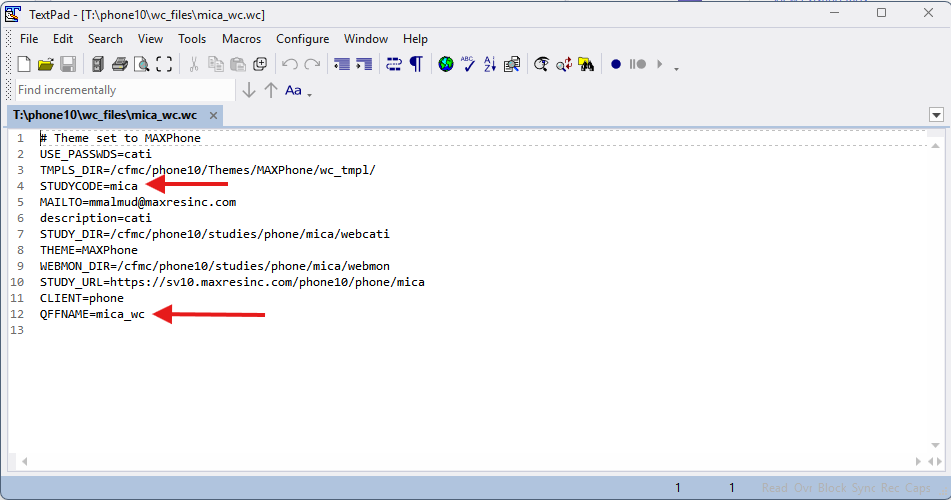
/cfmc/phone10/wc_files/and you will see the files for all the current studies listed. - Open the study file in question, and it should look similar to this:

- The two lines of importance are marked above:
- STUDYCODE= should always be the actual studycode, as set when creating the project.
- QFFNAME= This is the currently loaded qff (questionnaire formatted file) for the study. If programmers made changes to a project after it starts, this field will be updated when those changes get loaded.
- If either file is missing or mislabeled, it will prevent intvs from logging in, and typically give a white screen or a "no study named <jobname> exists" error.
- To fix, ensure the STUDYCODE= matches the actual study name and that the QFFNAME= is correct.
- To check the studycode, it should be the same as the filename itself... so if you open mica_wc.wc it should say mica in the STUDYCODE= line. If not, that is the issue, and correct the STUDYCODE= line to match.
- Fixing the QFFNAME= requires confirmation from the programmer on what the QFFNAME= should be... one thing that anyone can look for though is if someone left .qff extension on the end of the file. That should NOT be part of the line, and should be removed:
QFFFILE=mica_wcthis is CORRECT!QFFFILE=mica_wc.qffthis is INCORRECT!
- If the issue was related to the .wc file being setup wrong, after correcting have the interviewers try accessing the study again. If it works, congrats! If it doesn't work, proceed to the next step.
- You can view the file via puTTY or Windows Explorer. Simply browse to
- File Ownership/Permissions/Version Issues - Often times studies get loaded early in the day, but someone accessing the study, or viewing the qss/spi etc. Once loaded by the server, it stays loaded. This can cause issues if a programmer updates file while the study has them... When an interviewer tries to login, the server basically says to them "I have the files you need, but I can't give them to you because I don't own them anymore." This happens because the datestamp of the file updated outside of the server doing something to them, it sees that change of ownership as a reason to not reload the files, and just hangs on whitescreens for the interviewer.
- This fix this, the following steps should be run via a super/boss:
server:clearstudy jobname <enter> then 2-character confirm code- This clears the study from the server & dialer, also aborts all active sessions.server:deactivate jobname <enter> then 2-character confirm code- This prevents the server from automatically reloading the studyactivate jobname <enter>- This command has the server attempt to read and lock all the files for the study.qss/mpf jobname <enter>- This will test/load the files, like the quota screen, sample, data, etc.
- Once the above 4 commands are executed, and if there were no errors, the job should no longer whitescreen for the interviewers.
- If you get errors during any of those 4 commands, or the problem still persists, contact DP/IT for help as the problem is more complex.
- This fix this, the following steps should be run via a super/boss:
IV. "Study is not in the list of Active Studies" Messages
Similar to INTV white screens, if someone tries to access a study via boss/super and receive a message that "the study is not in the server's list of active studies" means most likely files changed after the study was loaded, so the server deactivated it to prevent potential damage to the files/project. The steps to correct this follow the same as #2 in the "White Screens" section above. To fix this, the following steps should be run via a super/boss:
server:clearstudy jobname <enter> then 2-character confirm code- This clears the study from the server & dialer, also aborts all active sessions.server:deactivate jobname <enter> then 2-character confirm code- This prevents the server from automatically reloading the studyactivate jobname <enter>- This command has the server attempt to read and lock all the files for the study.qss/mpf jobname <enter>- This will test/load the files, like the quota screen, sample, data, etc.
Once the above 4 commands are executed, and if there were no errors, the job should no longer give the error and will load. If you get errors during any of those 4 commands, or the problem still persists, contact DP/IT for help as the problem is more complex.
V. Conclusion - INTVs Still Cannot Login
If, even with doing everything above, intvs cannot login, contact DP/IT for help, as it is something more complicated/complex for simple troubleshooting to solve.
It could a large variety of issues, including:
- Server Frozen
- Storage Space Issue
- Network Issues
- Project stuck "shutting down"
- IPCFile corruption
- ...and many others
Troubleshooting - Server/Dialer Crash
Problem: Server/Dialer Crashes... What's Next?
There are many reasons why the Dialer and/or Study Server can crash, but those are for DP/IT to figure out**. This guide is more of a "what to do to get things running again" step-by-step list. Depending on the severity of the crash, various steps may be required. Following along in order helps diagnose the extent of the crash and the best steps to follow. Other times, it may be needed to "Bounce" the dialer or Study Server between shifts, to clear errors, locked files, or free up resources that hung. If this is a planned "Bounce" you can proceed directly to Sections B & C to follow the steps for listed there for "Bouncing". Bouncing steps are the exact same as restarting after a crash, so just follow along in order...
Section A - What actually crashed...?
The first, and most important step is to isolate what actually crashed... the Dialer, Study Server, both, building internet/power, the physical machine, etc. This is accomplished with a few simple steps/tests:
- Step 1 - Is it the power/internet at the building?
- Try opening the Survox Console/Putty
- if it loads, it is NOT Internet, so continue to the next step.
- If the Console/Putty doesn't load, check if other servers work, like the web server or VPN. If they too DO NOT load, it is 100% an internet/building issue. Contact DP/IT to investigate and await further instructions
- Ironically, if you are viewing this document live, it is NOT power/internet, as MAXWell sits on a server IN the building.
- Try opening the Survox Console/Putty
- Step 2 - Check Survox Access
- Once you have confirmed there is power/internet at the building, the next step is to confirm that the Survox Server is operational...
- Putty is your best test here. If you can access the server via puTTY, it means the physical server is running, and accessible, so proceed to step 3.
- If you cannot access the server via puTTY, most likely the physical machine crashed/rebooted. This has to be checked from within the building, by someone with security clearance to access the server room. Contact IT and have them investigate.
- Once you have confirmed there is power/internet at the building, the next step is to confirm that the Survox Server is operational...
- Step 3 - Check if the study server actually running
- Once you have confirmed that the physical server is running and there is power/internet at the building, the next step is to check the actual interviewing server, called the "study server".
- There are 2 ways to quickly check if the study server is running:
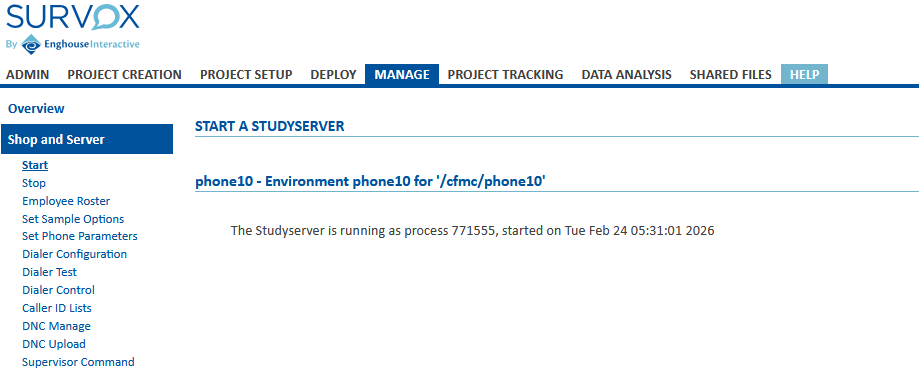
- From the Survox Console, navigate to Manage -> Shop and Server -> Start
- If the study server is running, you will see a message similar to below:

- The other option to check the server status is in puTTY, via a super/boss. If it type in super from putty and it loads, meaning you get the
Enter a SUPERVISOR Command -->prompt, the server is running.
- If either option shows the study server is running, proceed to the next step to further isolate what else may have crashed.
- If after testing the server, it is determined the study server is NOT running, process to Section B to attempt a restart.
- Step 4 - Check Dialer Status
- If you have gotten this far, there is most likely only one thing left that could have crashed, the Dialer. Again, just like with the study server, there are 2 ways to check the Dialer's status...
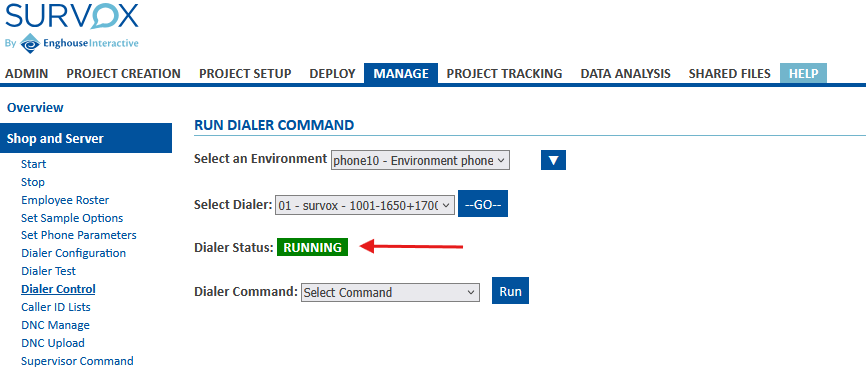
- From the Survox Console, navigate to Manage -> Shop & Server -> Dialer Control and simply click the blue "Go" button to see the dialer's current status
- This will show you if the dialer is running or not.

- The Console will either show RUNNING or NOT RUNNING in the highlighted image above. If the dialer is RUNNING it may just need to be activated on the server, to proceed to Section C, Step 3 to enable dialer control on the study server. If the dialer is NOT RUNNING it needs to be started and initialized on the study server, so proceed to Section C, Step 1 to do a full dialer reset.
- The second way to test the dialer is again via a boss/super. by typing
@testdialer <enter>you will either be met with a dialer not running message or a successful ping response, similar to this:ping command RETURNED (PING 1 2998 11:23:55.547 9901 11:23:55.54 11:23:55.547 ast:20260225112355 11:23:55.588)
- If you have gotten this far, there is most likely only one thing left that could have crashed, the Dialer. Again, just like with the study server, there are 2 ways to check the Dialer's status...
- Step 5 - Other Issues
- If you made it this far and still have not isolated what the issue is, it is most likely something more complex, that requires IT/Survox to diagnose.
- Contact the IT team and explain the issues and what steps you already attempted
- It could be hung apache services, full storage, certificate errors or other issues they are trained to diagnose.
- If you made it this far and still have not isolated what the issue is, it is most likely something more complex, that requires IT/Survox to diagnose.
Section B - Restoring Survox Study Server
More often than not, the study server has crashed from either an error record on a project, a corrupt file being accessed, or an accidental clearing from someone in DP/IT. The process to restart the study server is relatively simple, and can usually be doing via the Console, unless it is "hung/frozen" in which case puTTY is required. Below are the steps to take via the Console. Below those are the additional steps should the Console method fail.
These steps can also be followed if someone requested "bouncing" the server. Bouncing is essentially a planned shutdown & restart of the study server and/or dialer.
Note: Anytime the study server is restarted, it is advised to also restart the dialer, following the steps in Section C. Doing this ensures a clean connection state between the two processes.
- Option 1 - Restart Via the Survox Console
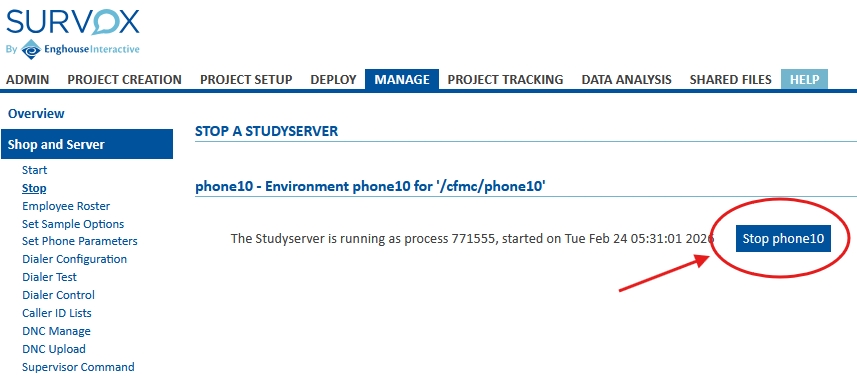
- Once logged in, navigate to Manage -> Shop & Server -> Stop - This is a safety check to make sure the Console doesn't think it is still running. If you see a Process ID showing, with a date/timestamp and "Stop Phone10" like below, that means the Console thinks the study server is still running, so only proceed if you are 100% sure the server is crashed or needs to be "bounced".

-
If the screen shows No Studt Server loaded, you can proceed with starting the server up. Just click on the "Start" option under Shop & Server. - This screen will give you the option to "Start phone10" if it is not already running. Simply click that button and wait for the Console to confirm back if the server started properly or not.
- If there are errors when restarting, proceed to the "Advanced" option of restarting via putty below.
- If the server loaded properly, the next step it to reinitialize the Dialer, so proceed to Section C.
- Once logged in, navigate to Manage -> Shop & Server -> Stop - This is a safety check to make sure the Console doesn't think it is still running. If you see a Process ID showing, with a date/timestamp and "Stop Phone10" like below, that means the Console thinks the study server is still running, so only proceed if you are 100% sure the server is crashed or needs to be "bounced".
- Option 2- Restart via PuTTY (Advanced Mode)
- Restarting the study server via putty is more informative on what is happening but takes a little more understanding of puTTY and linux. Below should give you all the information you need though. If this is a scheduled "bounce" it is recommended to cleanly shut down the server, via the console and only follow the below steps for "hung/frozen" study servers
- First, connect the study server via puTTY, as the normal cfmc user.
- Second - Check for an active/hung study server process by typing the following into puTTY:
srvrchk <enter>- This will either show you nothing, or a stdysrvr process running.
- If nothing is shown, proceed to the next step
- If a process id is shown, we need to clear it first, using the linux command "kill" which will IMMEDIATELY kill the study server process, disconnecting all intv sessions, super/boss sessions, and anything else running interactively.
- Note: the process ID is randomly assigned each time a process starts, so it will NOT be the same each time you start/restart a server
- To kill the process is simple... type
kill -9 process_id <enter>and it will immediately stop the study server process. - The full identify/clear/check process is shown in the below example, where the server's process ID is listed as 771555:
## ===== Check for Active study server CfMC-phone10 /cfmc>srvrchk Checking for active STDYSRVR process ID... If nothing appears below, there is no server active. However, if there is information shown, take note of the process ID listed PROCID ------ VvVvVv 771555 cfmc 20 0 336308 83852 10032 S 0.0 0.1 0:35.49 stdysrvr ## ===== FORCE CLEAR the study server CfMC-phone10 /cfmc> kill -9 771555 <-- immediately kills the process ID of the study server ## ===== RECHECK for active Study Server CfMC-phone10 /cfmc>srvrchk Checking for active STDYSRVR process ID... If nothing appears below, there is no server active. However, if there is information shown, take note of the process ID listed PROCID ------ VvVvVv <-- nothing shown this time, confirms server is down CfMC-phone10 /cfmc> - Once you have confirmed the "stdysrvr" process is not running, you can start the server back up. This is done with a single command in puTTY:
server_start.pl ALL <enter>and it can take 30-60 seconds to start. Hitting <enter> 2-3 more times helps speed it up, but when done, it should echo back that the server is started and running on a new PID. If not, there is something more complex going on and IT needs to step in. This process also attempts to restart the dialer as well, but it is always advised to still manually restart the dialer separately, following the steps in Section C. - After puTTY shows the server has successfully been restarted, you can again confirm if the stdysrvr process started, but running the
srvrchk <enter>command again and making sure it shows a new Process ID. - The final test that the server loaded properly is to try to access a super/boss. If that loads cleanly, the server has been started/restarted/bounced and you are good to resume operations... assuming you do not also need to bounce the dialer, in which case read on below...
- This will either show you nothing, or a stdysrvr process running.
Section C - (Re)Starting the Survox Dialer
Just like with the study server, the dialer can crash for various reasons. Most commonly it has to do with either changes made to the system or storage related problems. DP/IT can diagnose why it crashed later, the main goal of this section is to get the dialer up and running again. Unlike the study server though, the dialer can ONLY be stopped/started/bounced via the console. However, puTTY is useful to check the status prior to doing anything, and again afterwards to ensure it is running properly.
- Step 1 - Shutdown Dialer on Study Server
- From the Console, navigate to Manage -> Shop & Server -> Dialer Control
- Click the blue "--Go--" button to load the dialer
- If the Dialer status shows as RUNNING then follow the below steps to clear it. However if it shows as NOT RUNNING then the dialer is already shutdown and you can proceed to step 2 to restart it.
- Under Dialer Command, pick the option to "CLOSE DIALER" and click RUN it should then respond back if the command was successful or not.
- Under Dialer Command, pick the option to "WIPEOUT DIALER" and click RUN it should then respond back if the command was successful or not.
- NOTE: These 2 commands, while similar, do different things. CLOSE just tells the study server it is not using the dialer anymore, while WIPEOUT actually shuts the dialer process down.
- After you have issued both CLOSE & WIPEOUT, you need to refresh the dialer status the console sees. Simply click the --Go-- button again to refresh, and now the dialer should show as NOT RUNNING
- Step 2 - Start Dialer
- Once confirmed that the dialer shows as NOT RUNNING you can start it back up. Just like with shutting it down, you use the Dialer Command options.
- The first step is to select "INITIALIZE DIALER" and then clicking RUN
- Second, assuming you get a "Dialer Initialized OK" or similar message, pick the second option the list, "HANDSHAKE DIALER" and again click RUN
- These commands are the same as the super/boss command @startdialer (initialize) and @testdialer (handshake).
- If either the INITIALIZE or HANDSHAKE commands fail, it doesn't necessarily mean the dialer didn't start... there can sometimes be a few second delay after the command runs, that makes the console think it didn't load. To test, click the --Go-- button again. If it shows as RUNNING then just proceed to the last step. But... If it still shows as NOT RUNNING, then you need to engage with DP/IT to investigate further.
- Once confirmed that the dialer shows as NOT RUNNING you can start it back up. Just like with shutting it down, you use the Dialer Command options.
- Step 3 - Final Confirmation
- While not entirely needed, if the INITIALIZE and HANDSHAKE commands worked, and the screen shows as RUNNING, it is always best to do one last check via a super/boss in puTTY.
- Open putty and launch a super/boss
- type
@startdialer <enter>and then put in the 2-digit confirmation code. If the dialer is properly initialized, the super/boss should respond backinit command SUCCEEDED. if not, try doing another@cleardialerand then a second@startdialer - Once you get a successful initialize command response, do one last
@testdialer <enter>and enter the 2-digit code to issue the handshake one last time. This should echo back something similar toping command RETURNED (PING 1 2998 11:23:55.547 9901 11:23:55.54 11:23:55.547 ast:20260225112355 11:23:55.588)
- While not entirely needed, if the INITIALIZE and HANDSHAKE commands worked, and the screen shows as RUNNING, it is always best to do one last check via a super/boss in puTTY.
Conclusion
If following all the steps listed above, you are still unable to get the study server, dialer or both systems back up and running, something is gravely wrong, and you should IMMEDIATELY contact IT for help. There are a lot of moving parts behind the scenes, that while may not seem connected, actually are, and IT is trained to identify them quickly.
In most cases though, the above steps are the exact same thing IT would do if you contacted them and said the server crashed.
**IMPORTANT FOOTNOTE - If you ever do these steps on your own, it is still important to let IT know there was a crash, so they can investigate the initial cause, to hopefully prevent it from happening again, or at the very least make sure Survox is aware it happened, so they can isolate the issue and prevent it in future software releases.
TroubleShooting - Fixing (Rebuilding) Active Project Fone Files
Overview
Over the course of a project's life, the fone file can develop errors that affect dialing performance or sample integrity. Common causes include:
- Error records that need to be corrected before dialing can resume normally.
- Fresh numbers not being released because the stacks fell out of order.
- Excessive hide/reveal operations that corrupted the record number order -- since records are processed sequentially, a record numbered 1001 appearing after record 2432 in the file will never be reached.
- UITA (Up in the Air) and OTF (On the Floor) numbers left unresolved after a connection loss, survey blow, or dialer/server crash.
- Missed callbacks that need to be reassigned for the current day.
When any of these conditions are present, the fone file needs to be repaired or rebuilt before the project goes back into production. This article covers three processes for doing so, in order of escalating complexity:
- Process 1 -- VUXIS via FoneUtil: The fastest option. Runs the sample through five sequential steps that verify, clean, and reorder the fone file. Handles most routine issues and should always be attempted first.
- Process 2 -- fonerun rebuild: An automated rebuild that converts the fone file to ASCII and reconstructs it, then runs VUXIS automatically on completion. Handles more serious issues that Process 1 cannot fix, but can fail silently if it encounters an error mid-rebuild.
- Process 3 -- Manual Rebuild: A step-by-step manual replica of the fonerun rebuild, giving the programmer full control at each stage. Errors are surfaced explicitly and can be corrected before continuing. This is the most reliable option for serious fone file problems.
In practice, most situations are resolved by running Process 1 first. If the results are not clean, the typical path is to skip Process 2 and proceed directly to Process 3. Process 2 is documented here as a middle option, but its silent failure behavior makes Process 3 the safer choice when Process 1 is not enough.
Prerequisites & Backup
Before performing any fone file repair or rebuild operation, the following steps must be completed in order. Do not skip or reorder these steps.
Allow a minimum of 20-30 minutes before the project's next scheduled start time. Starting any repair process too close to shift start risks agent downtime if the process runs long.
Step 1 — Confirm the Job is Not Active
From a super/boss session in PuTTY, type:
daiwc jobname <enter>If agents are shown, the job is live and no repair work can be performed. Stop here and coordinate with Phone Ops before proceeding. If no agents are shown, continue.
Step 2 — Shut Down the Job and Clear Open Files
From the super/boss session, type:
server:clearstudy jobname <enter>You will be prompted for a 2-digit confirmation code. Enter it to close the study and clear any open files.
Step 3 — Confirm No Files Are Still Open
From PuTTY, type:
whylock jobname <enter>If nothing is returned, proceed. If files are still showing as open, resolve accordingly before continuing.
Step 4 — Navigate to the Fone Folder
From PuTTY, type:
fone <enter>Step 5 — Back Up the Fone File and Index Files
Copy the project's fone file and all associated index files into the backup directory by typing:
cp jobname.f* backup/. <enter>Once the backup is confirmed, you are ready to proceed with the appropriate repair process below.
Process 1 — VUXIS via FoneUtil
VUXIS is the fastest repair option and should always be attempted first. It runs the sample through five sequential steps that verify, clean, and reorder the fone file back to its proper state. It is most effective for minor issues and routine maintenance, but may not resolve more serious fone file errors.
The recommended default sequence is VUXISV — the trailing V acts as a safety net to catch any UITA records that the initial VU pass may have missed. Note that V and U are interchangeable in order; running UV instead of VU will sometimes recover more records than VU alone. Use your judgment based on what the initial V screen is showing.
NOTE: This process runs automatically each night during the overnight processing window around 5am. These steps should only be needed if the job is running across shifts, and something happened during dayshift that warrants the repair.
Step 1 — Launch FoneUtil
From the /cfmc/phone10/phone directory in PuTTY, type:
foneutil <enter>At the first prompt, you will be asked for a list file name. You have two options:
- Press
<enter>to skip — output will display directly on screen in real time. - Type a filename and press
<enter>— output will be written to that file instead of the screen, and you will need to read the list file afterward to review what changed.
Step 2 — Load the Project
At the next prompt, type the project name and press <enter>:
jobname <enter>FoneUtil will confirm whether the project loaded in Read-Write (R/W) or Read-Only (RO) mode. If the project loads as Read-Only, stop here and return to the Prerequisites section to resolve the issue before continuing.
Step 3 — V (Verify)
Type:
V <enter>Verify checks that all records are in their proper stacks and performs low-level adjustments where needed. The steps that follow are more capable of correcting deeper issues, but Verify establishes the baseline for the process.
Step 4 — U (UITA / OTF Return)
Type:
U <enter>When prompted for a select statement, type:
all <enter>This returns "Up in the Air" (UITA) and "On the Floor" (OTF) records back to their originating stacks. Because no status code was ever assigned to these records, they are treated as if the call never happened. For example, a fresh number that was UITA will be returned to the fresh stack.
Step 5 — X (fiX)
Type:
X <enter>This relinks records that are in the wrong stacks and restores them to their proper record number order within the correct stack.
Step 6 — I (Integrate)
Type:
I <enter>Integrate reassigns missed callbacks so they can be rescheduled for the current day. For example, a callback that was set for 12:00 PM yesterday but was never attempted will be reassigned for 12:00 PM today.
Step 7 — S (Sort Specials)
Type:
S <enter>When prompted for a select statement, type:
all <enter>This re-sorts all special numbers back into their designated special stacks, so agents configured as the associated special interviewer type can access those numbers when they start up.
Step 8 — V (Verify — Second Pass)
Type:
V <enter>This second Verify pass acts as a safety net, catching any UITA records that the initial VU sequence may have missed.
Step 9 — Review Phone Screens
Before exiting, verify the results by typing:
P <enter>This cycles through the 5-6 phone screens, equivalent to running SPI from a super/boss session. On the first screen, confirm that the UITA and OTF fields show zero. Any remaining values in those fields indicate the issue was not fully resolved by VUXIS alone, and Process 2 or Process 3 may be required.
Step 10 — Exit FoneUtil
Type:
q <enter>Then type:
q <enter>FoneUtil will close. If the phone screens confirmed clean results, no further action is needed. If UITA or OTF numbers were still present, proceed to Process 2.
Process 2 — fonerun rebuild
The fonerun jobname rebuild command automates the fone file rebuild process in a single step. It outputs the fone file as ASCII, attempts to rebuild it, and then runs VUXIS on the records automatically upon completion. This will resolve most issues that Process 1 alone could not fix.
Important: fonerun jobname rebuild can fail silently — meaning it may encounter an error mid-rebuild, halt the process, and not make that obvious. As a rule of thumb, any errors reported during the run should be treated as a reason to abandon the result and proceed to Process 3, even if the run appeared to complete successfully.
Note: Running
fonerun jobnamewithout therebuildargument will automatically execute the VUXIS sequence from Process 1. This is documented here for awareness only — Process 1 should always be run manually so the programmer can observe and interpret each step's output firsthand.
Step 1 — Run the Rebuild Command
From the /cfmc/phone10/fone directory in PuTTY, type:
fonerun jobname rebuild <enter>The process will run automatically. Watch the screen output as it progresses.
Step 2 — Evaluate the Result
When the process completes, review the output for any error indicators. A hard abort will be clearly signaled with an error block similar to:
**********************************
Program fonebuld ended with 11 errors!
**********************************
Whether the run aborted or completed with reported errors, the recommended course of action is the same — do not trust the result. Restore the backup and proceed to Process 3.
Step 3 — If Errors Were Encountered: Restore the Backup
cp backup/jobname.f* . <enter>Once restored, proceed to Process 3 to complete the rebuild manually.
Step 4 — If No Errors Were Reported: Verify the Result
If the run completed cleanly with no errors, verify the result the same way as Process 1 — launch FoneUtil, load the project in R/W mode, and use the P command to review the phone screens. Confirm that UITA and OTF fields on the first screen show zero before considering the job ready.
Verification — After Process Completed
you can edit and view the jobname.fnr file in the /fone folder to see the output of all the steps. This is helpful if there were errors that were missed while it was running.
If any UITA or OTF numbers remain, proceed to Process 3.
Process 3 — Manual Rebuild
The manual rebuild is a step-by-step replica of what fonerun rebuild does automatically, but with full control at each stage. This allows the programmer to identify and correct errors that would otherwise cause an automated rebuild to abort or fail silently. This process should be used when Process 2 encountered errors, or when the fone file condition warrants a controlled rebuild from the start.
Step 1 — Launch FoneUtil and Load the Project
From the /cfmc/phone10/phone directory in PuTTY, launch FoneUtil and load the project the same way as Process 1. Confirm the project loads in Read-Write (R/W) mode before continuing. If it loads Read-Only, return to the Prerequisites section.
Step 2 — Convert the Sample to ASCII
Type:
C <enter>C is short for Convert -- this outputs the entire sample as a readable ASCII file that will be used as the source for the rebuild. When prompted for a select statement, type:
all <enter>When prompted for a filename, type:
jobname.asc <enter>Step 3 — Dump the Header File
Type:
header jobname_hed.spx <enter>This dumps the project's SPI/MPF/Market settings into a header file that will be read back in during the rebuild, preserving all study configuration.
Step 4 — Exit FoneUtil
Type:
q <enter>Then type:
q <enter>Step 5 — Back Up Again Before Deleting
Before deleting the live fone files, take a second backup as a safety net. From the /cfmc/phone10/fone directory, type:
cp jobname.f* backup/. <enter>This ensures you have a clean restore point before the next step. Do not skip this.
Step 6 — Delete the Live Fone Files
Type:
rm jobname.f* <enter>This clears the active fone files from the directory so the rebuild can create fresh copies in their place.
Step 7 — Run fonebuld
Type:
fonebuld <enter>Then follow the prompts in sequence:
ascii <enter>&jobname_hed.spx <enter>The & prefix tells fonebuld to load the header from that file.
go <enter>jobname <enter>jobname.asc <enter>Press <enter> two to three more times as prompted until the process completes and exits automatically.
Step 8 — If fonebuld Reported Errors
If errors are shown during the rebuild, do not copy the partially-built files to the backup folder — this would overwrite your good backup copy. Instead:
- Delete the partially-created fone files from the active directory:
rm jobname.f* <enter> - Open the
jobname.ascfile and correct the errors that were reported. - Re-run
fonebuldfrom the top using the exact same command sequence in Step 7.
Repeat until the rebuild completes cleanly with no errors.
Step 9 — Verify the Result
Once fonebuld completes cleanly, the rebuilt fone file is considered sorted, verified, and fixed as part of the rebuild process itself. As an optional but recommended final check, run VUXIS via FoneUtil (Process 1) to confirm everything is in order before handing off to Phone Ops for reactivation.