II. Survox - Tools Of The Trade
A dedicated section that touches on all the various "built-in features" Survox has to offer. This does NOT include customizations or other home-brew systems created for MAXimum, and is solely information on items provided DIRECTLY by CfMC/Survox/Enghouse.
How To - Survox LIST Utility
Overview
LIST is a built-in Survox utility used to view and extract data directly from the command line via PuTTY. It allows staff to inspect data files, fone files, subset files, and coded files at any point during a project -- without needing to generate a formal report or run a full data dump.
LIST can be run from any directory that contains data in a record-based format -- meaning CaseIDs in a data file, or sample records in a fone file. While LIST can technically be run against other file types, common practice limits its use to data files (.tr) and fone files (.fon).
LIST produces output in one of two formats:
- By Variable -- Groups all records together and displays them one variable at a time. Think of it like a normal column in a spreadsheet -- all respondents' answers to Q1 together, then all answers to Q2, etc.
- By Record -- Displays one record at a time, showing all selected variables for that case before moving to the next. This is the most common format. Think of it like transposing a spreadsheet so each case is its own column. Useful for drilling into a single respondent's full record.
To launch LIST, open a PuTTY session, navigate to the appropriate directory, and type:
list <enter>The utility will walk you through a series of screens to configure your output. It works like a survey, so how you answer each screen, dictates what screen shows up next.
Step-by-Step Process
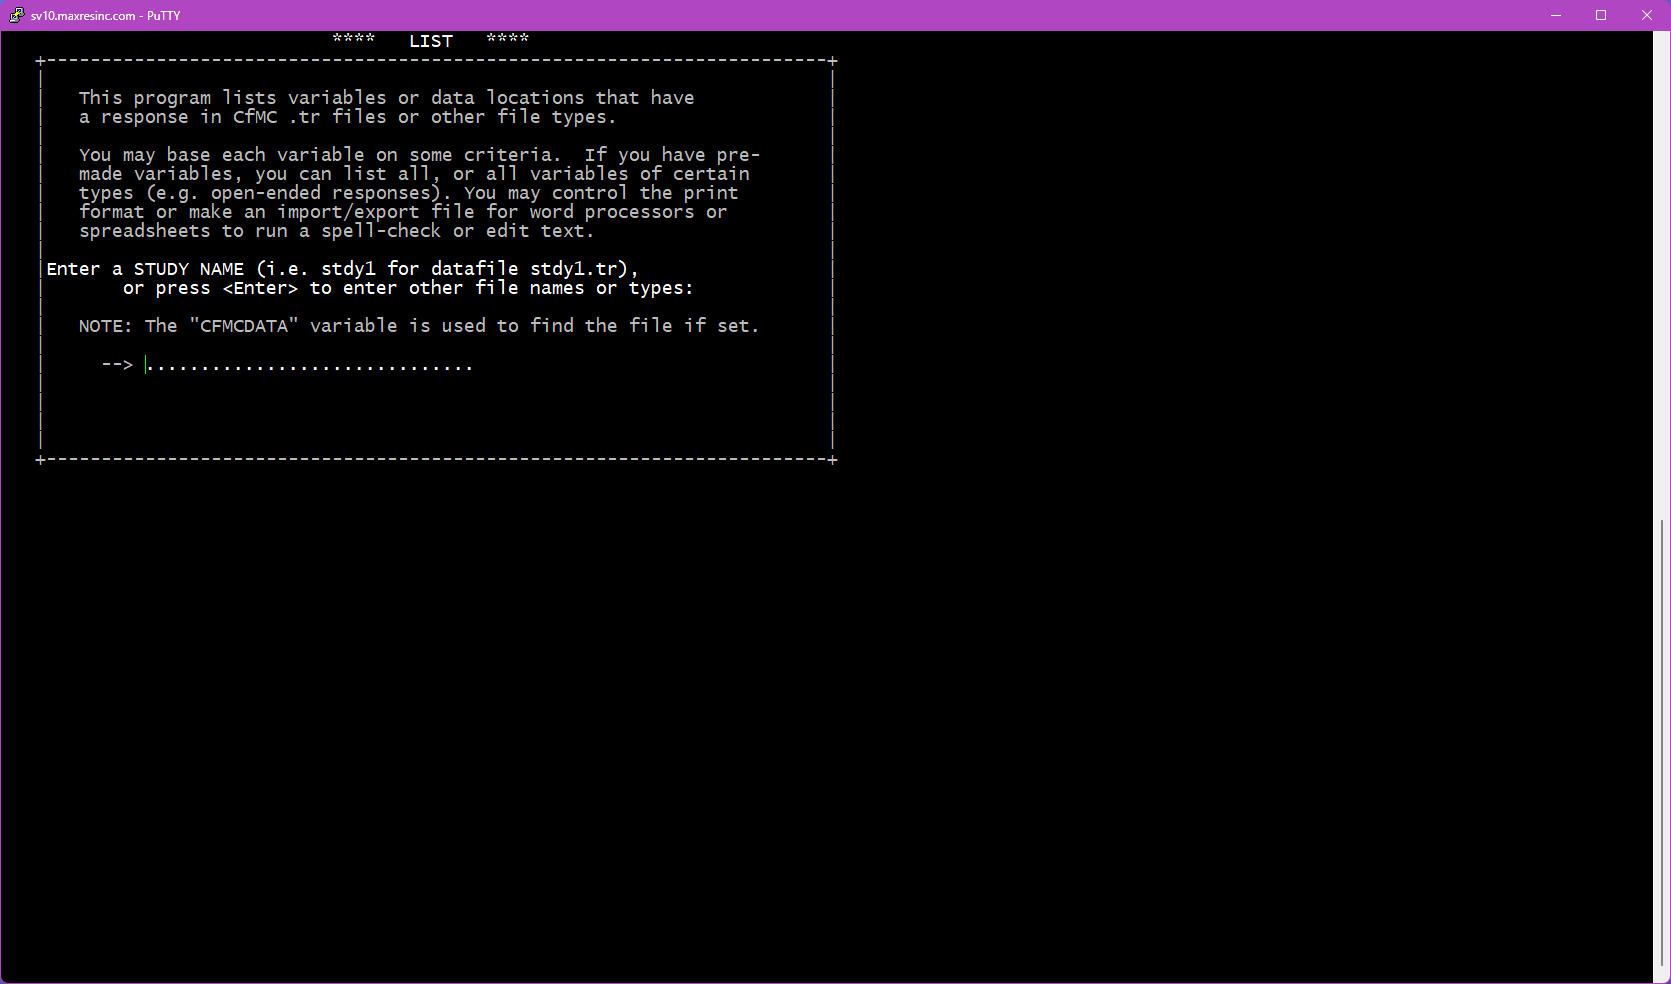
Step 1 -- Specify the Data File
The first screen asks for a datafile name. By default, LIST looks in the $CFMC/data folder for whatever filename you enter here.
- If you want the main data file for the project (located in
$CFMC/data), type the jobname/datafile name and press <Enter>. - If you want any other file (a subset file, coded file, fone file, etc.) -- or if you are already in a different directory -- leave this screen blank and press <Enter>. This will take you to Steps 1B and 1C.
Step 1B -- Specify an Alternate File (if Step 1 was left blank)
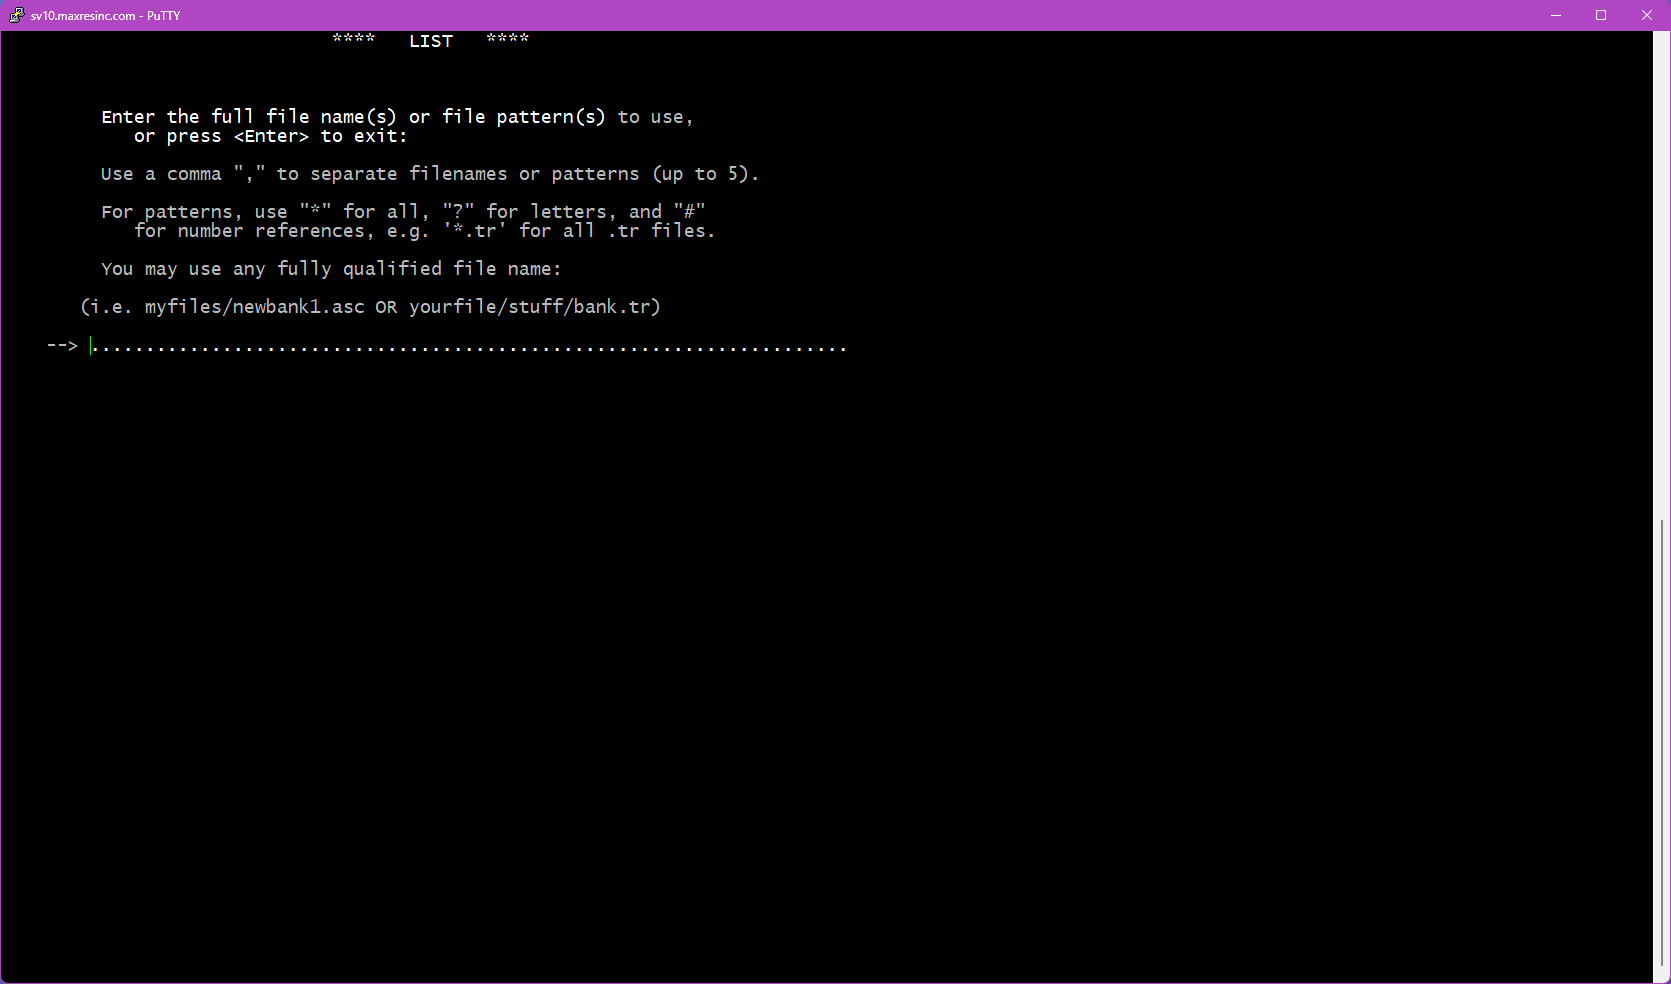
If you left Step 1 blank, this screen asks you to provide the full filename of the file you want to list. Unlike Step 1, you must include the file extension here.
Examples:
jobname1.tr
jobname1.fon
jobname1_subset.tr
Important: If the file is not located in the directory you are currently in, you must either provide the full path to the file, or abort (Ctrl+C), navigate to the correct directory, and relaunch LIST.
Step 1C -- Specify the File Type (if Step 1 was left blank)
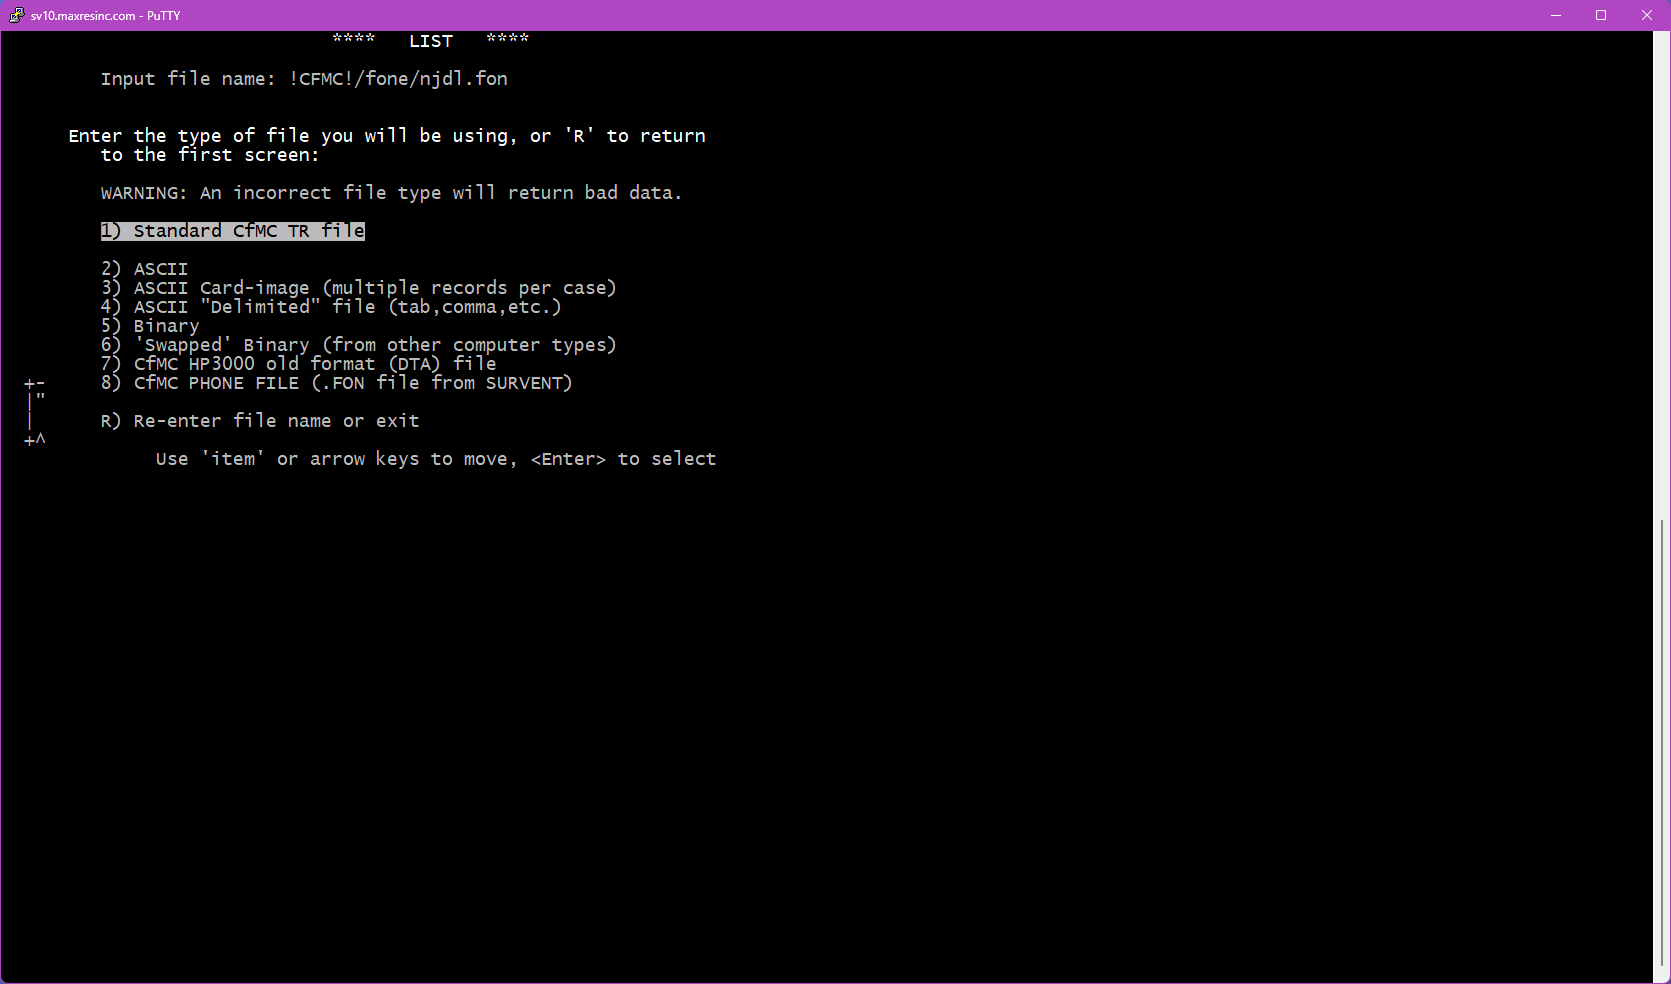
If the file you specified in Step 1B is not a .tr datafile, this screen will appear and ask you to identify the file type so the software knows how to load it.
The two most commonly used options are:
- Option 2 -- ASCII file (use for subset files, coded files, etc.)
- Option 8 -- Fone file (use for
.fonsample files)
Note: This screen does not appear if the file you entered in Step 1B is a .tr file.
Step 2 -- Use a DB File?
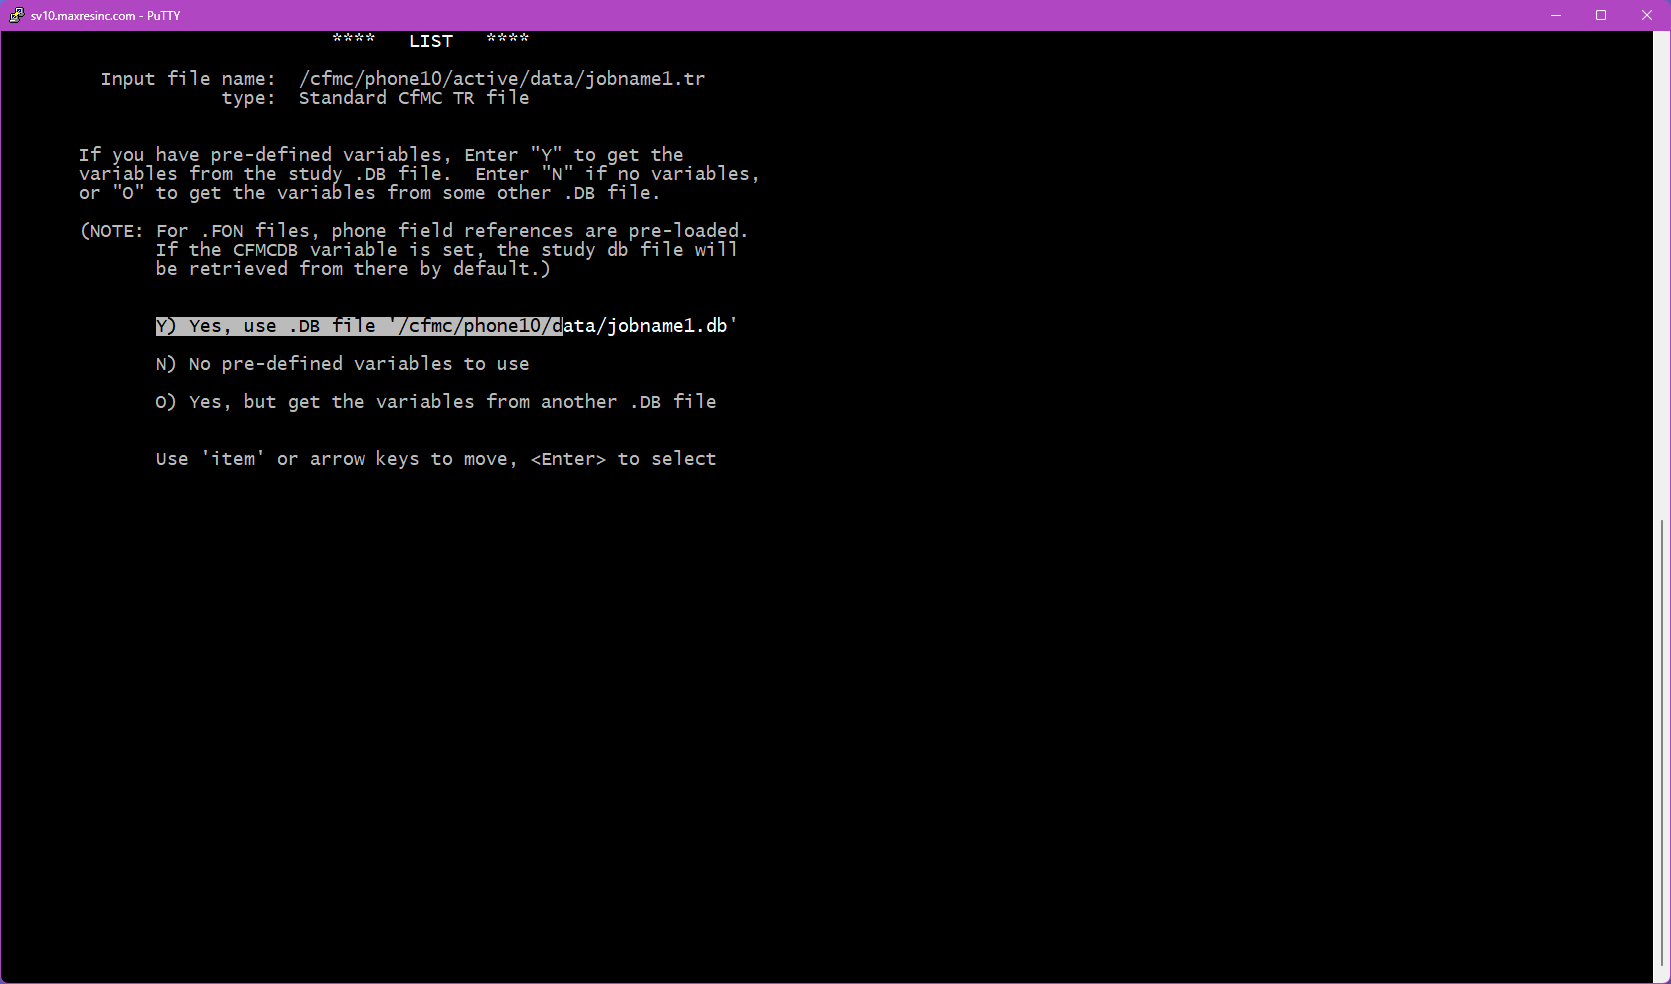
This screen asks whether you want to use a .db file. A .db file contains the variable definitions for the study -- without it, you cannot reference variables by name (like statcode, date, intv, q1, etc.) and would need to know the exact data locations instead.
Important: If you are listing an ASCII or fone file, answer N and press <Enter>. These file types cannot easily use a .db file.
If you specified a study name at Step 1, you will see three options:
- Y) Yes, use the .db file found at the default location for this study
- N) No -- do not use a .db file (variable names will not be available)
- O) Yes, but load the .db file from a different location
If you loaded a file from Step 1B instead, the Y) option will not appear -- only N) and O) will be shown.
To use a .db file from a non-default location, select O and press <Enter>. This will take you to Step 2B.
Step 2B -- Specify the DB File Location (if O was selected)
Enter the full path to the .db file you want to use. Do not include the .db extension -- the utility appends it automatically.
Example:
/cfmc/studies/phone/jobname1/jobname1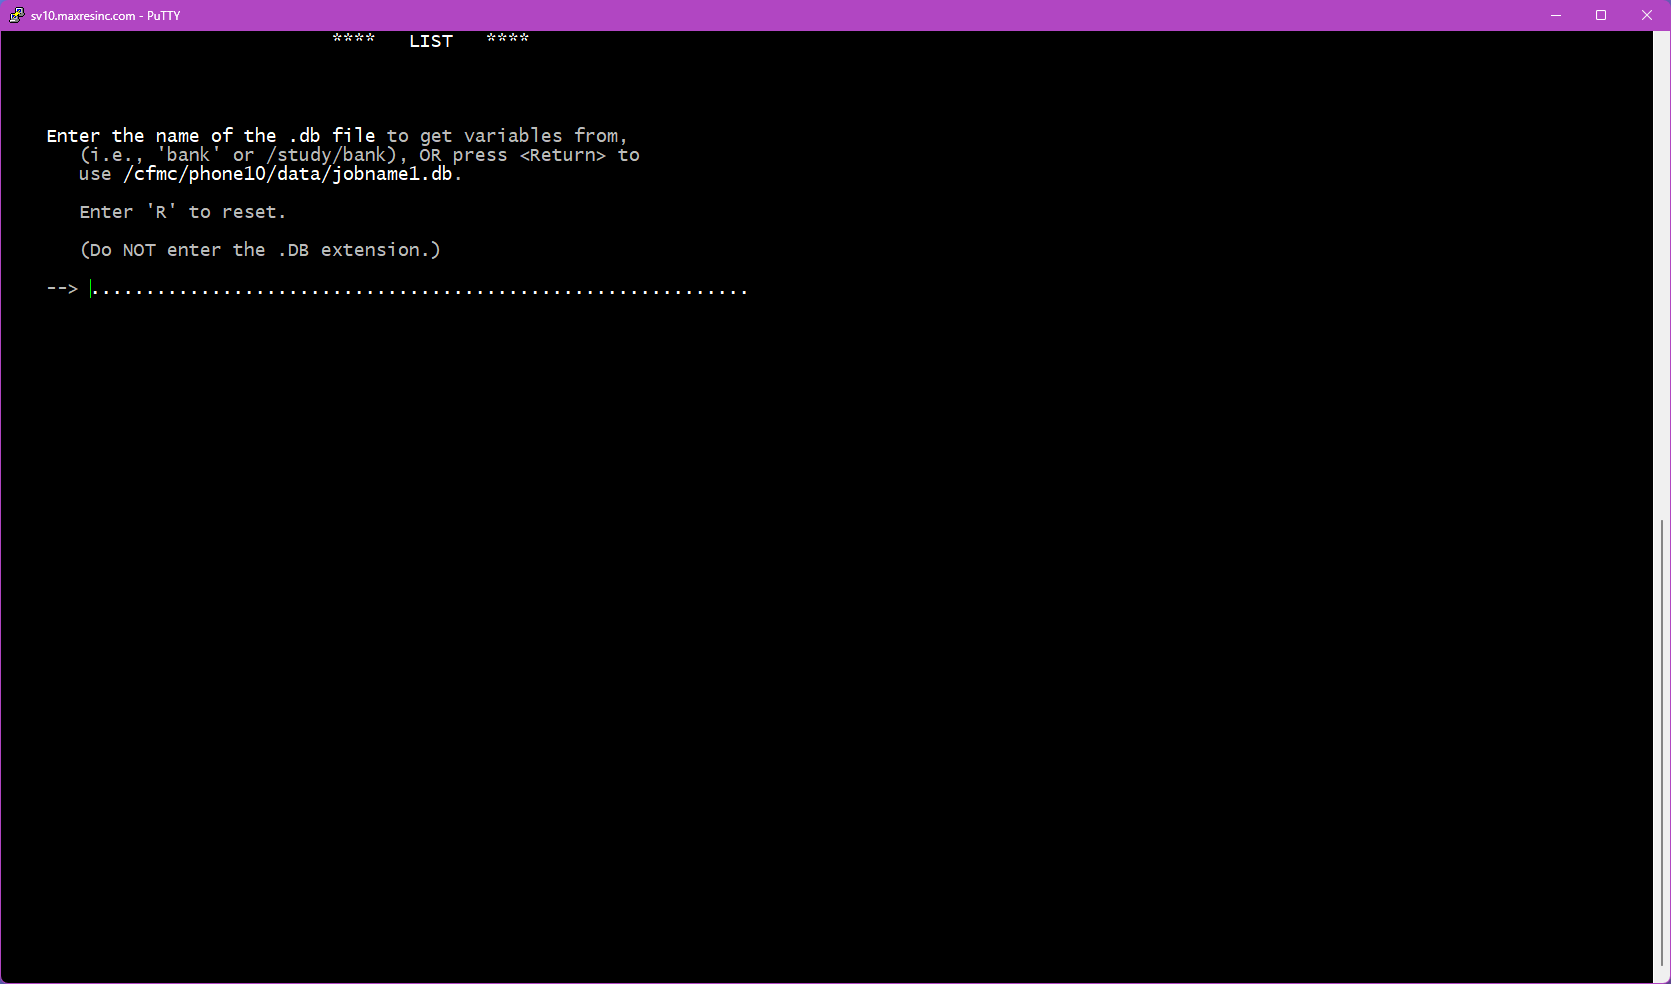
Step 3 -- Title
This screen allows you to enter a title that will appear at the top of each page of output. In most cases, leave this blank and press <Enter>.
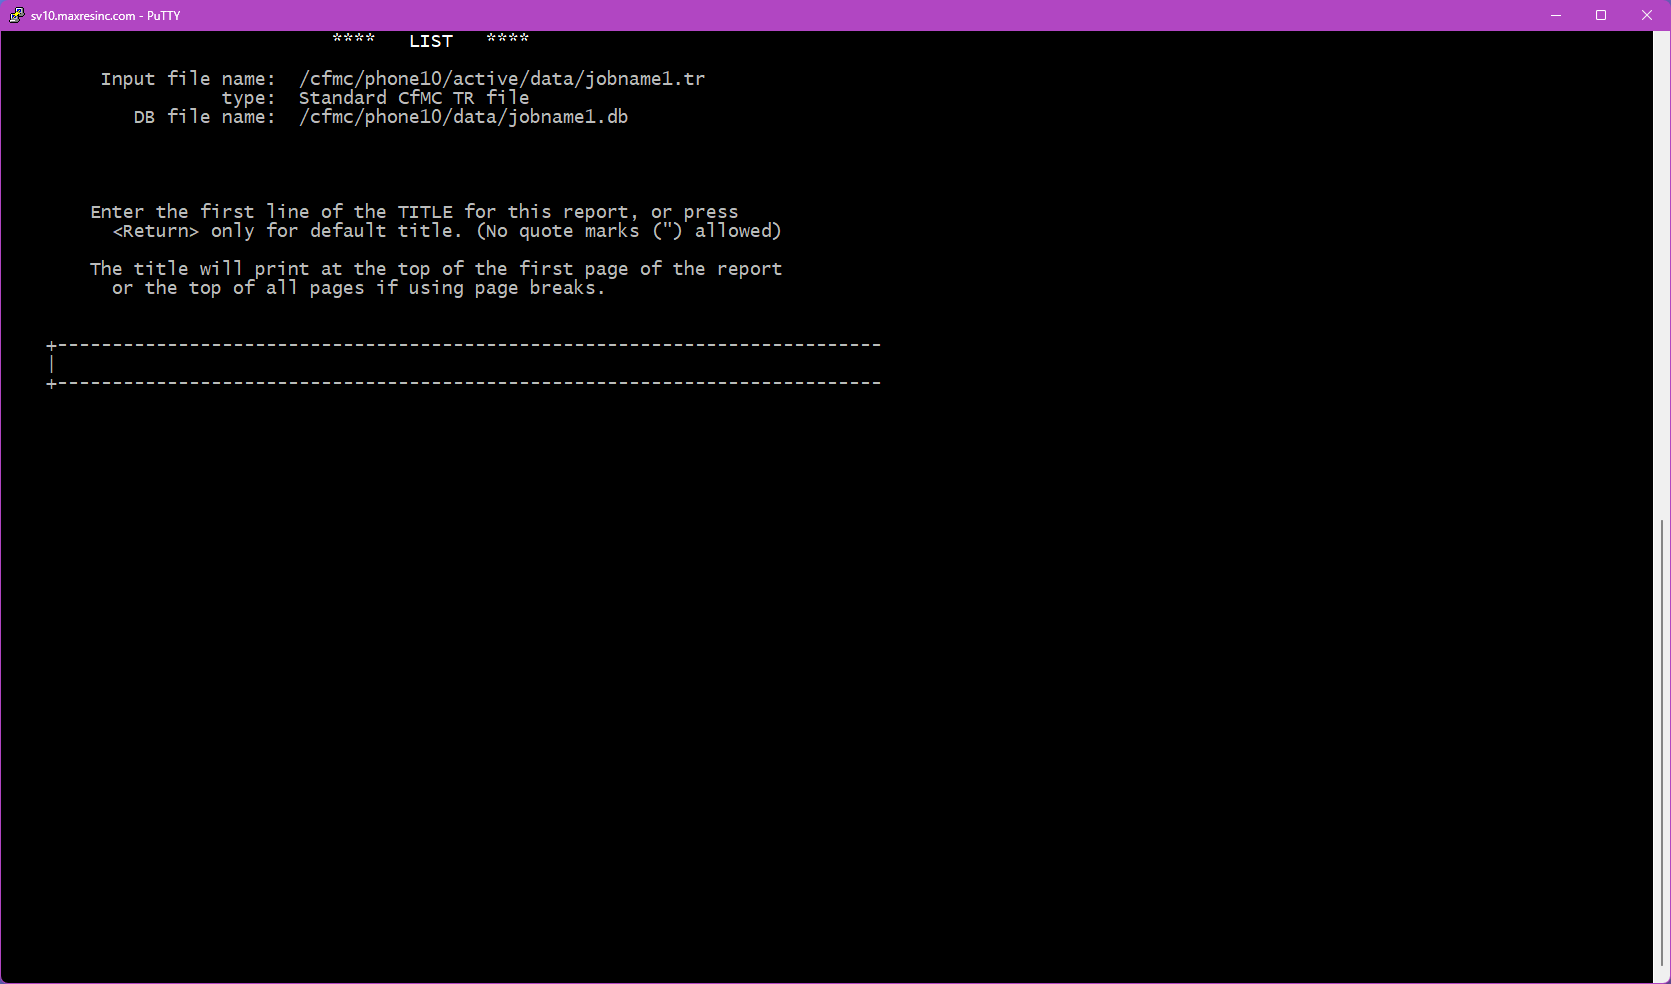
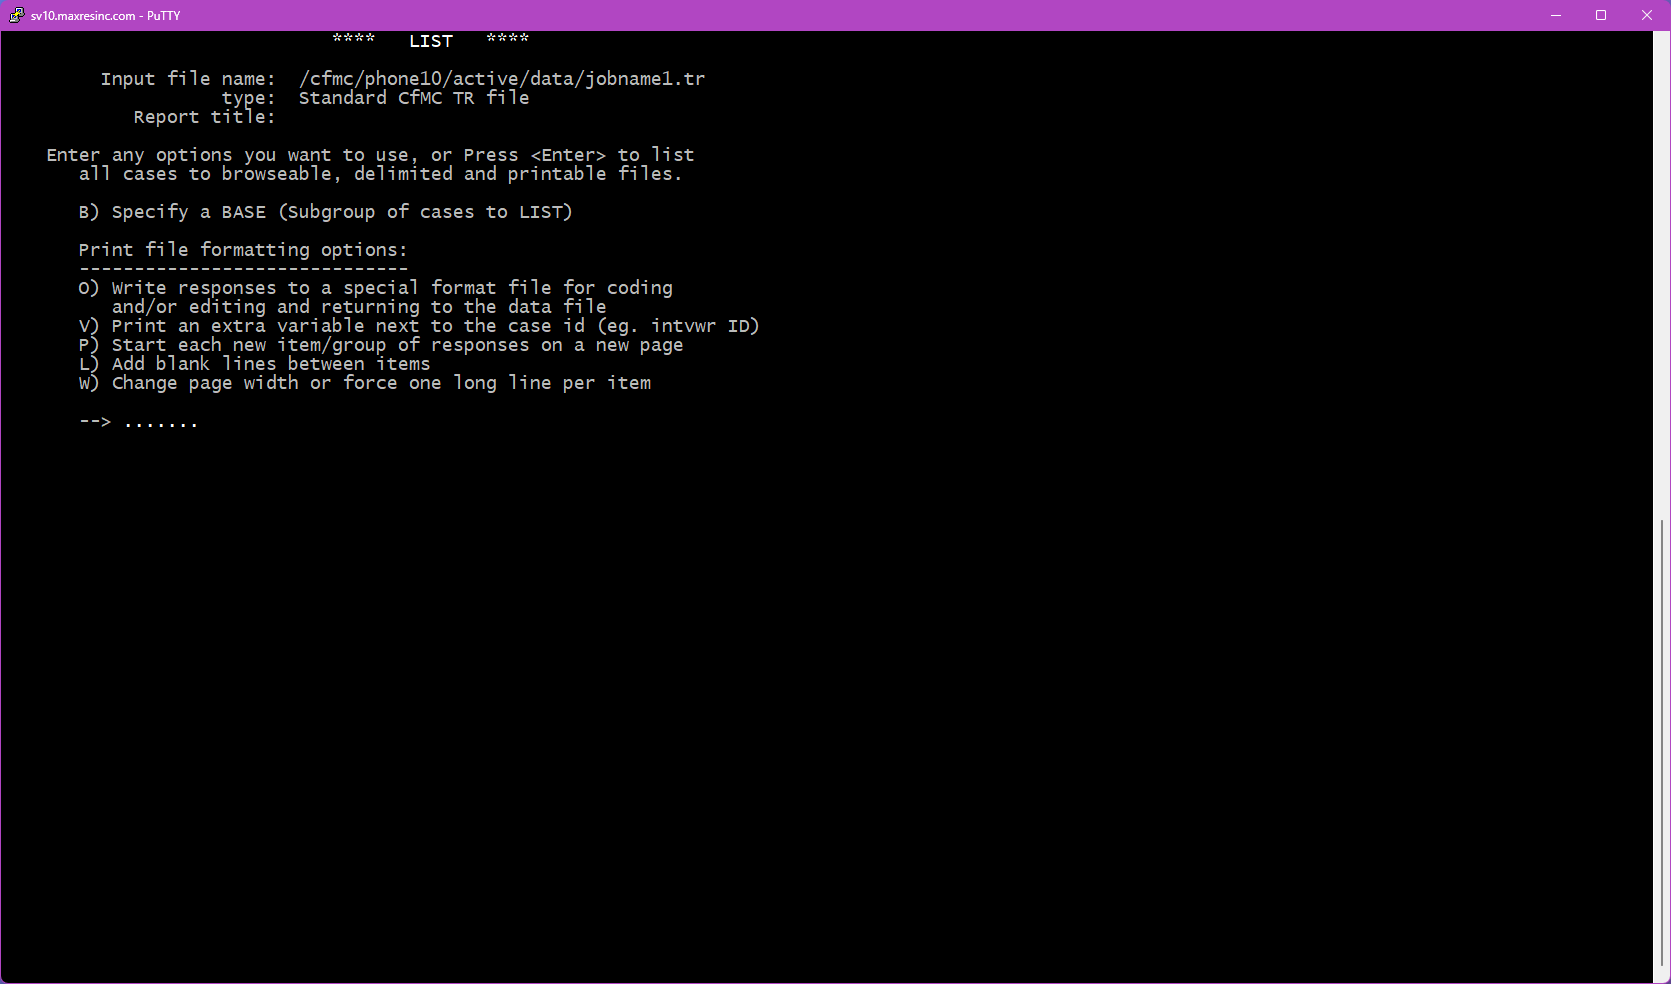
Step 4 -- List Options
This screen presents up to 6 optional settings you can apply to your list. You can select none, one, or several. The four most commonly used are:
- B -- Base: Subsets the list to only include records matching a condition you specify. For example, only completed interviews, or only records from a specific region.
- V -- Extra Variable: Adds a single additional data label to every record in the output. Useful when listing open ends and you also want to see the interviewer ID or phone number alongside each response.
- P -- New Page: Starts a new page for each variable in the output. No additional screens are required for this option. This is a useful option if the lists will be printed, as it creates a natural page break after either each case/record or variable listed.
- L -- Blank Lines: This will prompt you near the end of the run for how many blank lines to add between variables, 0, 1 or 2.
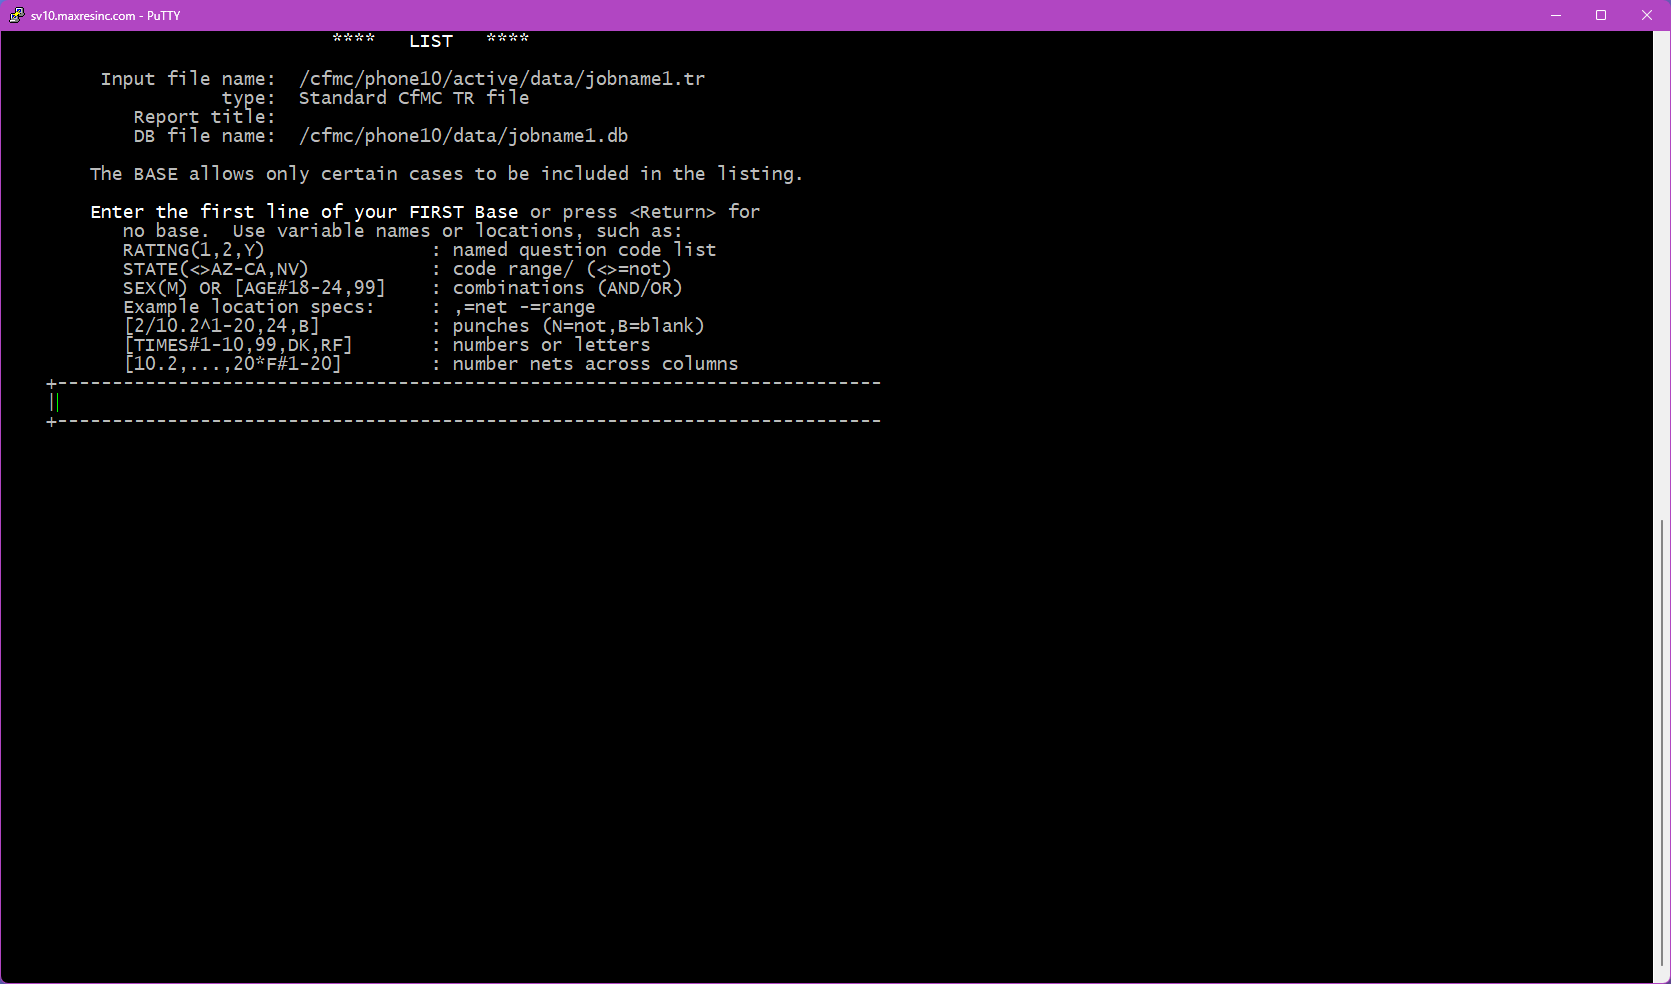
Step 4B -- Base Entry (if B was selected)
Enter the base (select condition) you want to apply. Only records matching this condition will appear in your list output. For guidance on building base conditions, refer to:
- LINK: Data Variable Bases article (coming soon)
- LINK: Sample Variable Bases / Select Statements article (coming soon)
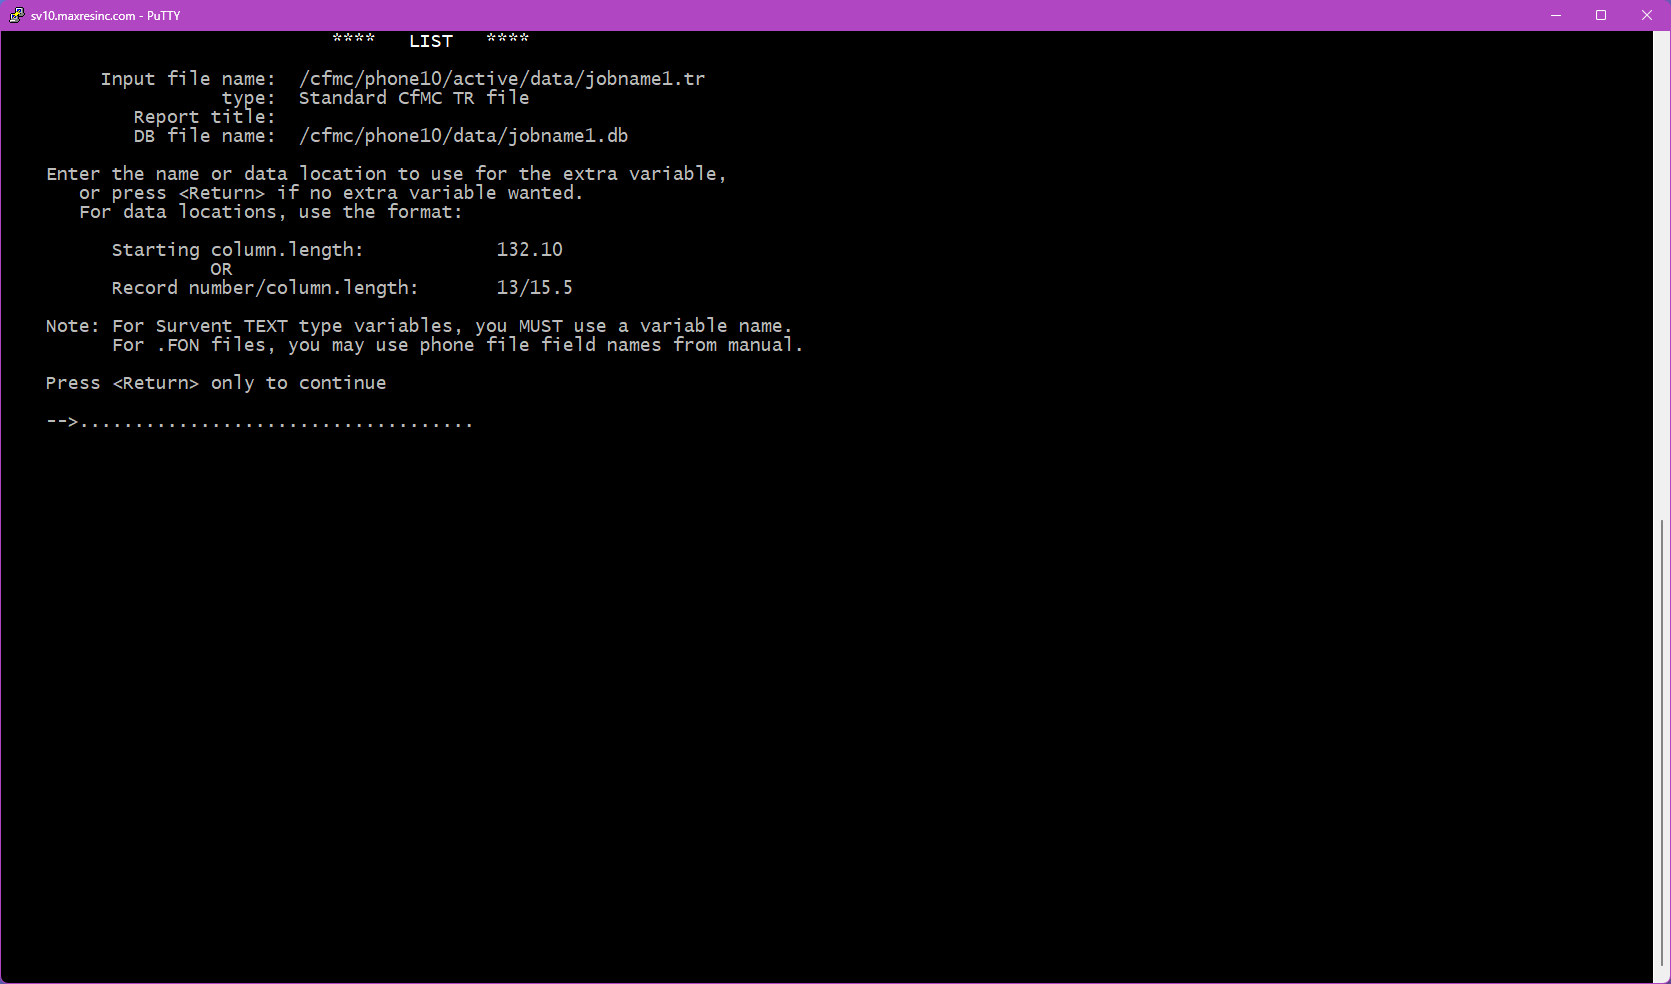
Step 4C -- Extra Variable Entry (if V was selected)
Enter a single variable label or data location to include as an extra column alongside your list output. Only one extra variable can be specified.
Example use case: You are listing all open end responses, but you also want to see the interviewer ID (intv) attached to each response for QC purposes.
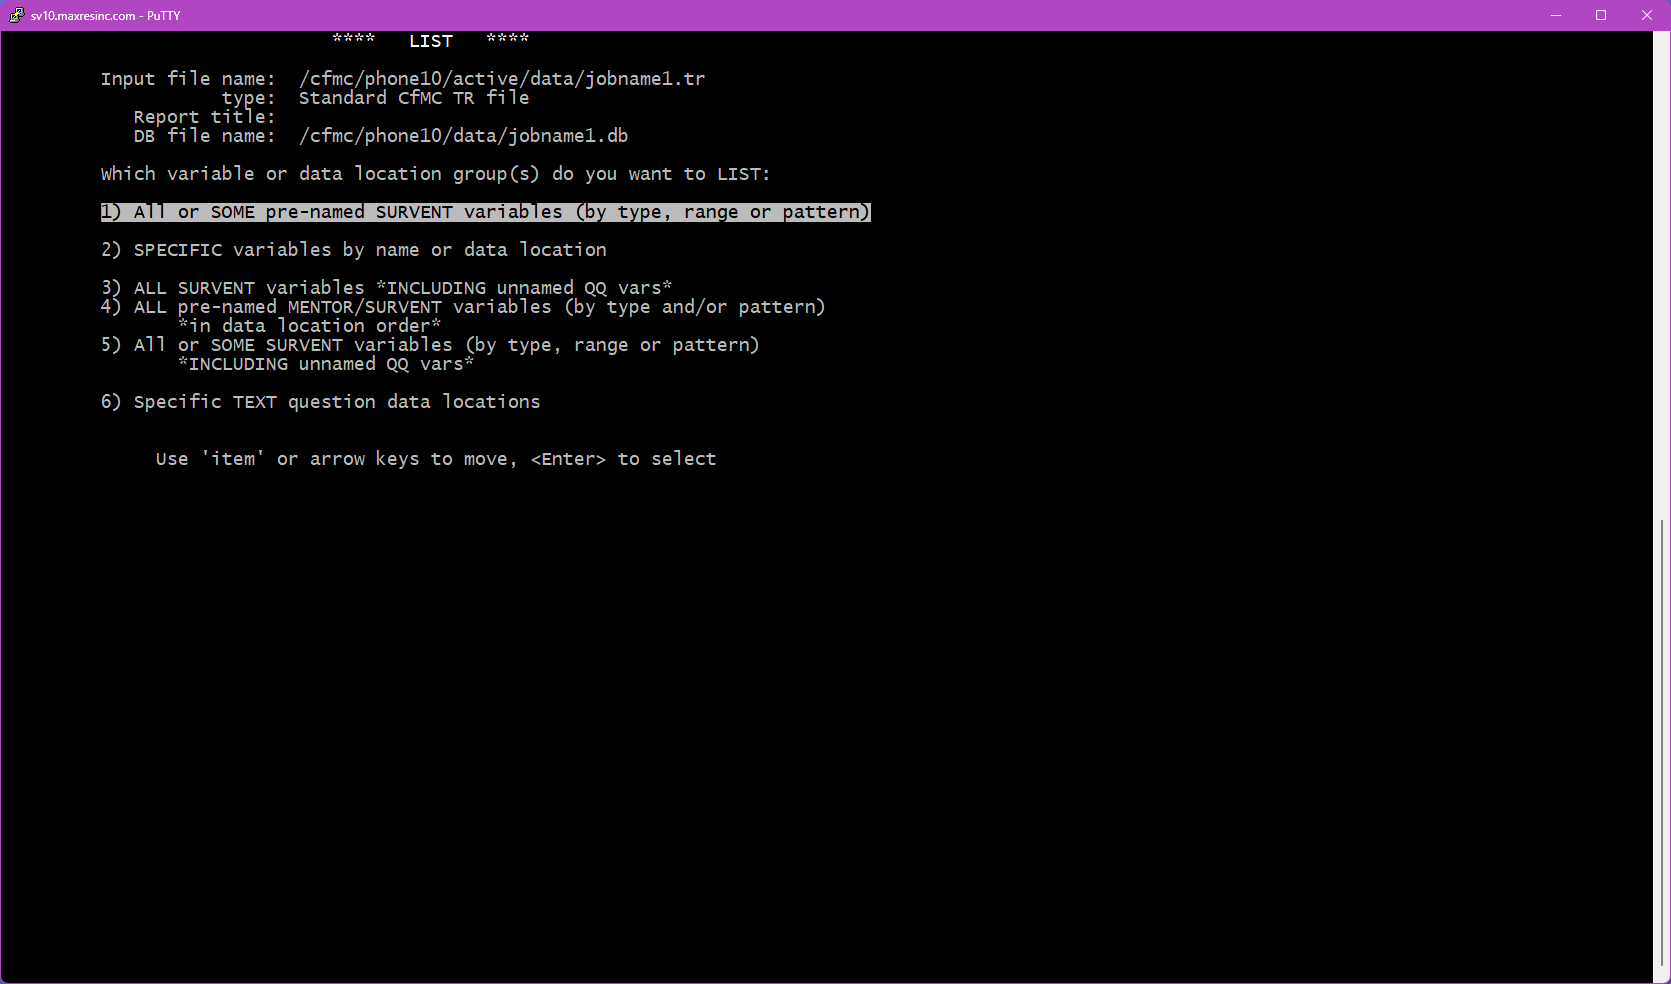
Step 5 -- What to List
This screen asks what variables you want included in your list. This screen only appears if you are using a .db file. If no .db file is in use, you will only be able to specify raw data locations.
The two options used in practice are:
- Option 1 -- All or Some Pre-Named Variables: Lists all variables, or a filtered subset by type (open ends only, closed ends only, etc.). Takes you to Steps 5B and 5D.
- Option 2 -- Specific Variables: Allows you to manually specify up to 10 individual variable labels or data locations. Takes you to Step 5C.
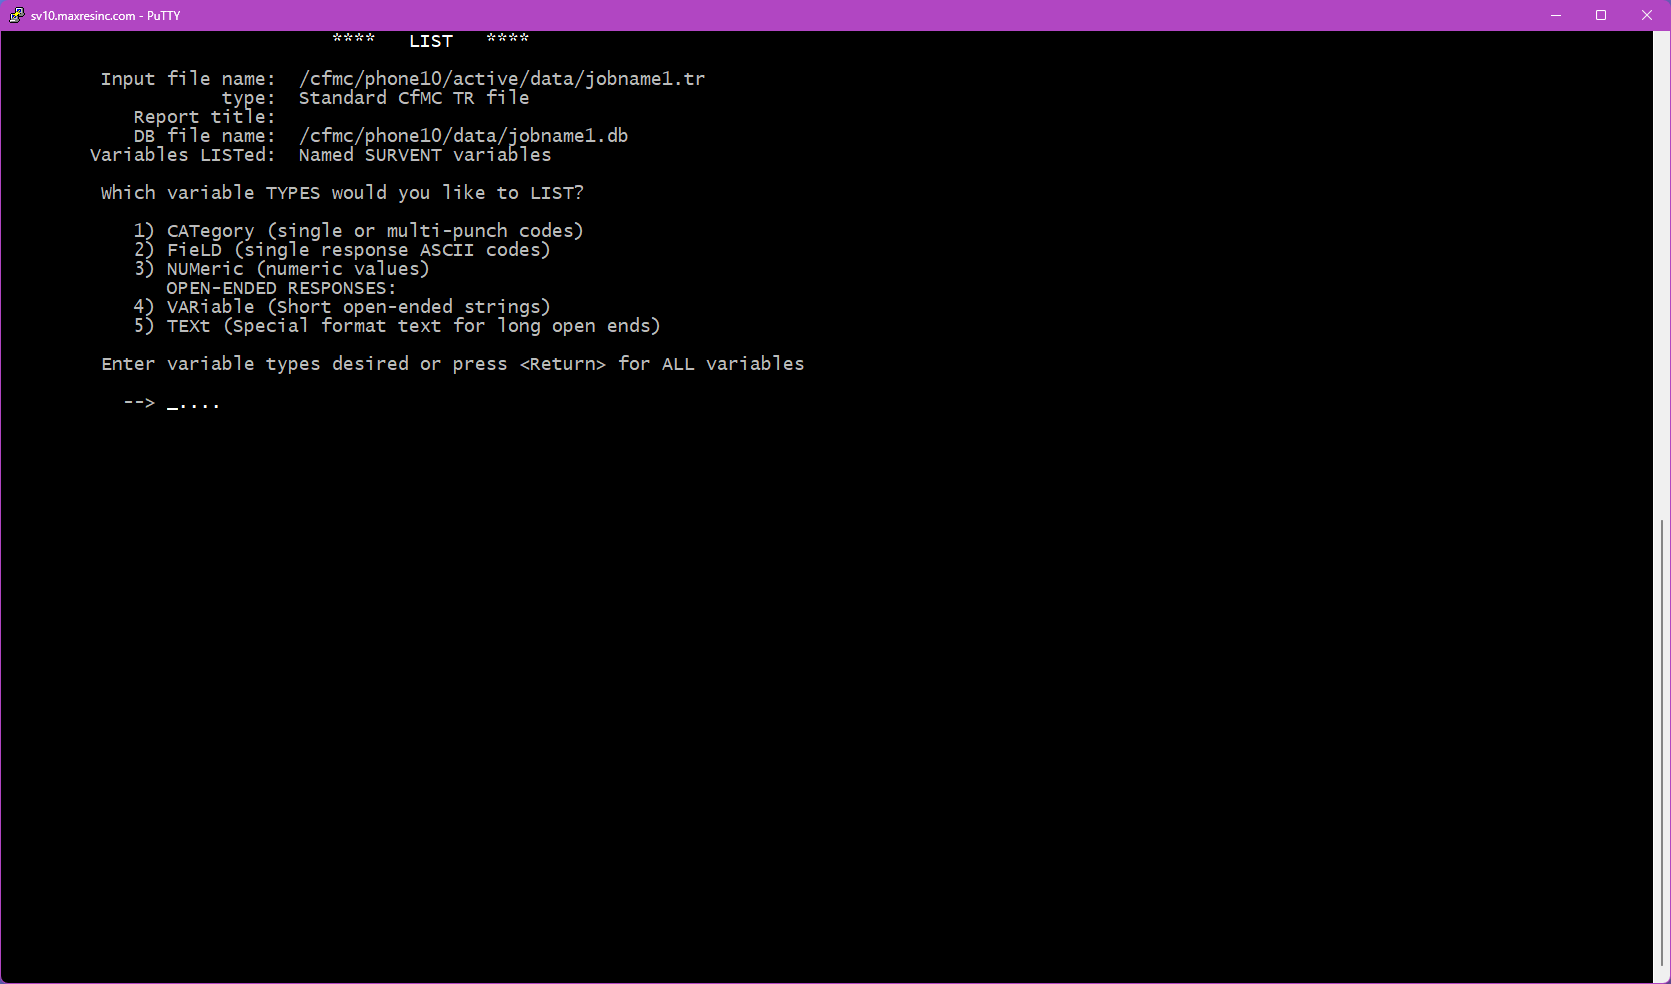
Step 5B -- Select Variable Types (if Option 1 was selected)
Press <Enter> without entering a code to return all available variables. Or enter one or more codes to filter by type:
- 1 -- CAT: No longer used in Survox 10. Selecting this will return no data.
- 2 -- List/Closed End: Single-response questions -- gender, yes/no, rating scales, hospital lists, etc.
- 3 -- Numeric: Numeric answer fields -- age, date of birth, percentage scales, etc.
- 4 -- Short Text / Variables: Short text fields -- name, address, sample data, and system variables like
date,intv,ipaddress. - 5 -- Open End: Long-form verbatim responses.
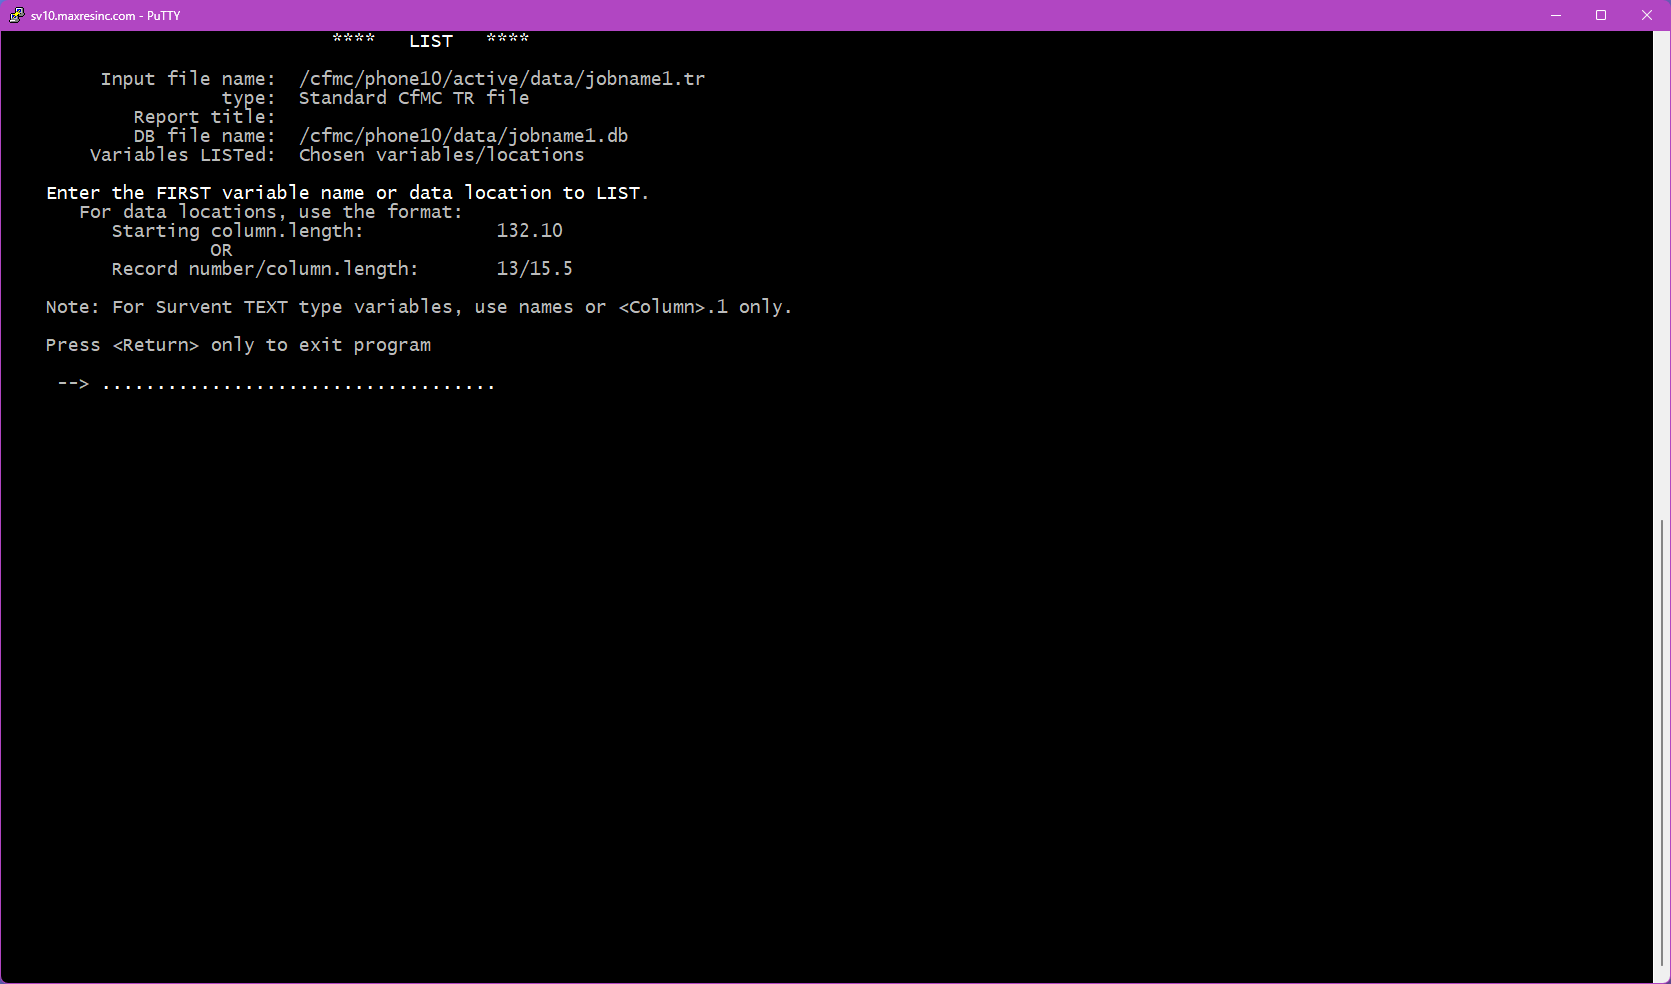
Step 5C -- Specific Variable Entry (if Option 2 was selected)
You will be prompted to enter variables one at a time, up to 10. After entering the second variable, an additional prompt will appear asking if you want to apply a secondary base specifically for that variable. Press <Enter> to skip and use the main base from Step 4. Each variable can have its own independent base, though this is rarely needed for list output.
Step 5D -- Subset the Variable List (if Option 1 was selected)
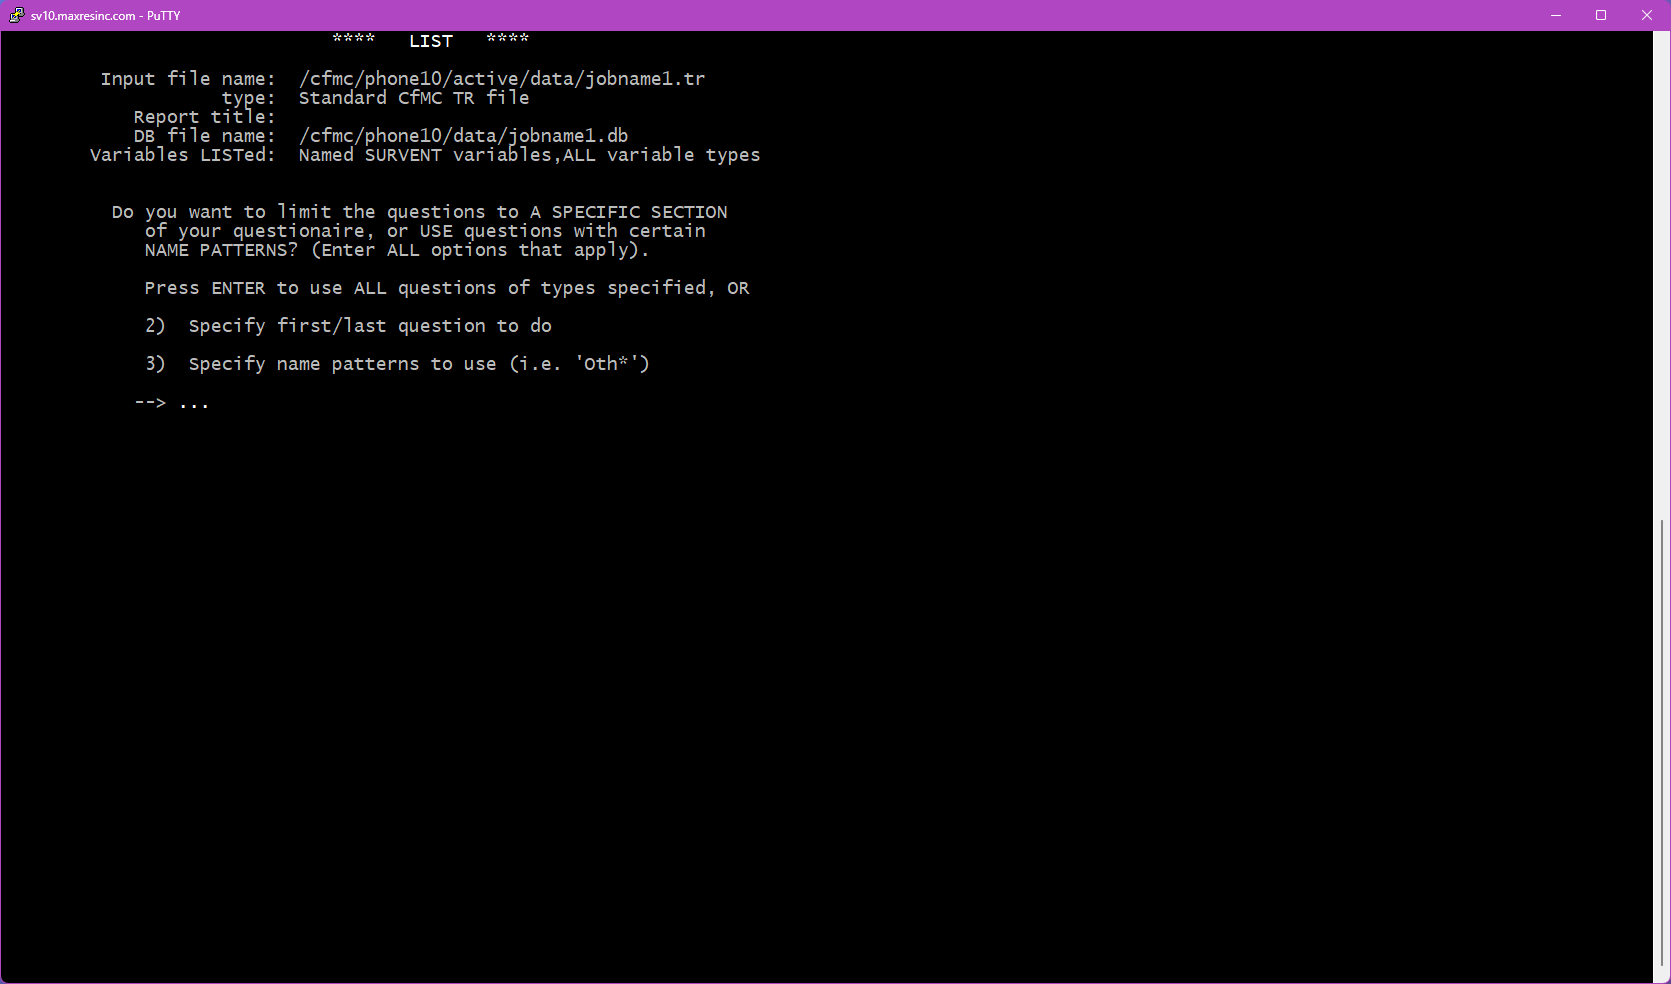
This screen asks if you want to narrow down which variables are included in the output. Three options are available:
- <Enter> -- All: Returns all variables of the selected type(s). No further filtering.
- Option 2 -- Range: Specify a starting and stopping variable. You can use the built-in markers
FirstQandLastQto limit output to actual survey questions only, omitting sample and system variables. - Option 3 -- Pattern Match: Filter by a naming pattern using the
*wildcard. Examples:*_os-- returns only Other Specify fieldss_*-- returns only sample variables
*wildcard is required when using this option.
Step 6 -- By Variable or By Record?
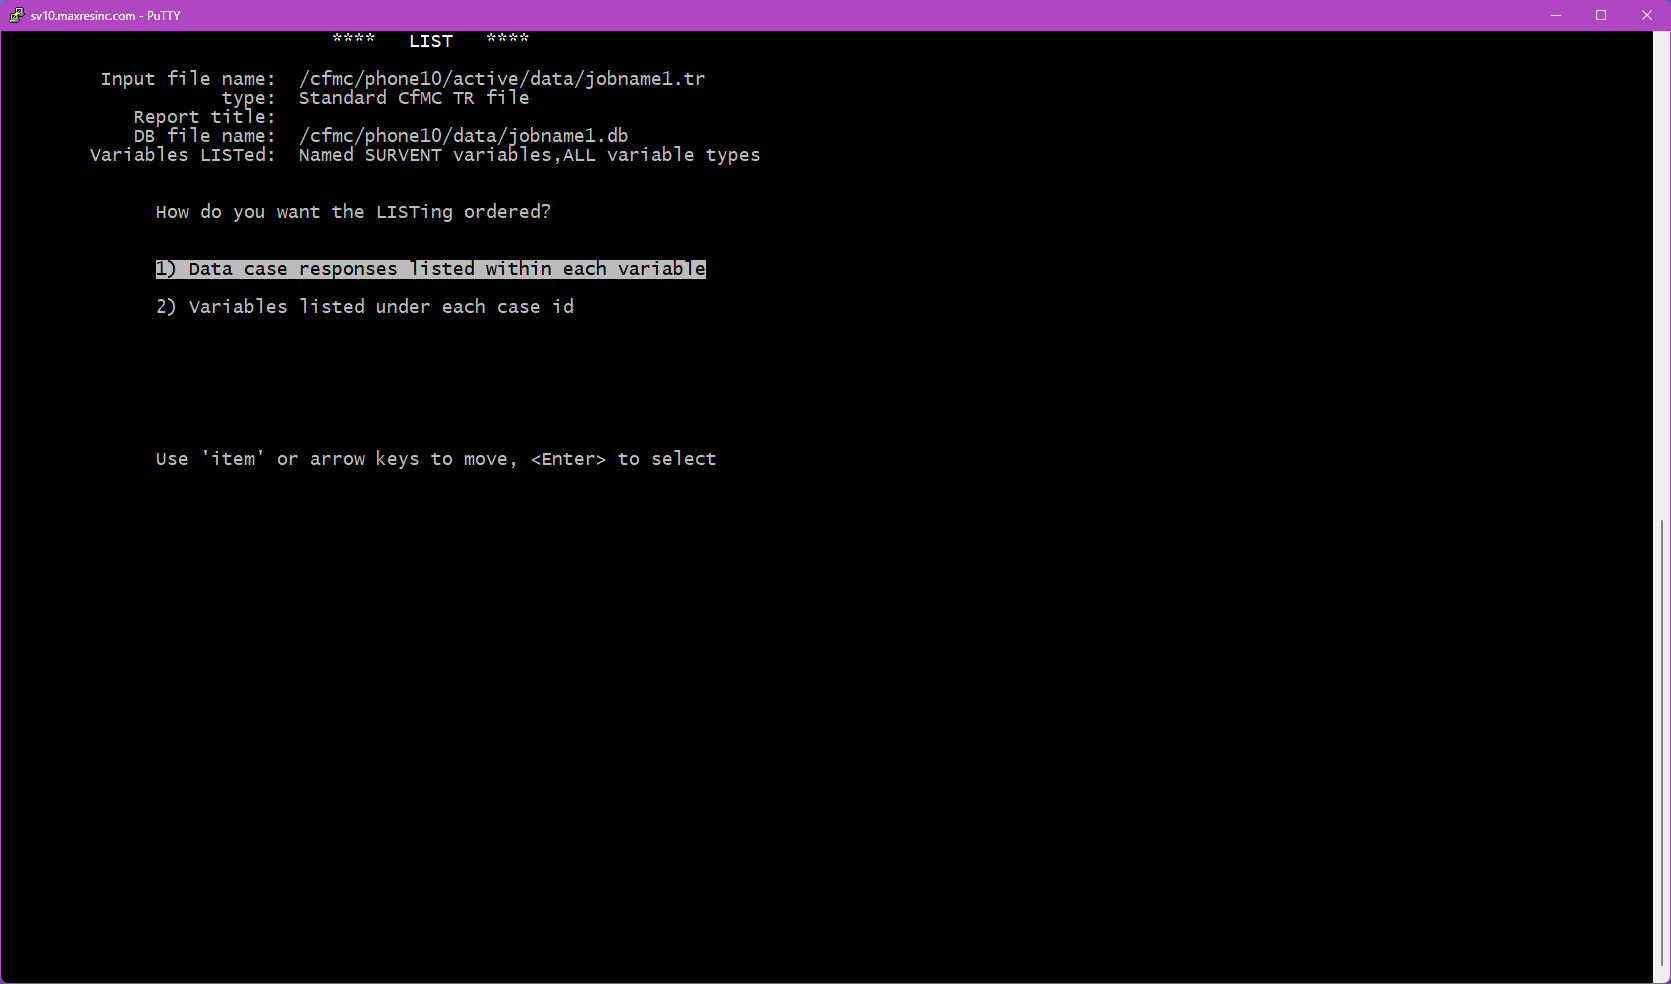
This screen asks how you want the output organized:
- Option 1 -- By Variable: All records grouped together under each variable, one variable at a time. Best used when reviewing open end responses, or stepping through a set of questions one at a time for QC or coding work.
- Option 2 -- By Record: All selected variables shown for one case at a time before moving to the next. Best used when you need to view a full survey record question by question -- for example, reviewing a specific respondent's complete interview. Note that if you need this data in spreadsheet form, pulling it from rundata or a reformatting tool is generally more efficient.
Step 7 -- Output Format
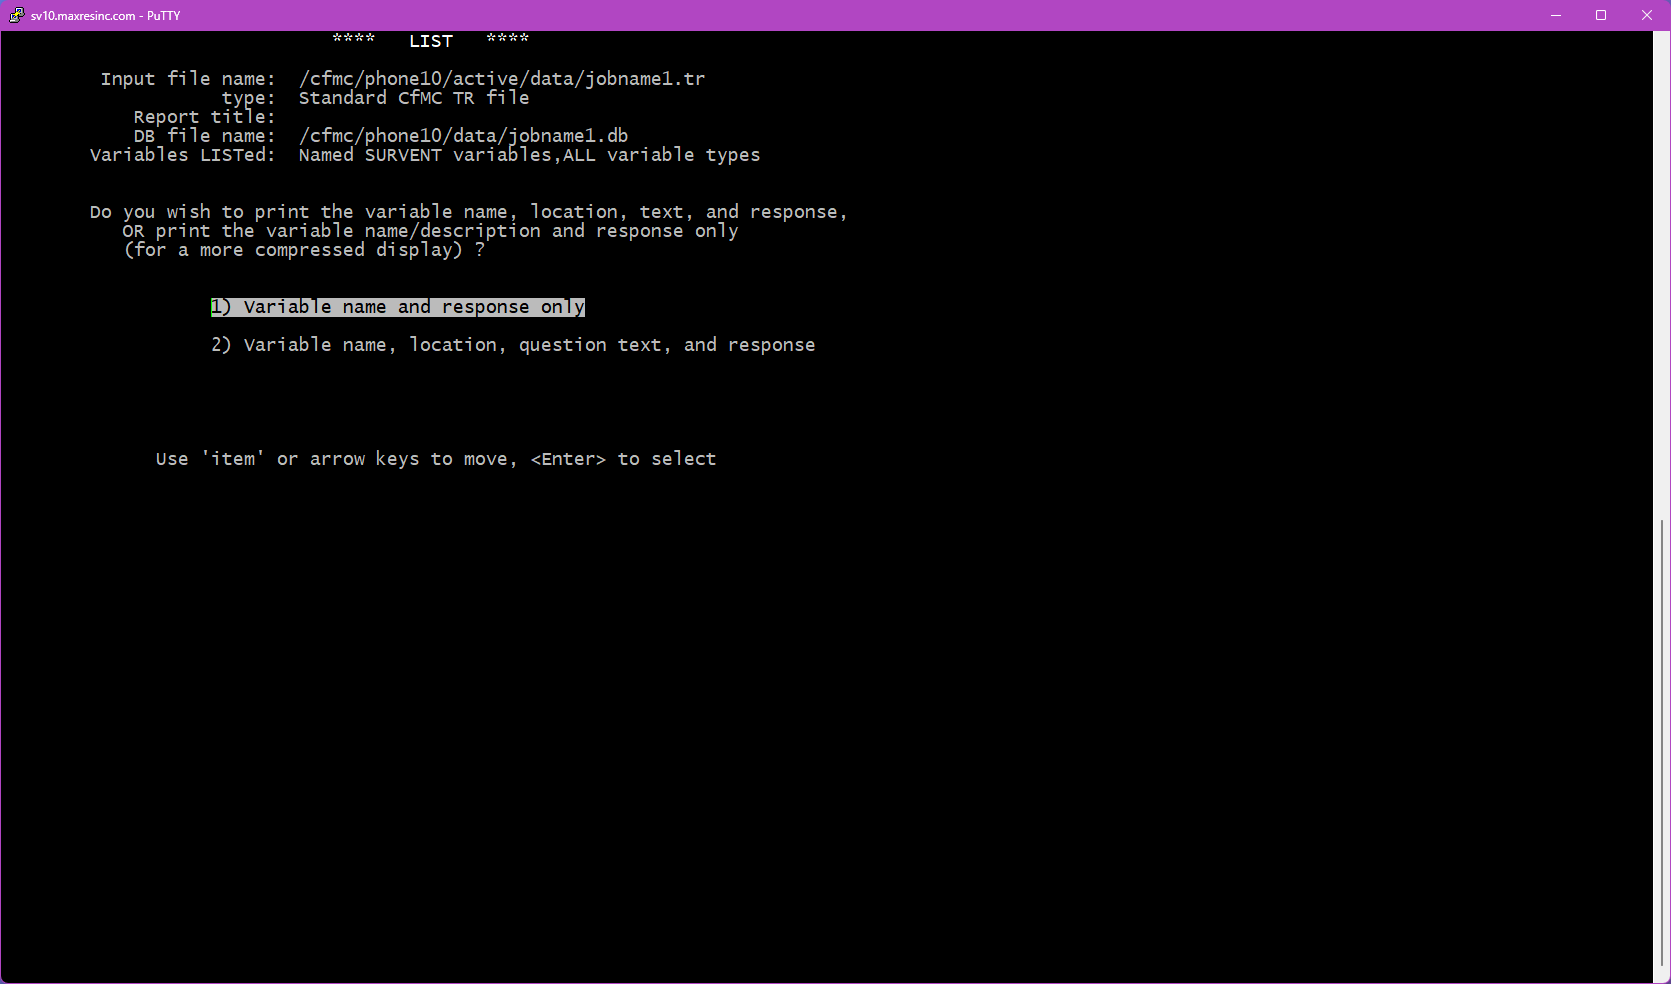
This screen controls how much detail is shown for each item in the output:
- Option 1 -- Label and Response Only: The standard format. Shows the variable name and the recorded response. Use this in most situations.
- Option 2 -- Question Text, Label, and Response: Also includes the full question text above each variable. Most useful when listing open ends by variable (Option 1 from Step 6), as it provides visual context for QC and coding review.
Step 8 -- Output File Name
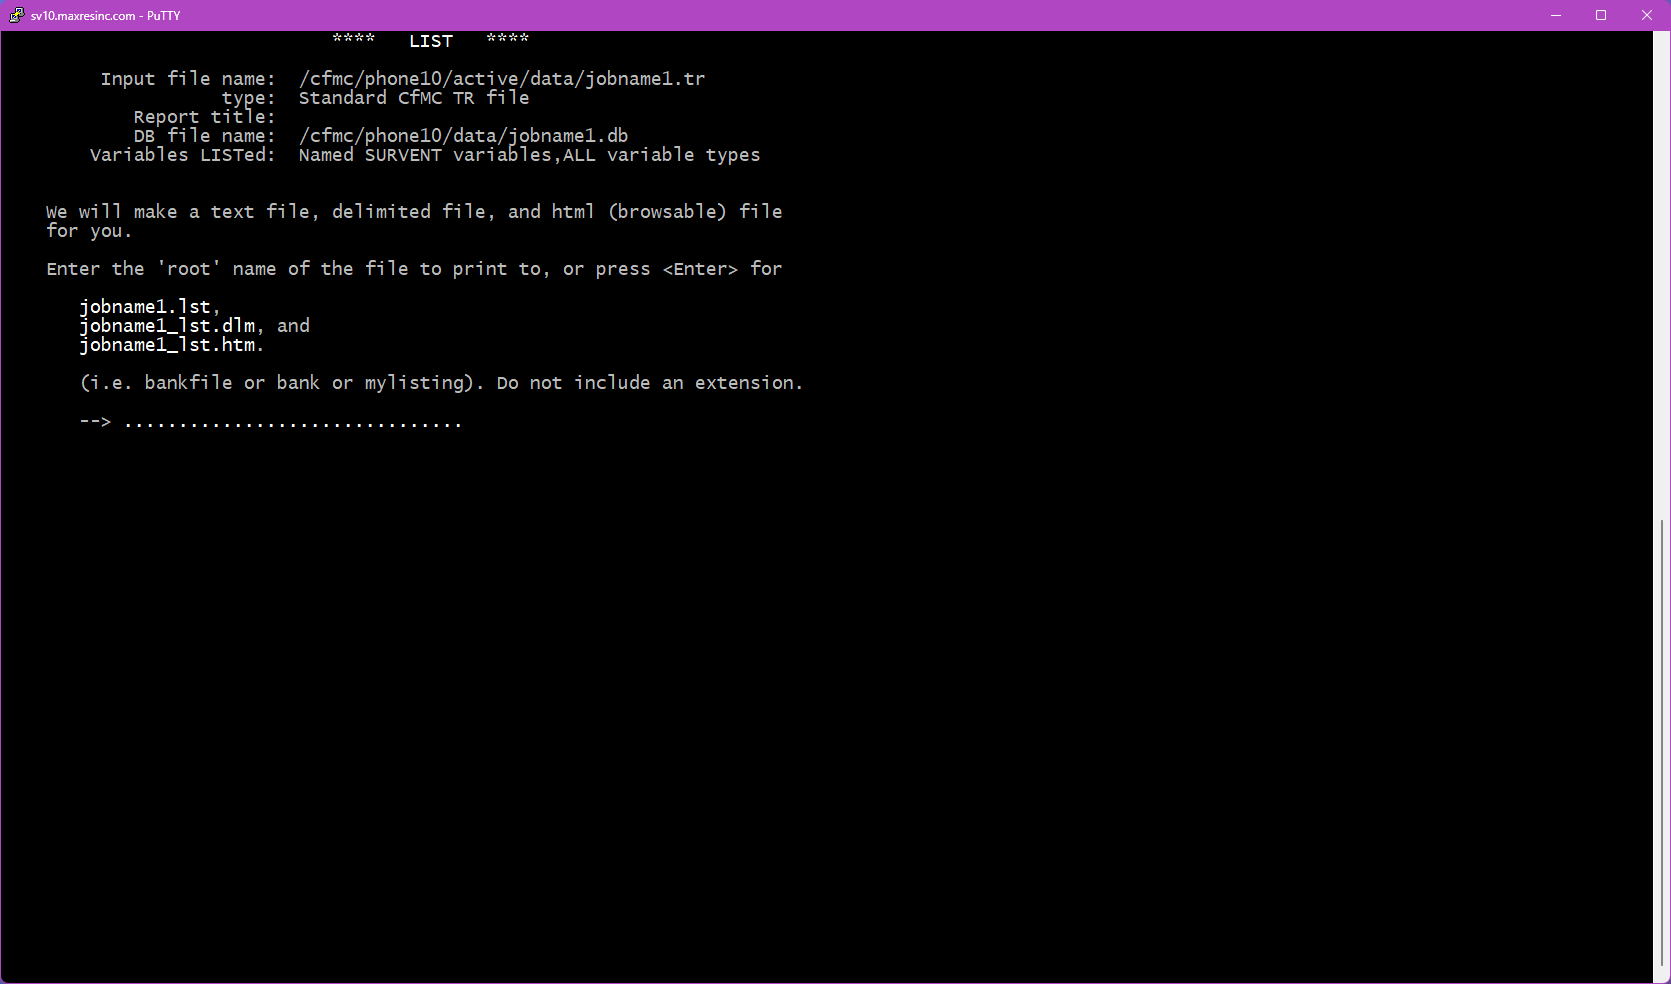
Enter a name for the output file, or press <Enter> to accept the default (jobname1.lst). The output file will be saved in the directory you are currently in.
Step 9 -- Final Confirmation and Run
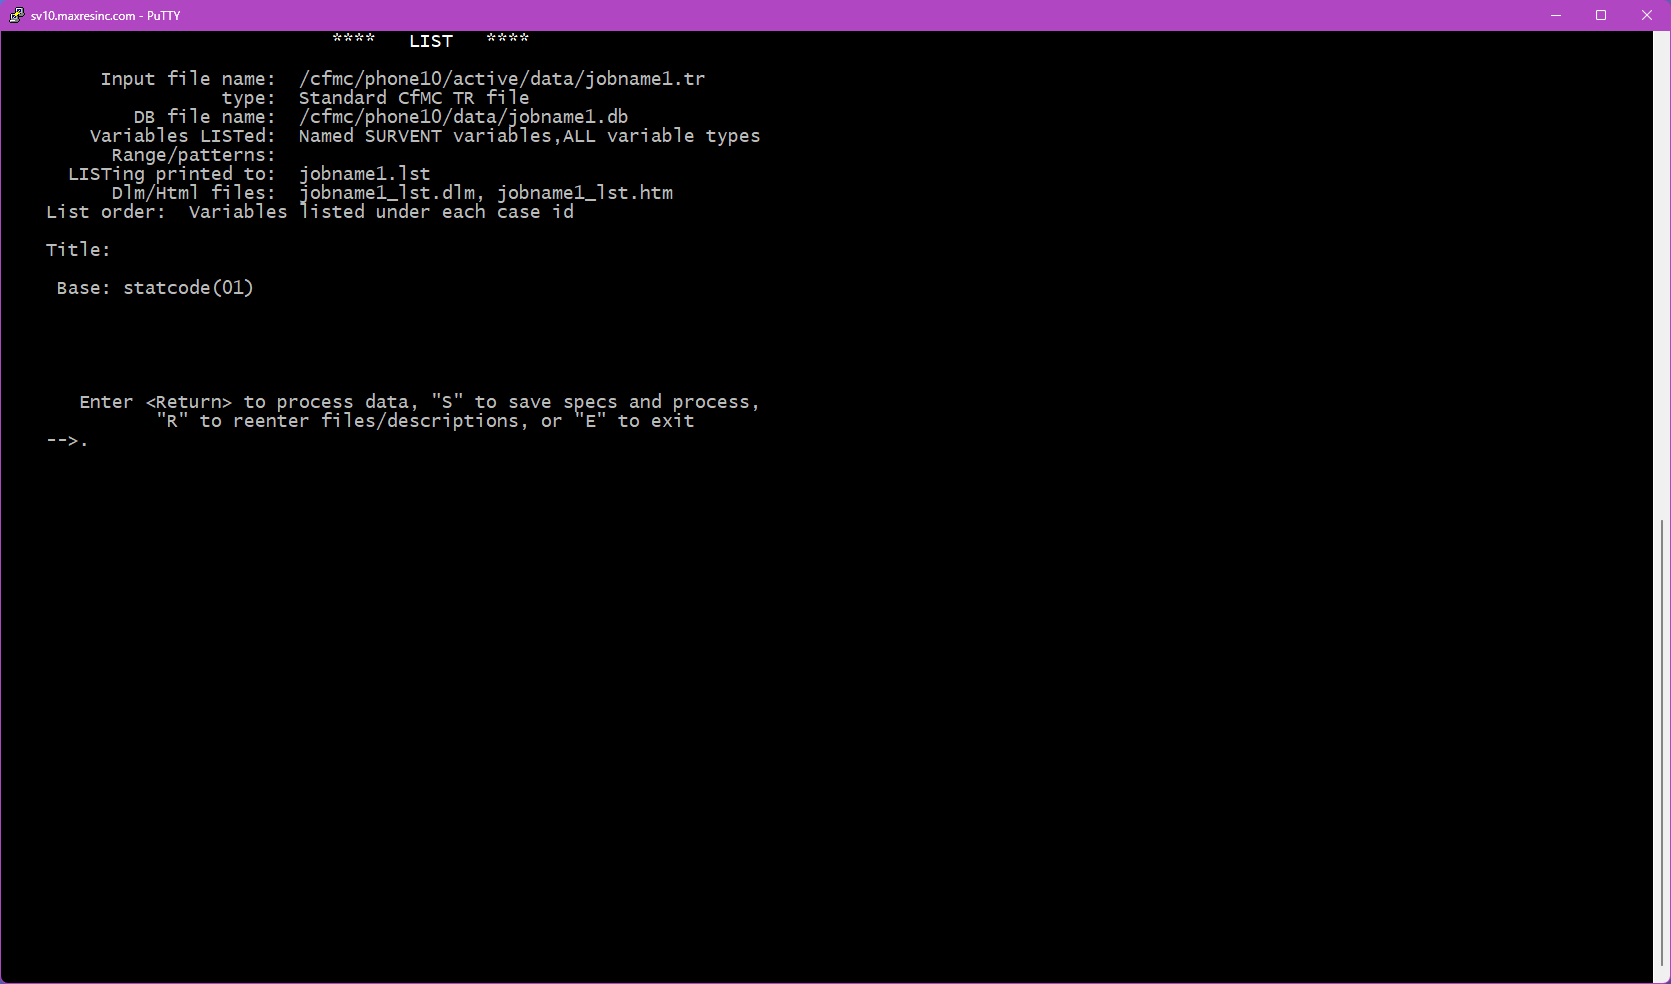
This screen displays a summary of everything you have configured -- the file being read, whether a .db file is in use, the base (if any), the variables or types selected, and the output format. Review the summary, then press <Enter> to run the list.
Saving Your Settings for Later (SPX File)
Before pressing <Enter> to run, you have the option to save all of your current settings as a reusable file. Instead of just pressing Enter, type a filename with an .spx extension -- for example:
jobname1_openends.spxThis saves all your LIST configuration options to that file. To rerun the exact same list in the future, navigate to the same directory and run:
m2 jobname1_openends.spxThis is especially useful for lists that are complex to configure, or that will be run repeatedly throughout the life of a project.
Video Demonstrations
The following short demos walk through two common LIST use cases from start to finish.
Demo 1 -- All Completes, By Case ID, Survey Data Only
This demo shows how to run a list of all completed interviews, outputting only the actual survey questions (using FirstQ / LastQ to exclude sample and system variables), organized by record (By Case ID).
Demo 2 -- All Sample Variables, By Variable, No Base
This demo shows how to run a list of all sample variables across all records, with no base applied, organized by variable.
Demo 3 -- Open Ends Grouped by Question, with INTV shown
This demo shows how to run a list of all open ends, by caseID, with an Extra Variable of the INTV. It will show two methods, one is raw and the other is a cleaned up version.
Troubleshooting / Common Issues
Output file is empty or contains no records
The most common cause is a base (Step 4B) that returned zero matching records. Double-check your select condition for typos or logic errors. Also verify that the data file you specified actually contains records -- running LIST against an empty or partially built file will produce no output.
Confirm that you are using the * wildcard in your pattern. Without it, the system looks for an exact match rather than a pattern. For example, use *_os not _os.
Variable names are not recognized
This means LIST is running without a .db file, or the wrong .db file was specified. Return to Step 2 and confirm the correct .db file path. Remember -- do not include the .db extension when entering the path in Step 2B.
File not found error at Step 1B
The file path or filename entered is incorrect, or the file does not exist in the current directory. Verify the exact filename and extension, and confirm your current working directory with pwd. If the file is in a different location, provide the full path or navigate there first.
No data returned when selecting CAT (Option 1) in Step 5B
CAT-type questions no longer exist in Survox 10. Selecting this option will always return no data. Use the appropriate question type instead (closed end, open end, etc.).
Data values look incorrect or misaligned
If the data in your list output does not appear to match what you expect -- wrong values, shifted responses, or variables that don't line up -- the most likely cause is an outdated .db file. If the study's questionnaire has been modified since the .db file was last generated, the variable definitions will be out of sync with the actual data. Regenerate the .db file for the study and rerun the list.
How To - Survox SCAN Utility
Overview
SCAN is a built-in Survox utility used to generate frequency tables from survey data, directly from the command line via PuTTY. Think of it as Survox's equivalent of an Excel pivot table -- it counts how many respondents gave each answer to a question, and can break those counts down across groups (called banners), such as party affiliation by gender.
SCAN reads data files or fone files and produces frequency tables showing the count (and optionally, percentage) of responses for each answer in a question. Results can be presented overall, or broken out by a banner variable for cross-tabulation. Additional options allow for weighting, statistics, and customized formatting.
SCAN is run from the PuTTY command line:
scan <enter>Step-by-Step Instructions
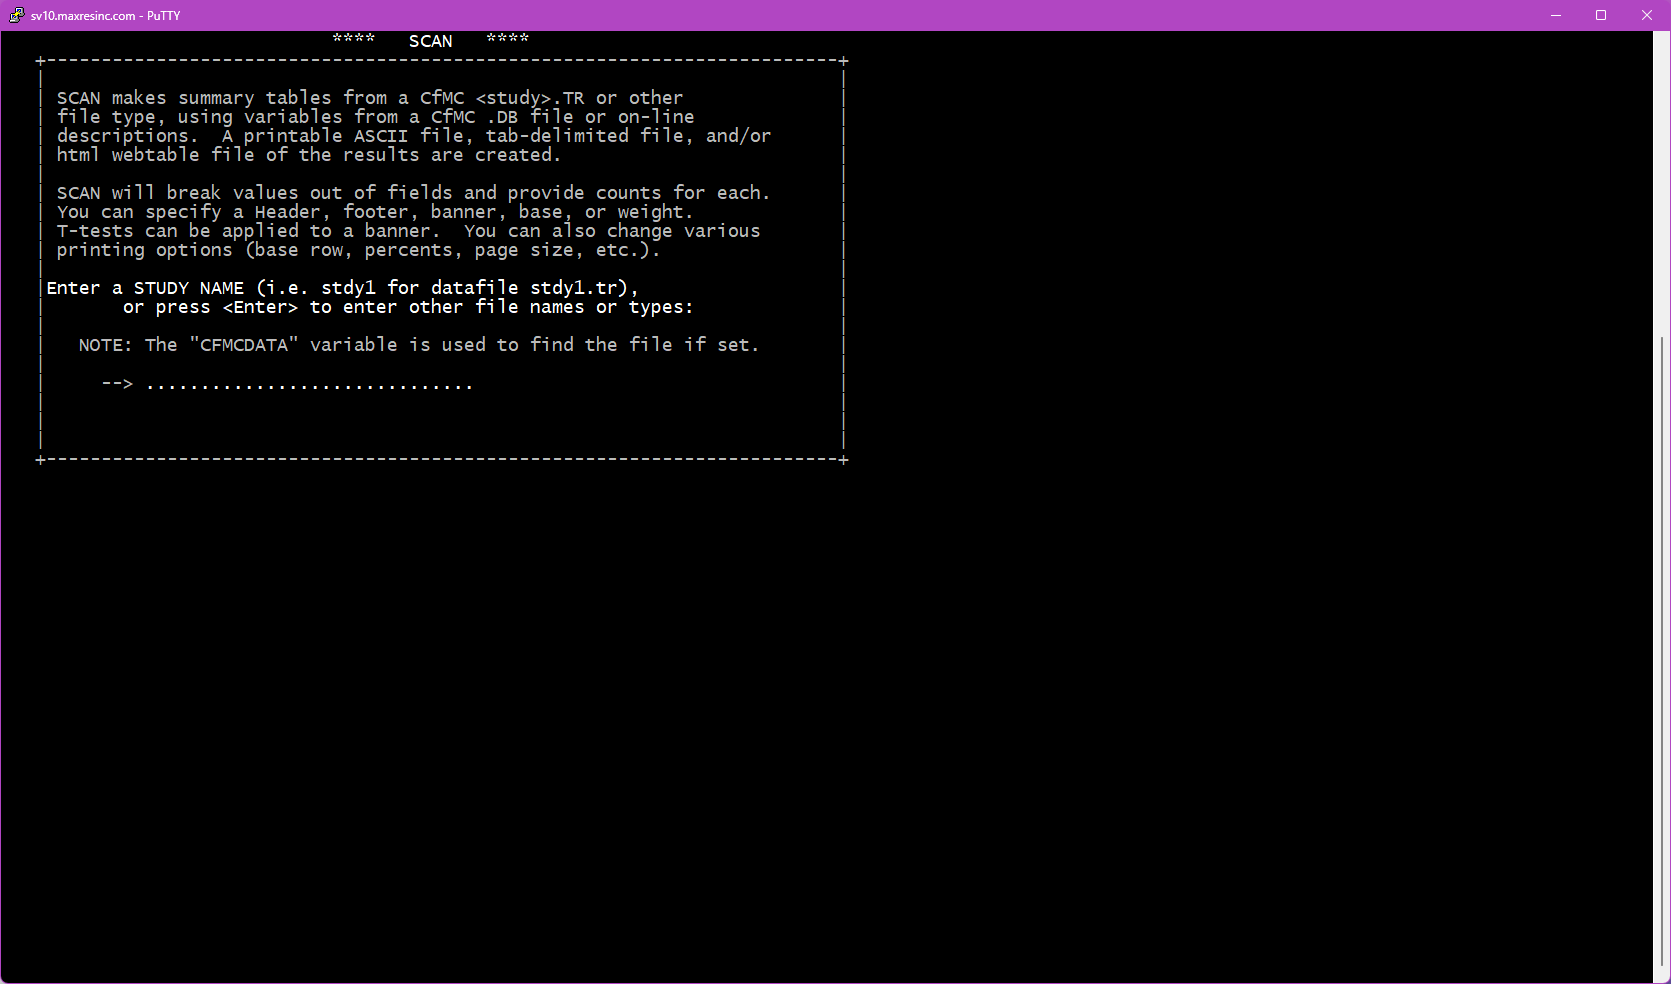
Step 1 -- Specify the Data File
The first screen asks for a datafile name. By default, SCAN looks in the $CFMC/data folder for whatever filename you enter here.
- If you want the main data file for the project (located in
$CFMC/data), type the jobname / datafile name and press Enter. - If you want any other file (a subset file, coded file, fone file, etc.) -- or if you are already in a different directory -- leave this screen blank and press Enter. This will take you to Steps 1B and 1C.
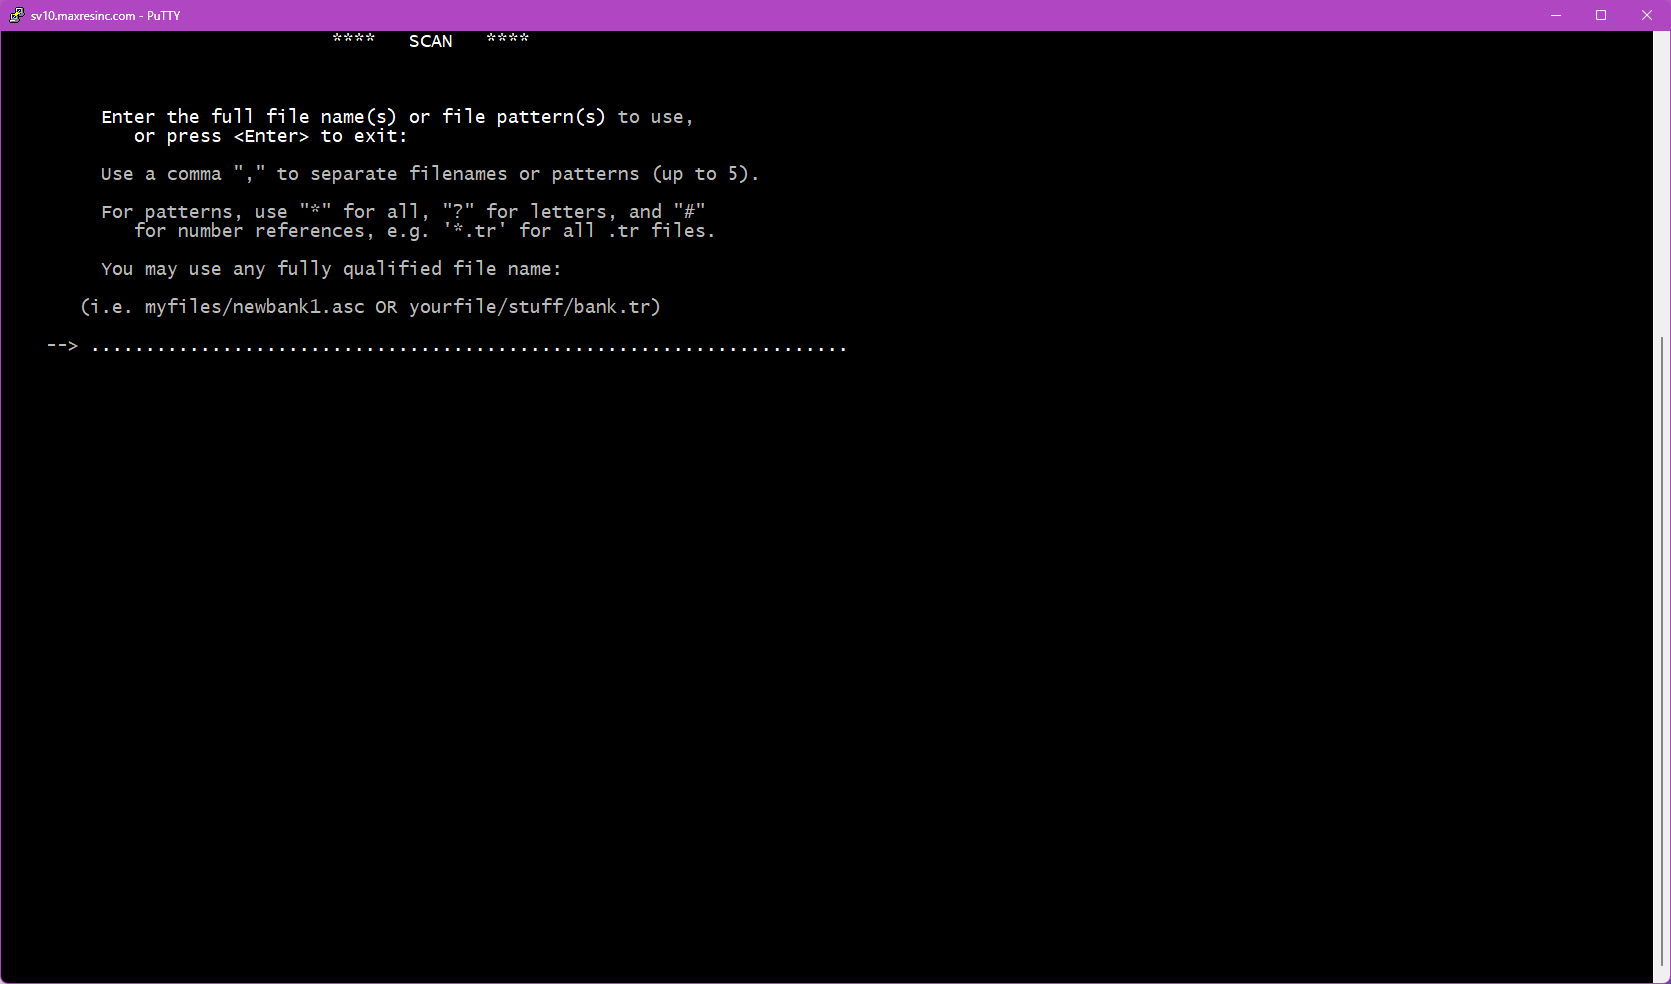
Step 1B -- Specify an Alternate File (if Step 1 was left blank)
If you left Step 1 blank, this screen asks you to provide the full filename of the file you want to scan. Unlike Step 1, you must include the file extension here.
jobname1.tr
jobname1.fon
jobname1_subset.tr
Important: If the file is not located in the directory you are currently in, you must either provide the full path to the file, or press Enter again at the next prompt to quit out, navigate to the correct directory, and relaunch SCAN.
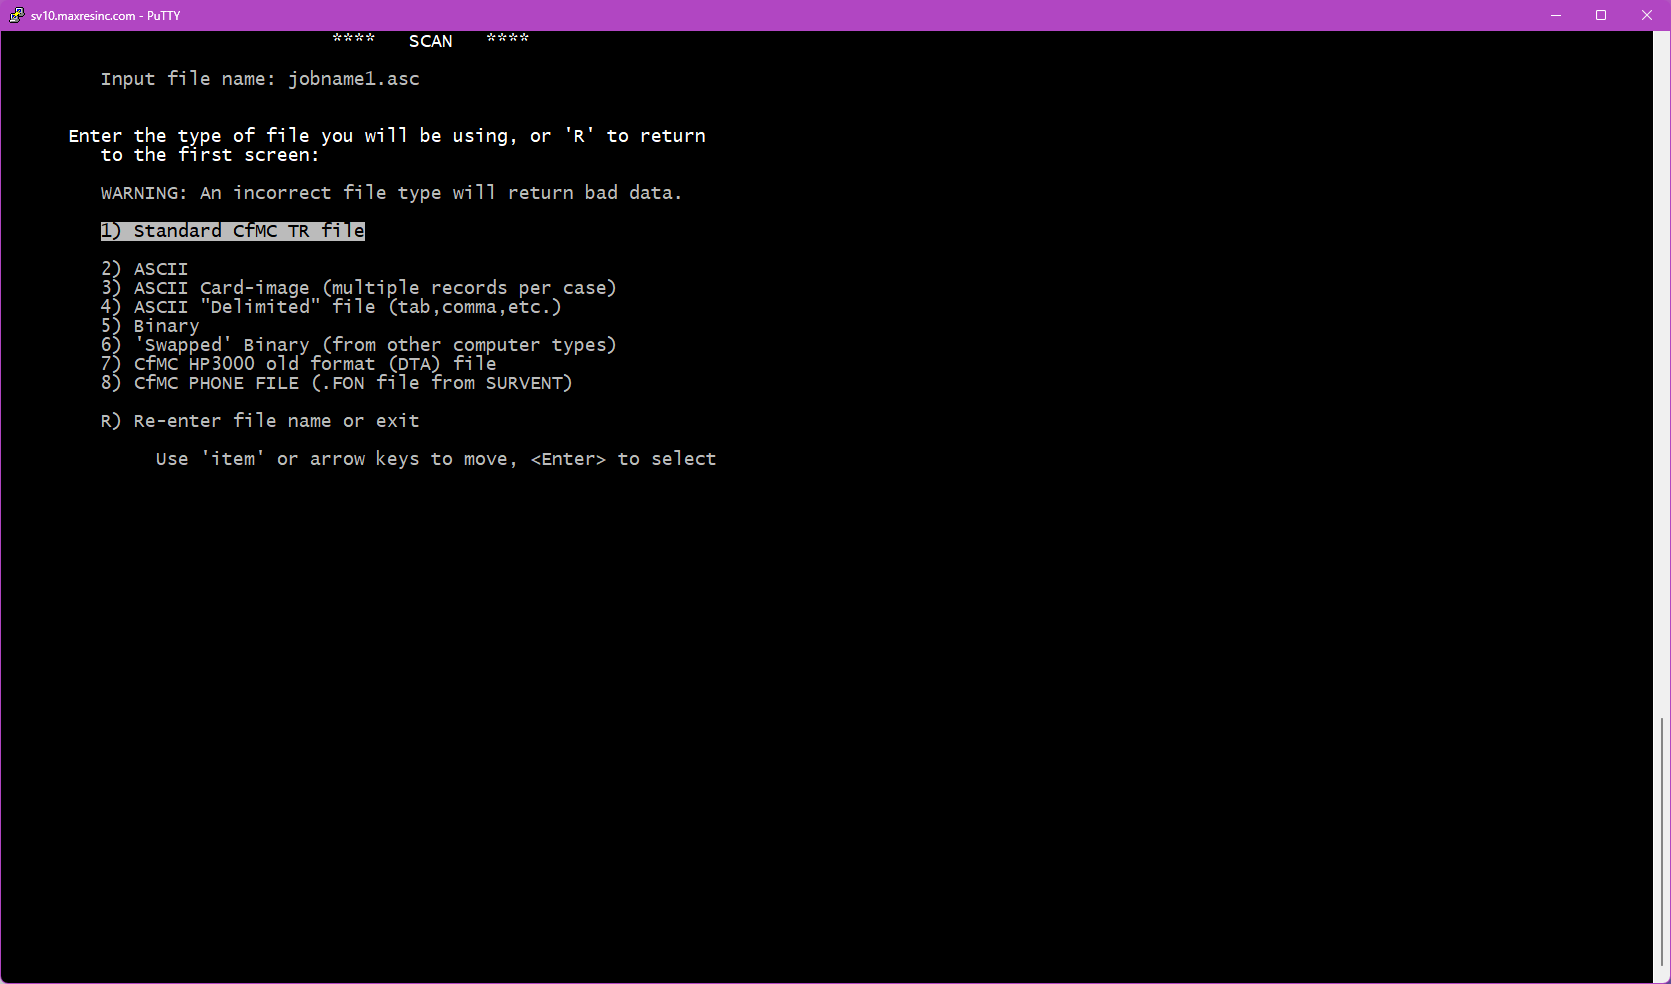
Step 1C -- Specify the File Type (if Step 1 was left blank)
If the file you specified in Step 1B is not a .tr datafile, this screen will appear and ask you to identify the file type so the software knows how to load it. The two most commonly used options are:
- Option 2 -- ASCII file (use for subset files, coded files, etc.)
- Option 8 -- Fone file (use for
.fonsample files)
Note: This screen does not appear if the file entered in Step 1B is a .tr file.
Step 2 -- Use a DB File?
This screen asks whether you want to use a .db file. A .db file contains the variable definitions for the study -- without it, you cannot reference variables by name (like statcode, date, intv, q1, etc.) and would need to know the exact data locations instead.
Important: If you are scanning an ASCII or fone file, answer N and press Enter. These file types cannot easily use a .db file.
If you specified a study name at Step 1, you will see three options:
- Y) Yes, use the
.dbfile found at the default location for this study. - N) No -- do not use a
.dbfile (variable names will not be available). - O) Yes, but load the
.dbfile from a different location.
If you loaded a file from Step 1B instead, the Y) option will not appear -- only N) and O) will be shown.
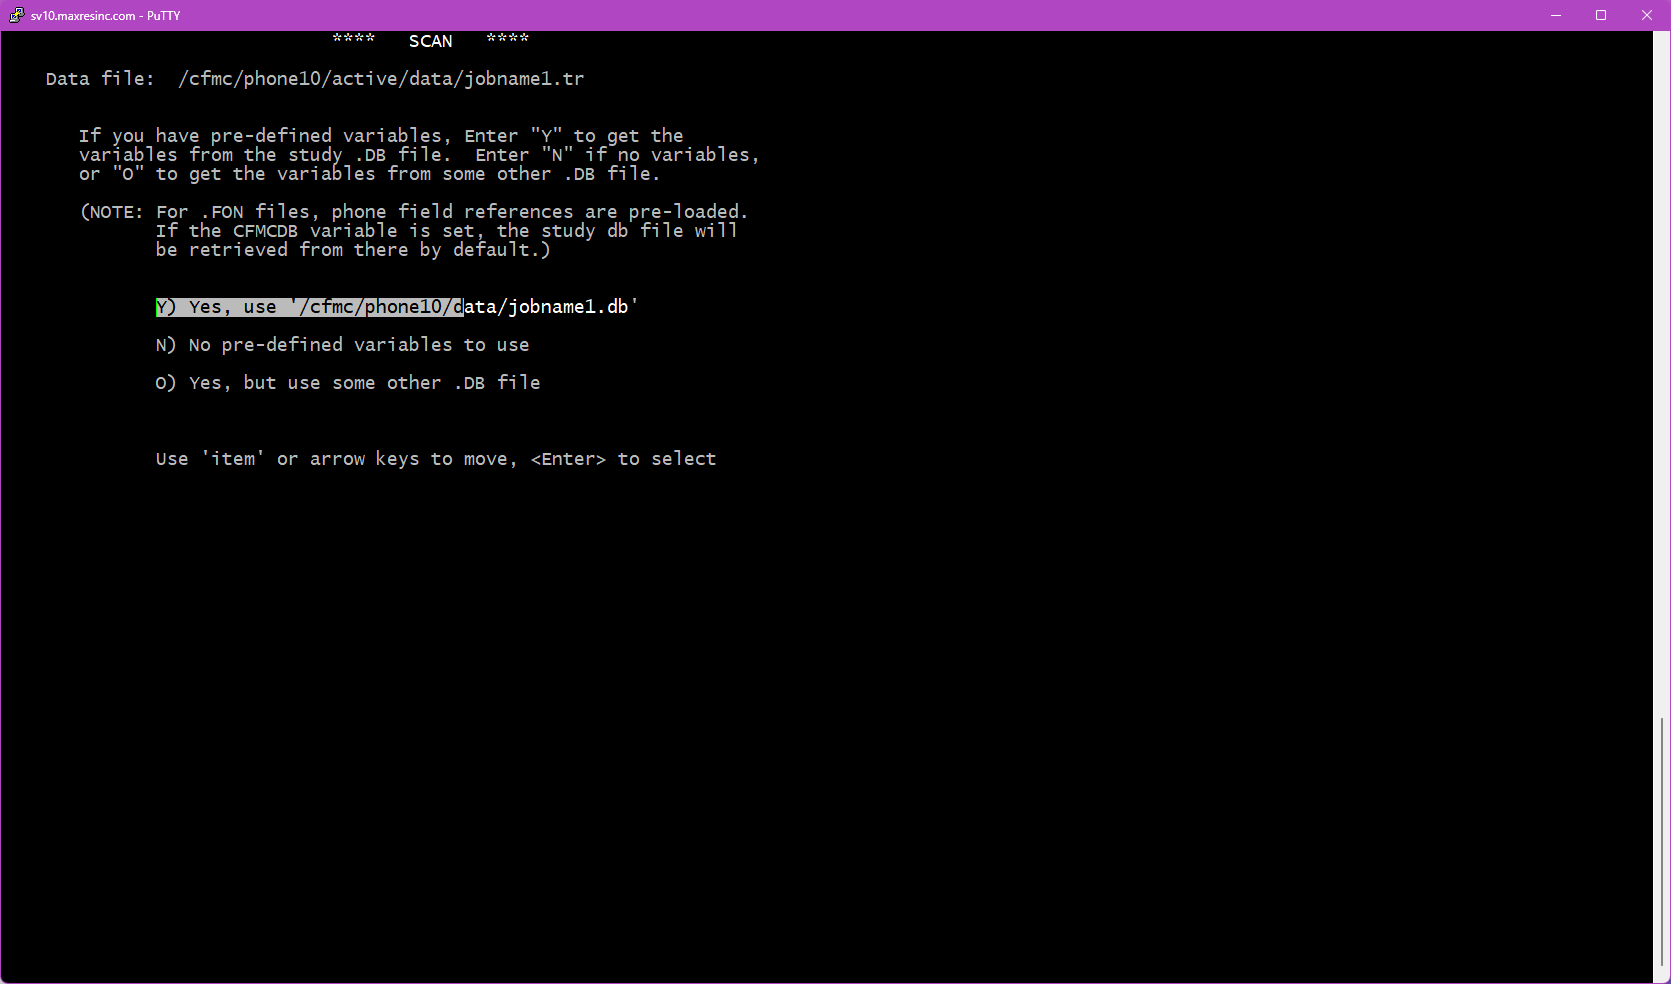
Step 2B -- Specify the DB File Location (if O was selected)
Enter the full path to the .db file you want to use. Do not include the .db extension -- the utility appends it automatically.
/cfmc/studies/phone/jobname1/jobname1

Step 3 -- SCAN Options
This is the main options screen -- the "guts" of the setup. From here you can configure how your tables will look and what additional data will be included. Each option you select will bring up its own sub-screen. You can select as many or as few options as needed.
Note: Selecting the FREQ option (3h) cannot be combined with most other options -- the one exception is the Base option (3c), which can be used together with FREQ.
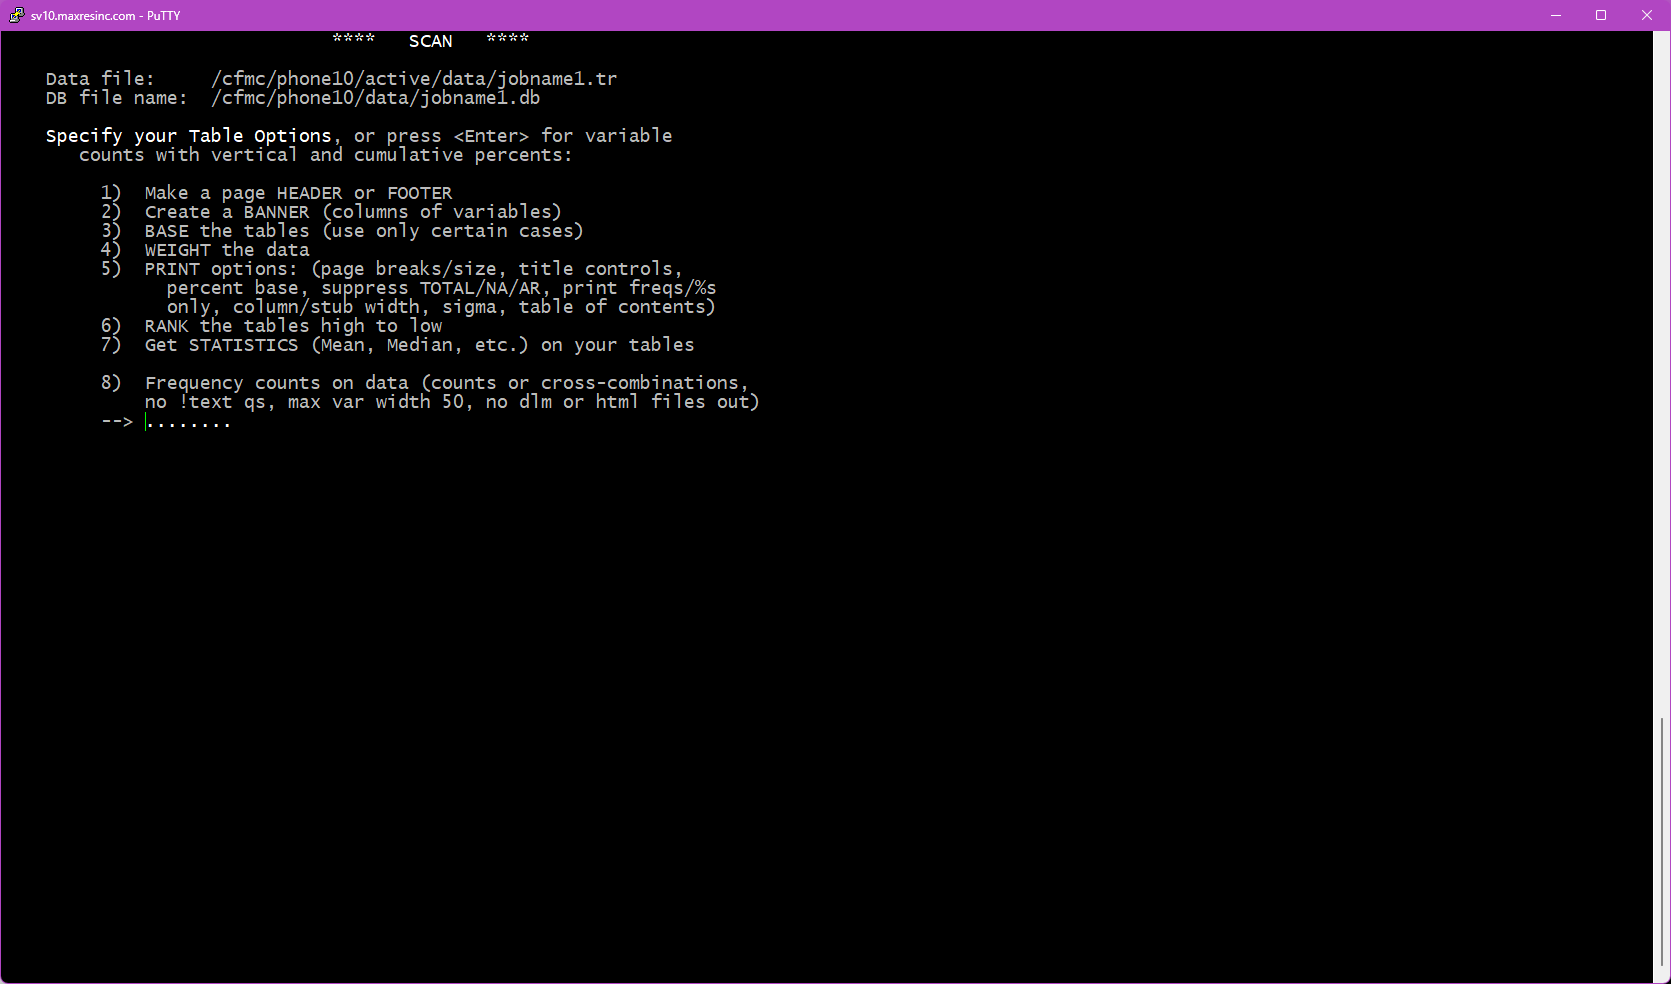
3a -- Add Header / Footer
Allows you to add a custom text header and/or footer to the output. Useful for labeling the output with the study name, date, or run description.
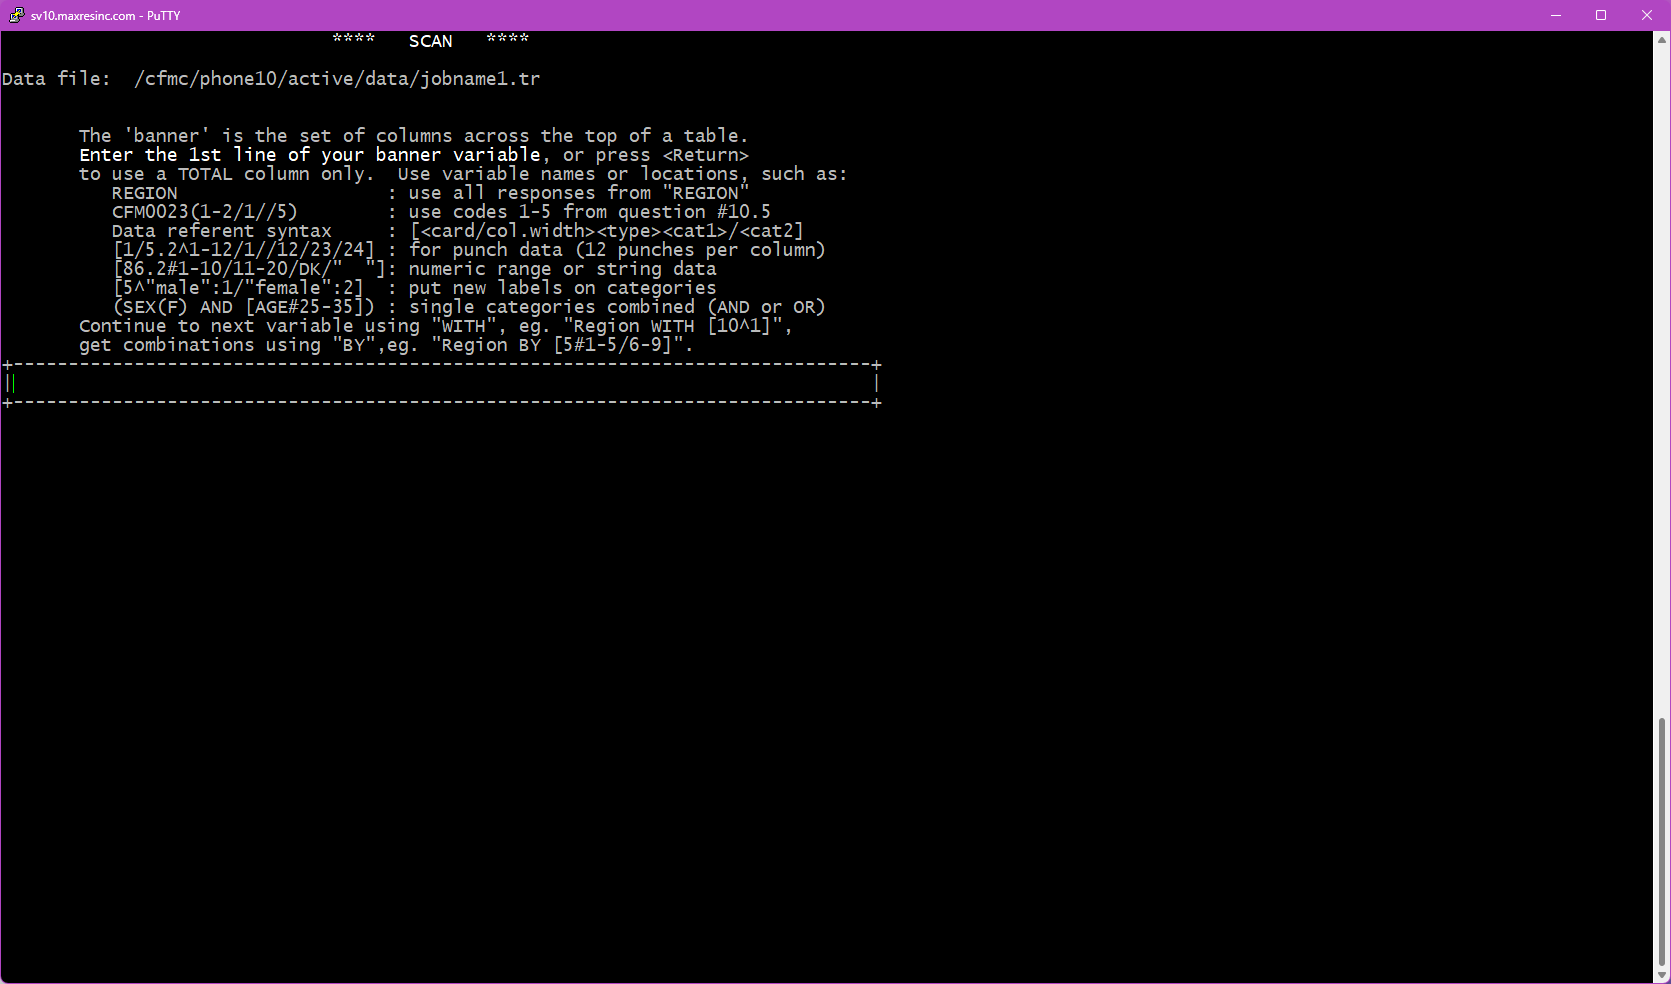
3b -- Create a Banner
After providing a banner, you will be presented with 2 extra screens asking you to adjust/set the column width and "stub" width. The stub is the lefthand side that shows the codes/text. most times, you can just leave the defaults in there and the system will adjust as needed.
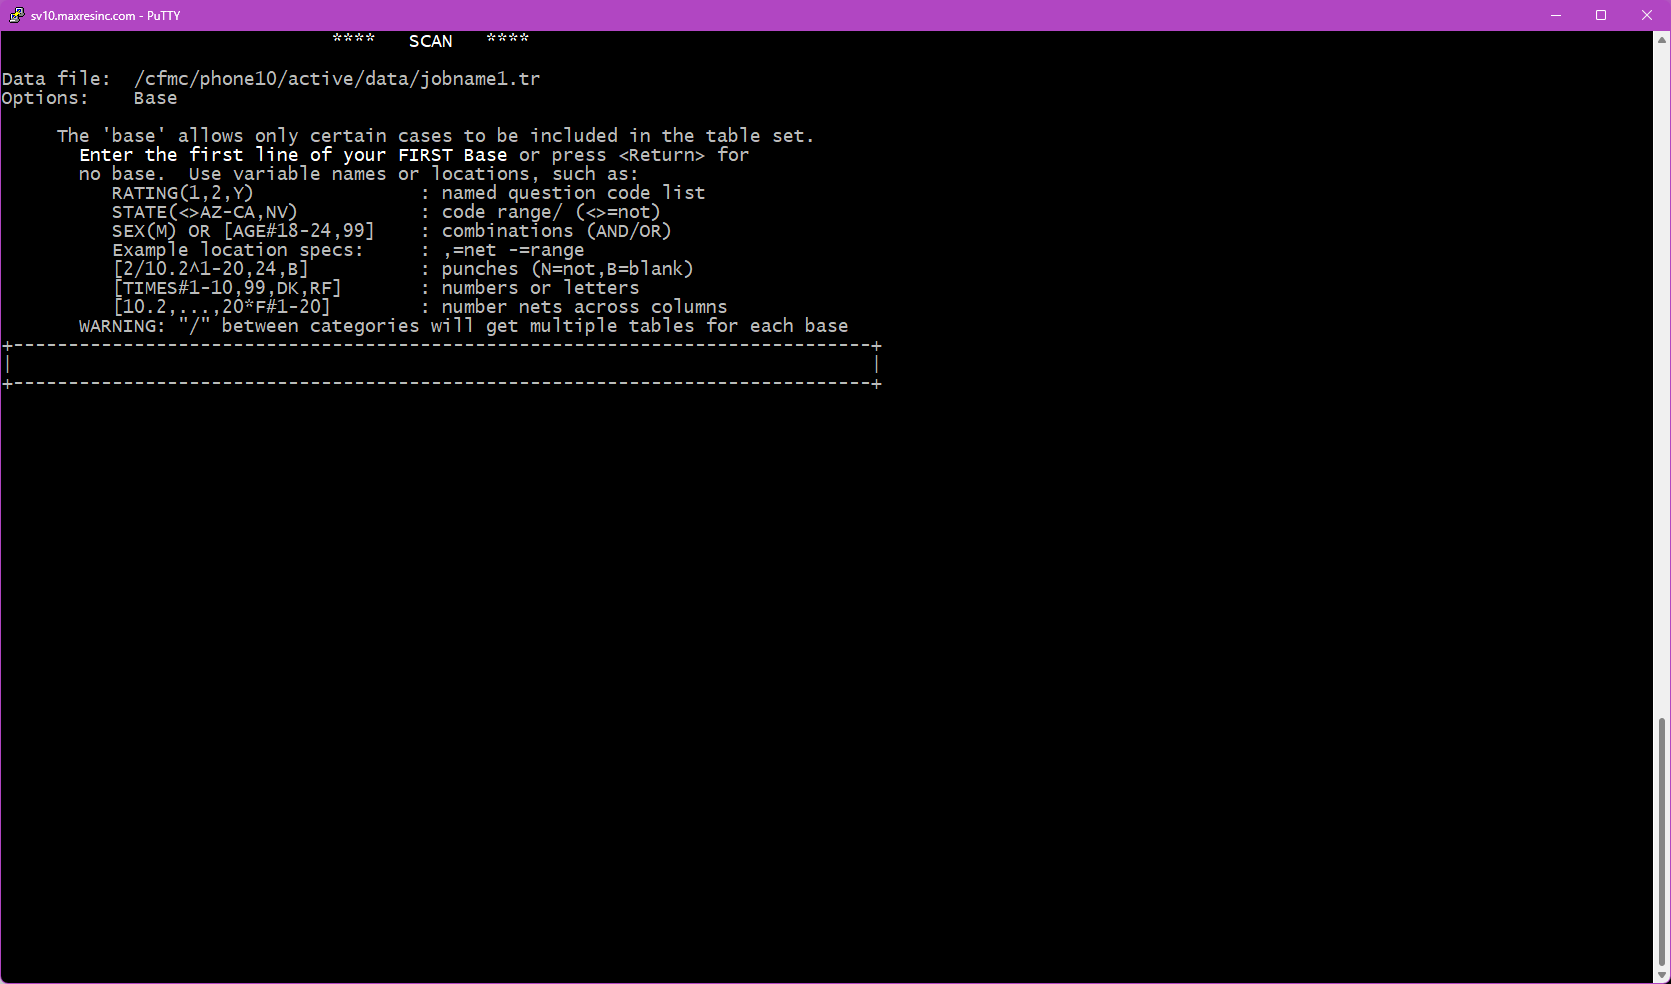
3c -- Base the Tables
Sets a base (filter) to limit which records are included in the counts. Works the same as the base option in LIST. For example, you could base on completes only, or on a specific region or quota group.
3d -- Weight the Data
Applies a statistical weight to the data, which adjusts counts to reflect a target distribution rather than what was actually collected. For example, if your sample skewed male, weighting can bring the gender balance in line with the general population.
Note: Weighting in SCAN is rarely needed for day-to-day use -- it is primarily applied during final data deliverables using dedicated tabulation tools. However, if a weight value exists in the study data, SCAN's weight option can be used as a quick spot-check. Full weighting procedures will be covered in a dedicated KB article.
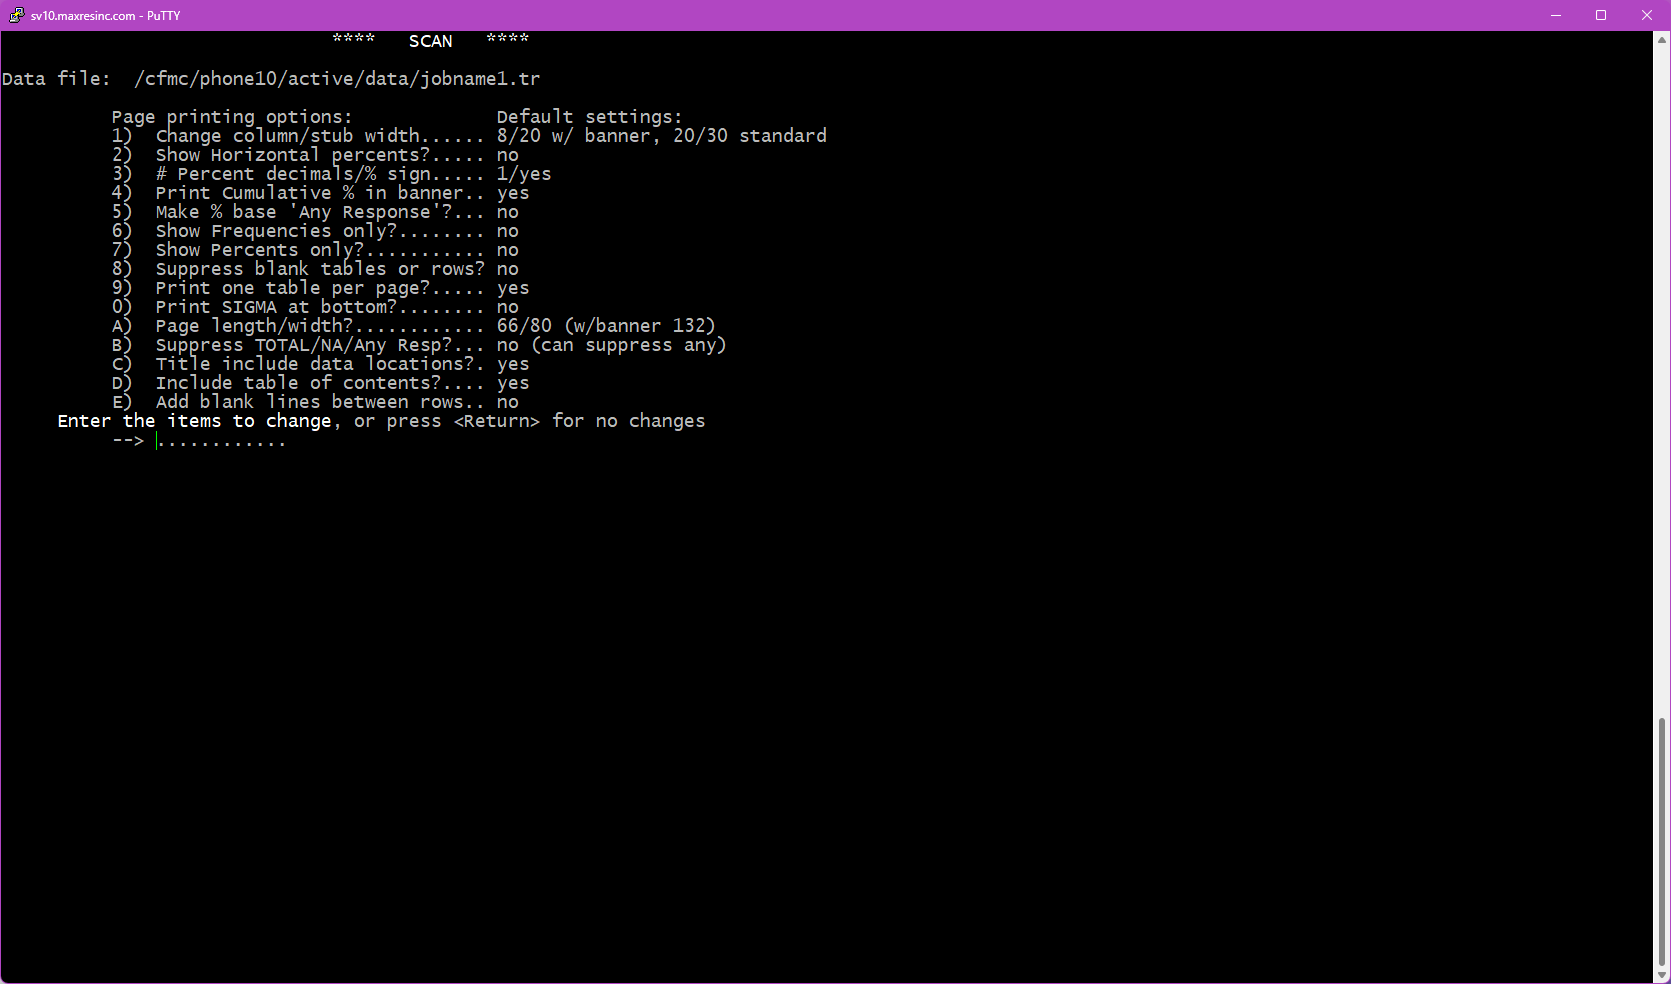
3e -- Print Options
Sets formatting preferences for the output, including:
- Page, column, and row size
- Show / hide table of contents
- Show / hide percentages and / or frequencies (raw counts)
- Show / hide summary rows: TOTAL, No Answer, and Any Response
*Options listed should all be elected at once. Anything listed as Yes/No, putting in that code will flip it to the opposite. Items like #1, 3, & A will all prompt for values on their own screen.
*After making your selections, the screen will refresh showing the new values. Press <ENTER> to commit, or "R" to go back to the default settings.
3f -- Rank Tables
When selected, answers within each table will be sorted from highest mention to lowest, rather than appearing in the order they were coded in the survey. Useful for quickly identifying top responses on list-style questions. *You CANNOT combine RANK with STATS
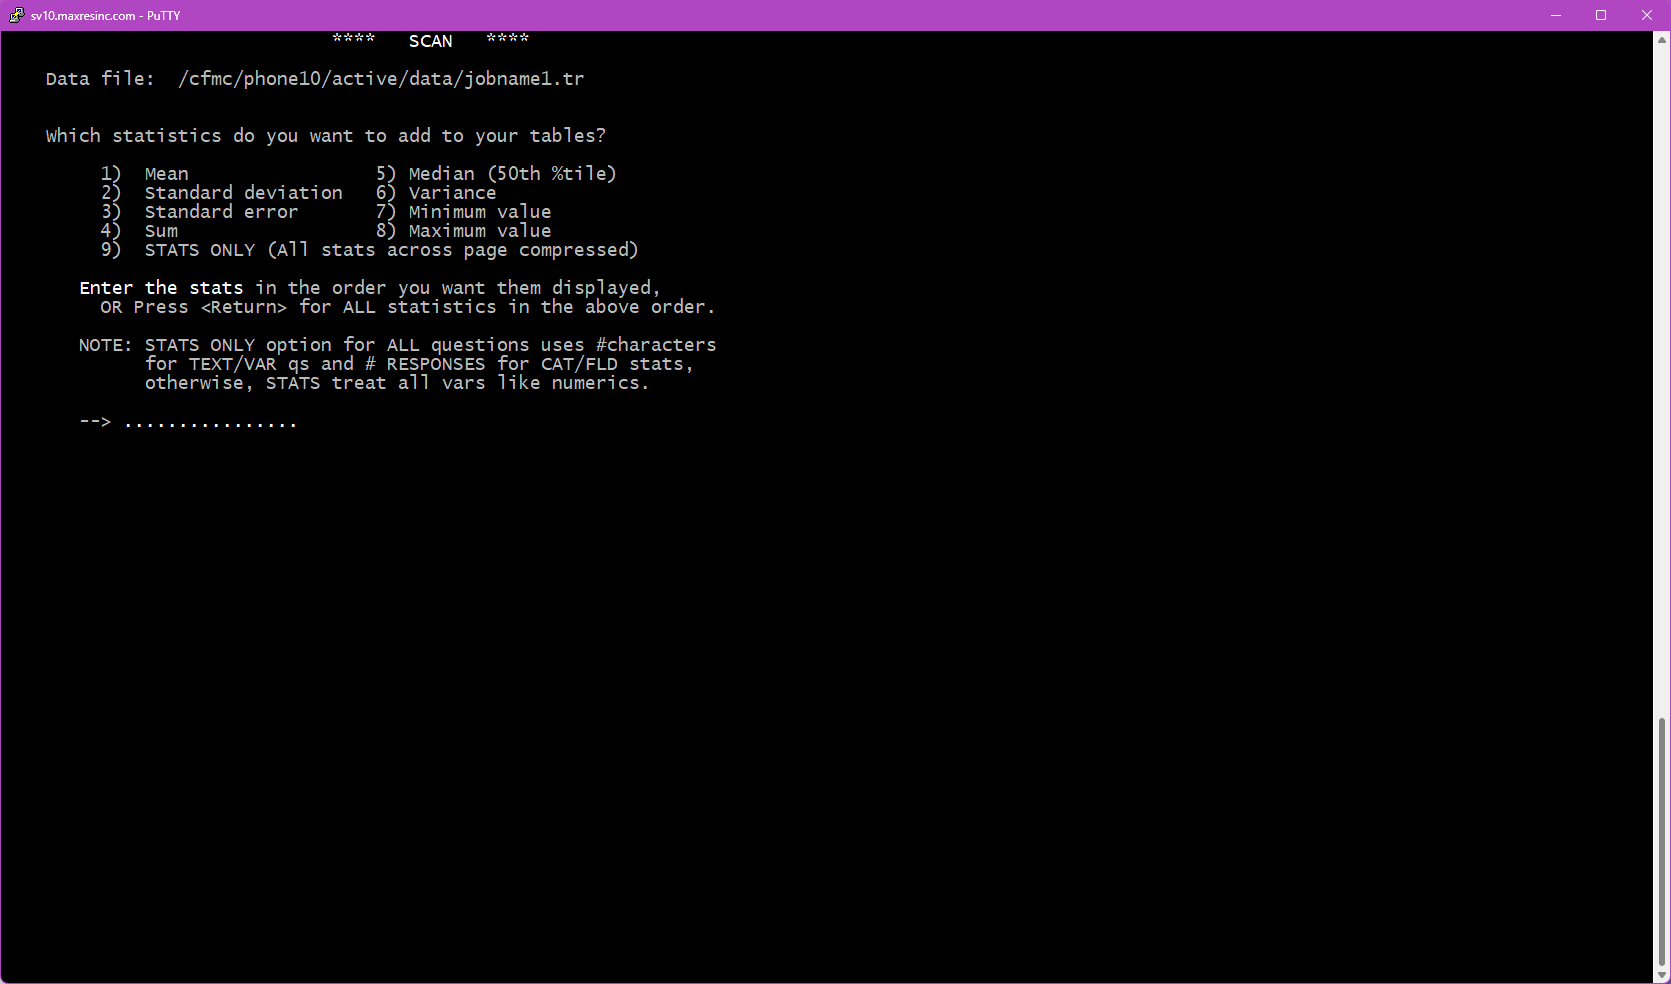
3g -- Get Stats
Adds statistical calculations to the output. Stats are most useful on numeric questions (age, percentages, etc.) and scaled list questions (e.g., a 1-5 rating scale), where a mean or median has practical meaning.
Stats can be applied to any list question, but the results may be meaningless depending on how the answers are coded. For example, a mean of 1.5 on a gender question (1=Male, 2=Female) only tells you the responses landed halfway between the two codes -- it does not describe the data in any useful way. Use your judgment about whether stats make sense for the question type being scanned. *You CANNOT combine RANK with STATS
Important: When stats are enabled, they are applied to all questions being processed in that run -- you cannot selectively enable stats for individual questions. If you need stats on only certain variables, run those as a separate SCAN using Option 2 (Specific Variables) in Step 5.
Available stats include:
- Mean -- The average value across all responses.
- Median -- The middle value when all responses are sorted in order. Less affected by extreme outliers than the mean.
- Standard Deviation -- How spread out the responses are from the mean. A low number means most answers were close together; a high number means they were spread wide.
- Standard Error -- An estimate of how much the mean might vary if the survey were run again with a different sample. Smaller is more reliable.
- Min / Max -- The lowest and highest values recorded.
- Sum -- The total of all values added together.
- Variance -- Similar to standard deviation, but expressed as a squared value. Used in more advanced statistical analysis; standard deviation is more human-readable for everyday use.
3h -- FREQ Tables
A streamlined, no-frills frequency table output. Limited options and no formatting controls. Cannot be combined with other Step 3 options, with the exception of Base (3c). Best used for a quick, raw count when formatting is not needed.
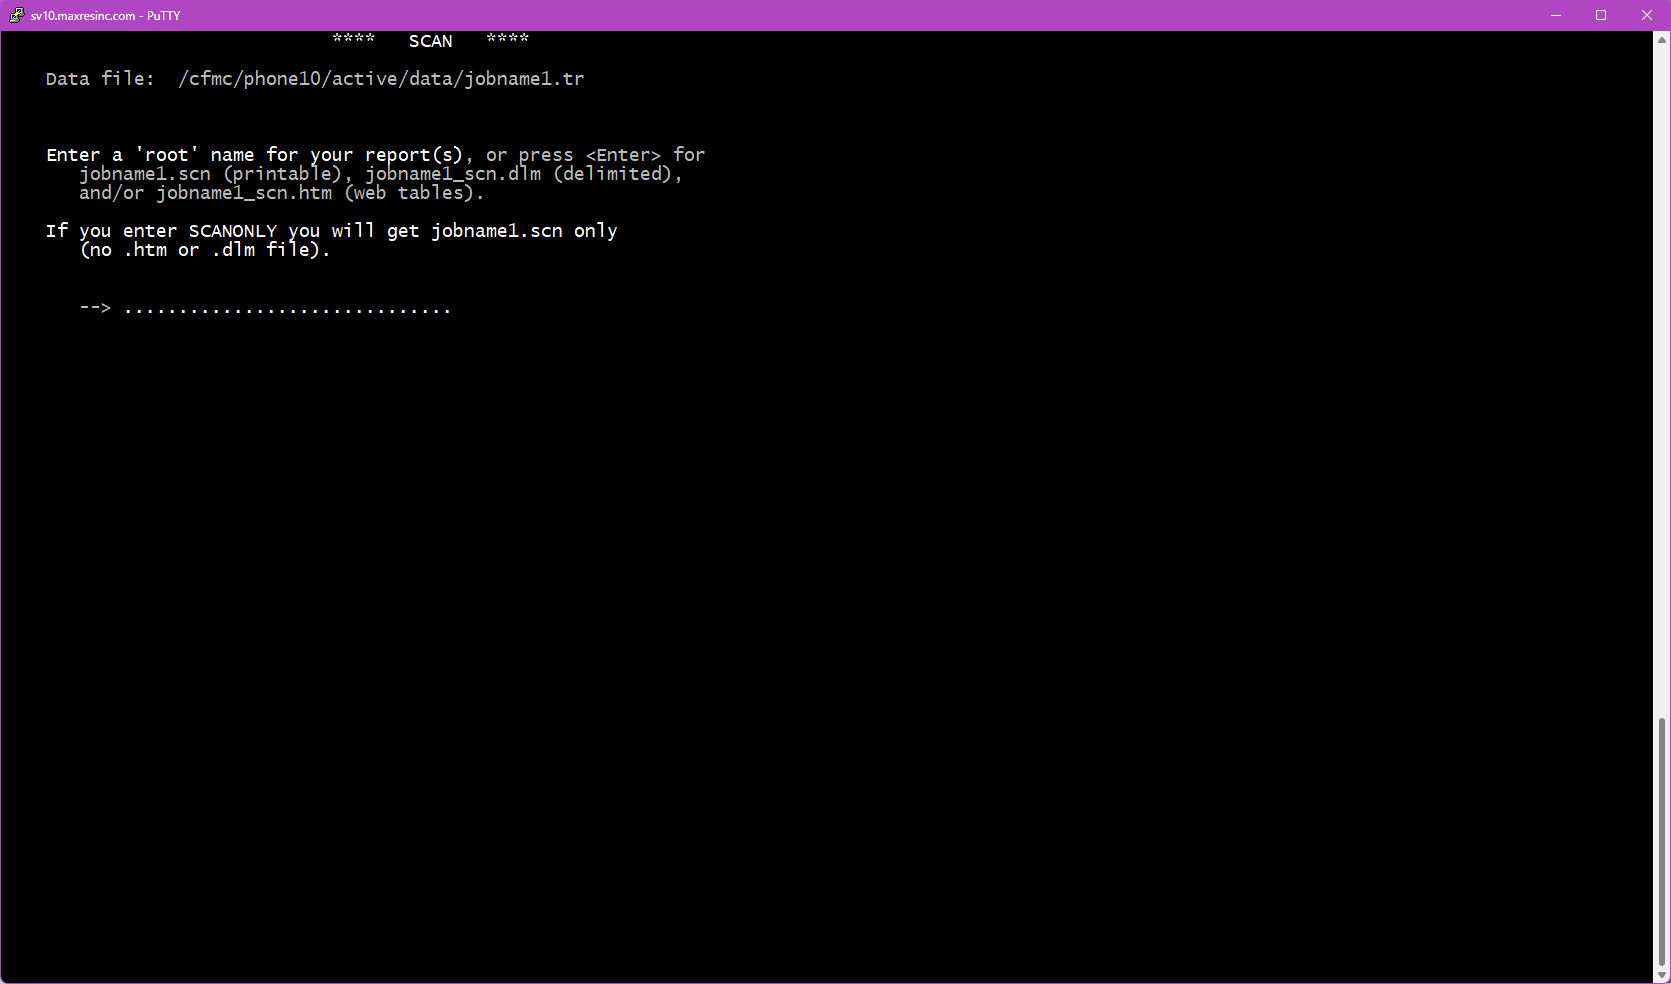
Step 4 -- Name the Output File
You will be prompted to provide a name for the output file. This step comes earlier in SCAN than in LIST -- it appears here, before variable selection.
If you provided a studyname on the FIRST screen, this will default to jobname.scn and you can provide a diferent name if you wish. If you however specified a filename on the second screen, pressing Enter without entering a name will output the tables directly to the screen only. Note that skipping a filename will also trigger an error beep -- this is expected behavior, not a crash.
Output files are typically saved with a .scn extension (e.g., jobname1.scn).
Step 5 -- Select Variables
Choose which questions / variables you want to include in the scan. There are three options on this screen, though Option 3 is not used in practice.
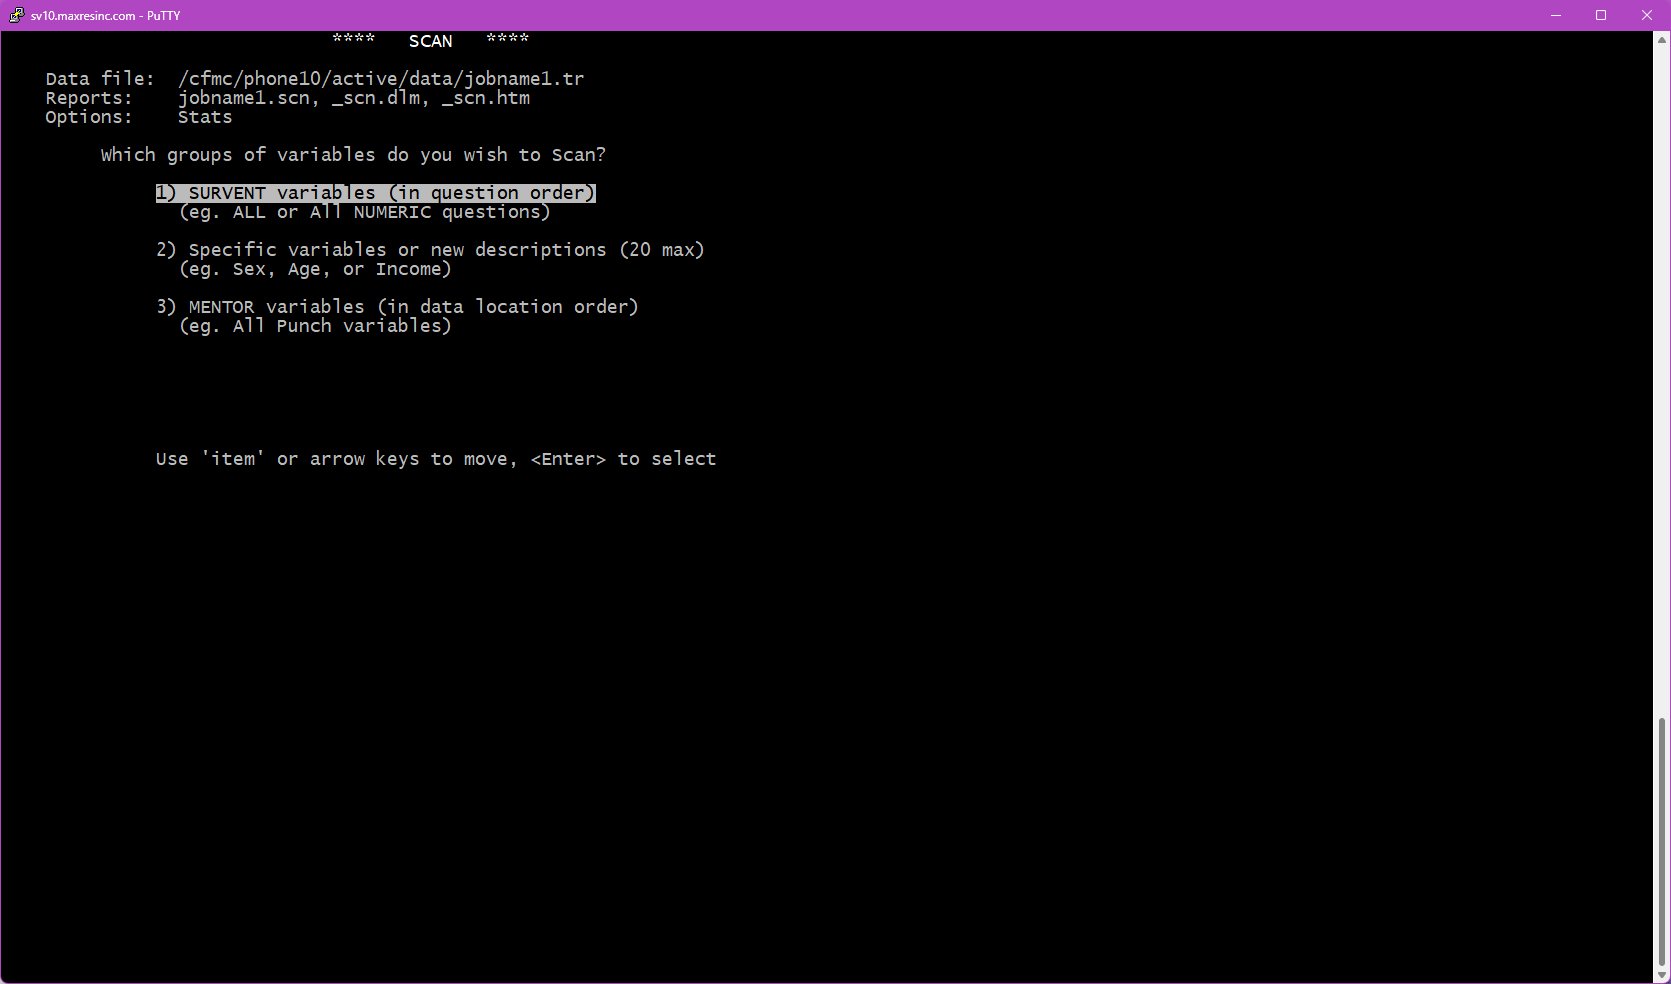
Option 1 -- All or Specific Question Types
Select all variables, or filter by question type. Follow-up screens will appear:
Step 5b -- Select Question Types
Press Enter to include all available question types, or enter codes to filter:
- Option 1 (CAT) -- No longer exists in Survox 10. Selecting this will return no data.
- Option 2 (FIELD) -- Closed-ended questions: yes/no, gender, rating scales, lists, etc.
- Option 3 (NUMERIC) -- Numeric answers: age, date of birth, percentage scales, etc.
- Option 4 (VAR/SHORT TEXT) -- Short text fields: name, address, sample info, system data (date, interviewer, IP address, etc.)
- Option 5 (OPEN END) -- Long-form open-ended text responses.
Note on text-based questions (Options 4 and 5): SCAN will not meaningfully tabulate free-text responses unless the entries are identical. For example, ZIP codes would calculate correctly since they are consistent values, but name fields would not produce useful output since every entry is likely unique. In most cases, running a SCAN on open ends or address fields will only return a count of how many records had something entered.
Step 5c -- Include / Exclude System Variables
Choose whether to include system and unnamed variables. The default is named variables only, which is the correct choice in most cases.
Step 5d -- Stats Handling for Numeric Questions
If your selected question types include numeric questions, stats may be generated automatically -- even if you did not select stats in Step 3. If this is the case, you will be prompted to choose:
- Show all answers only
- Show all answers + stats
- Show stats only
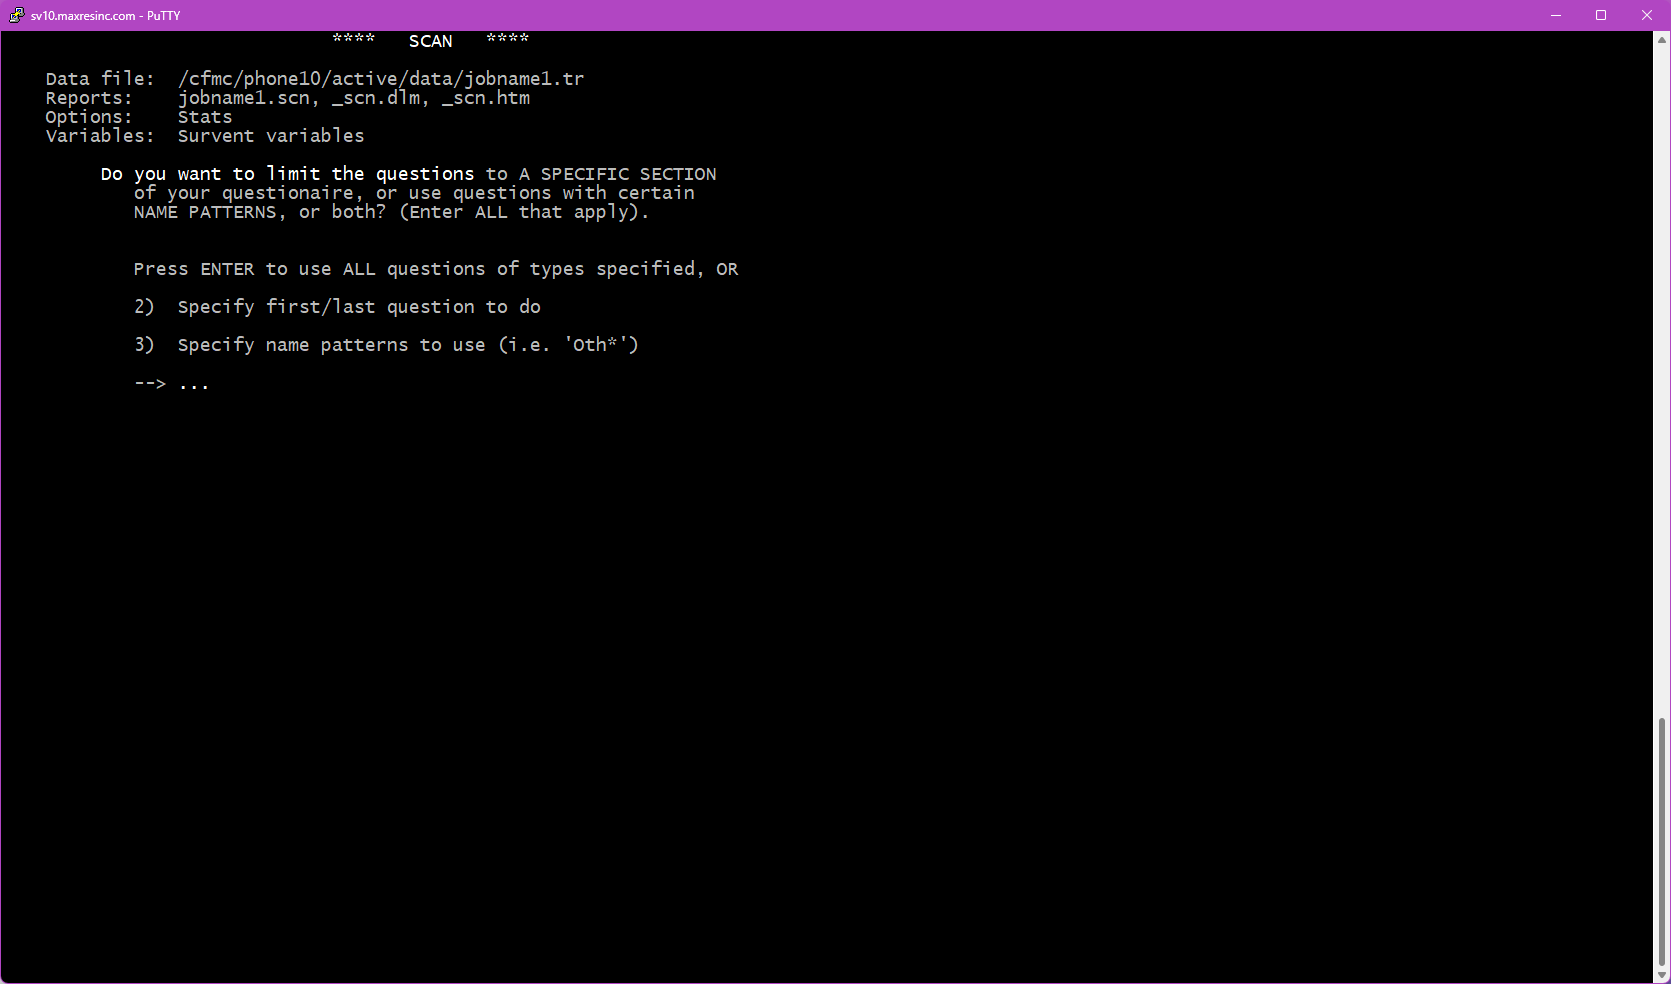
Step 5e -- Subset the Variables
Optionally narrow down which variables are included. Three options:
- Press Enter -- Include all variables of the selected type(s).
- Start / Stop -- Specify a starting and ending question label. You can use the built-in
FirstQandLastQmarkers to include only actual survey questions, excluding sample and system variables. - Pattern Match (wildcard) -- Use the
*wildcard to match variable names. For example,q*to include all survey questions that begin with Q (e.g., Q1, Q15, QD6), ors_*for all sample variables. The*wildcard is required -- partial names without it will not match.
Option 2 -- Specific Variables
Step 5f -- Frequency Counts or Use Variables as Defined in Survey Specs
Two display options:
- Frequency Counts -- Attempts to break down responses by matching identical values. Required when using data locations instead of label names.
- Use Variables as Defined in Survey Specs -- Shows actual answer text (e.g., Yes / No) based on the predefined codes in the survey. This is the preferred option for standard closed-ended questions.
Important: If you are specifying variables using data locations (e.g., column positions rather than label names), you must use Frequency Counts.
Note on text / variable fields: If the variables selected in Step 5b include short text or open end question types, Use Variables as Defined in Survey Specs will only return a total count of answered records -- there are no predefined codes to load and display. Use Frequency Counts if you want SCAN to attempt to match and tally identical text entries.
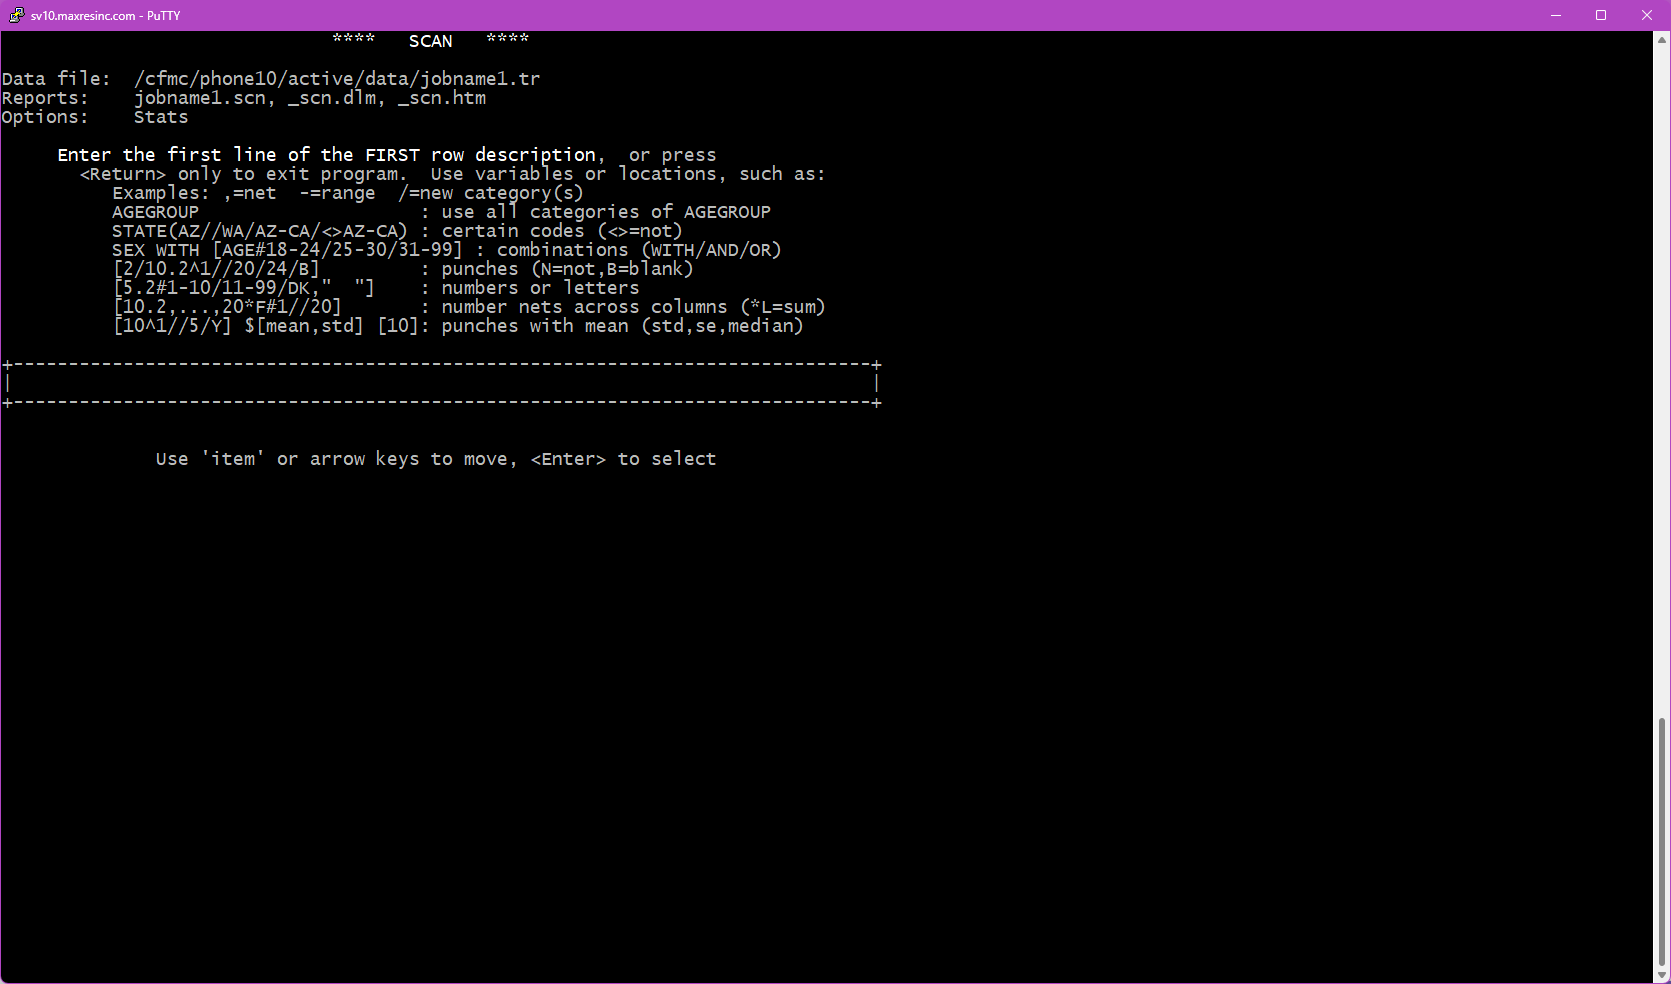
Step 5g -- Enter Variable Names
Enter the variables you want to scan, one at a time, up to 10.
Important -- [$] Notation (SCAN only): For question types that are not standard list / closed-ended questions -- including numeric questions, short variable fields, and open ends -- the variable label must be wrapped in [$] notation, or SCAN will return an error. For example:
[age$]
[51.2$]
This applies to sample info fields specified by data location as well (e.g., [51.2$]).
Step 5h -- Per-Variable Base (Optional)
After entering the second variable, you will be prompted to specify a base for that variable, or press Enter to use the same base set in Step 3c, or enter none for no base. Each variable can have its own independent base if needed, though this is less commonly used in SCAN than in LIST.
Step 5i -- Cross Variable (FREQ tables only)
When running FREQ tables, after each variable entry you will be given the option to cross it by another variable. Crossing combines two questions into a single table showing all possible combinations of their answers. For example, crossing gender by race would produce output showing Male-White, Male-Asian, Female-Black, and so on -- for every combination present in the data. This option only appears when FREQ (3h) is the selected output type.
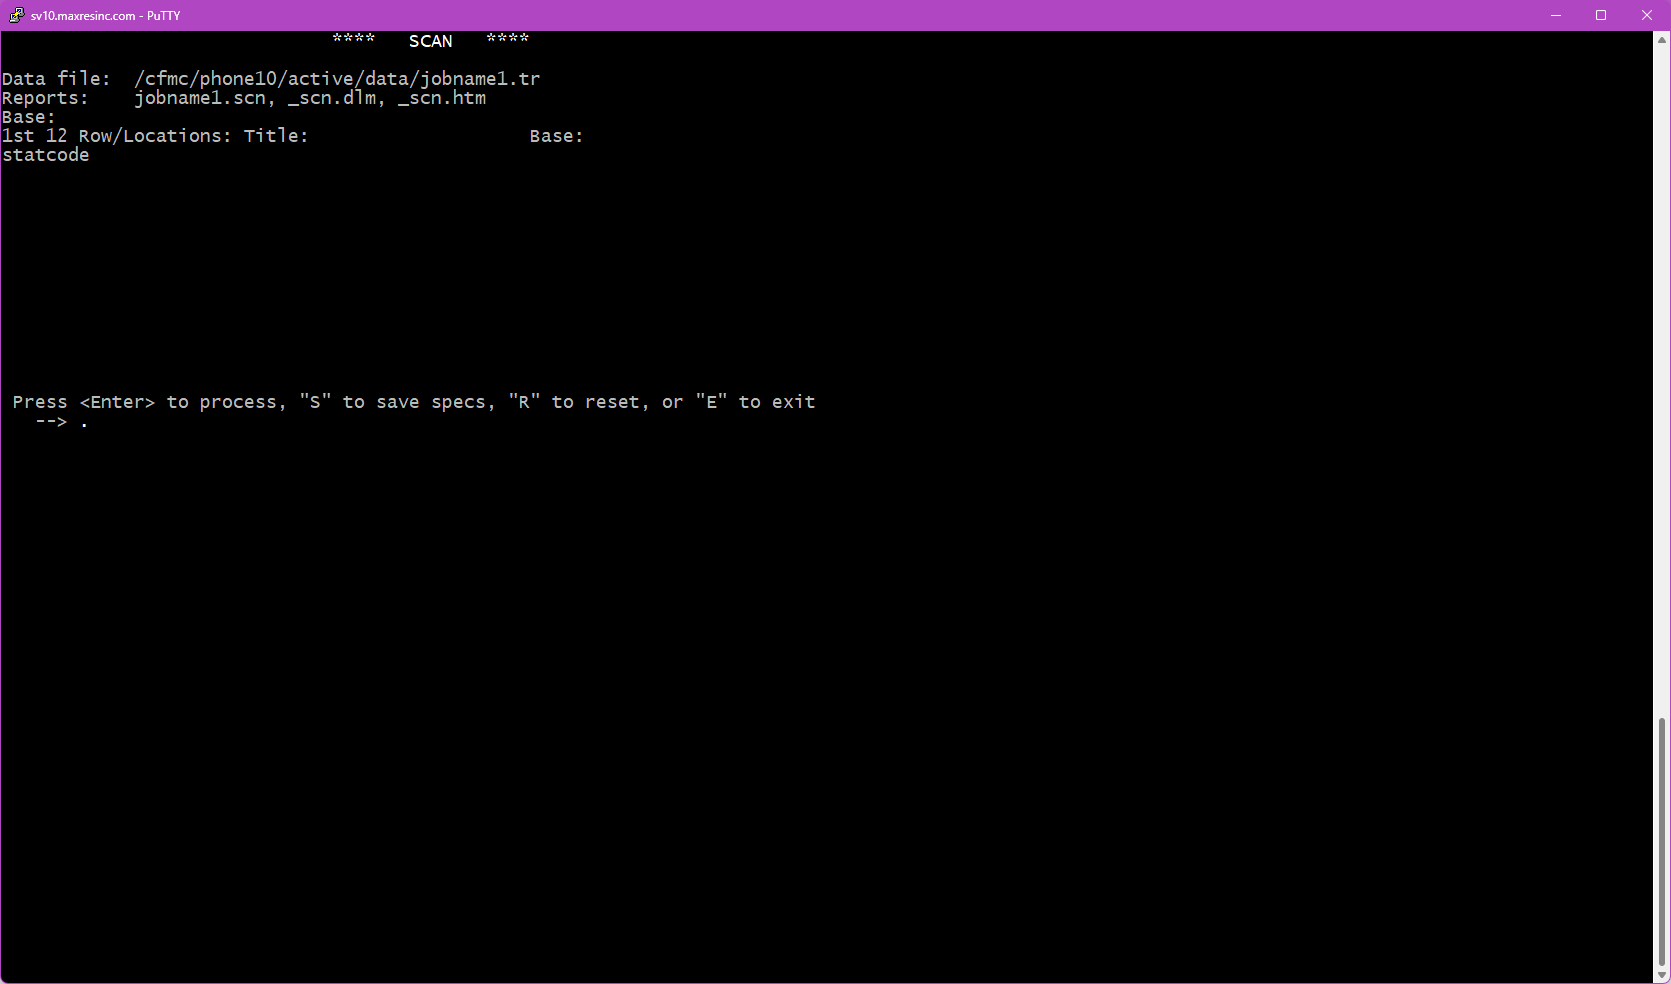
Step 6 -- Confirm and Save Spec
The final screen shows a summary of everything you have configured -- the file being read, the DB file in use, the base, banner, output file name, selected variables, and any options chosen in Step 3. Review this carefully before running.
Press Enter to run the scan as configured.
Saving as a Spec File: Before pressing Enter, you can type a filename with a .spx extension (e.g., jobname1_scan.spx) and press Enter. This saves all current settings as a reusable spec file. To rerun it later from the same directory:
m2 jobname1_scan.spx
This is particularly useful for complex scans with banners, stats, and custom bases that you plan to run regularly or update as data comes in.
Video Demonstrations
The following short demos walk through three common SCAN use cases from start to finish.
Demo 1 -- Simple Scan, Completes Only, No Banner
Shows how to run a basic frequency scan on survey questions with no banner applied -- just overall counts for each variable, output to screen.
[
Demo 2 -- Frequency with Banner
Shows how to set up a banner (e.g., quotavar(01/02/03/04) for sample type) and run a scan that breaks out frequency counts across banner points.
Demo 3 -- Print and Stat Options, Using Frequency Counts, Not Variable Counts
Shows how to configure Step 3 options including print formatting (show/hide percentages, totals) and stats (mean, median, min/max) for a numeric question.
Troubleshooting / Common Issues
Error beep with no output file specified
Expected behavior when pressing Enter through the filename prompt in Step 4. The scan will still run and output to screen. If you need a saved file, rerun and provide a filename.
Variable returns an error or no data
If a variable label is not a standard closed-ended (FIELD) question -- such as a numeric, open end, or short variable field -- it must be wrapped in [$] notation (e.g., [age$]). Entering the label without this wrapper will cause an error. The same applies to data location references (e.g., [51.2$]).
FREQ option warning when combined with other options
FREQ tables cannot be combined with most other Step 3 options -- the one exception is the Base option (3c). If you attempt to select FREQ along with any incompatible option, SCAN will not allow you to proceed -- it will display a message that the options cannot be combined and return you to the options screen automatically.
Numeric question generates stats you did not request
This is normal. Certain numeric question types automatically trigger stats generation in SCAN regardless of whether you selected stats in Step 3. You will be given the option at Step 5d to control how those stats are displayed.
Banner or base logic not working as expected
DB file out of sync with data
If the study questionnaire has been modified since the .db file was last generated, variable definitions will be out of sync with the actual data. Regenerate the .db file for the study and rerun the scan.